
Yes, you can absolutely cut crown molding with a table saw, and it’s a fantastic solution if you don’t own a miter saw. By building a simple jig to hold the molding at the correct angle, you can make precise, clean cuts for inside and outside corners safely and accurately.
Staring at a long piece of crown molding can feel intimidating. You know it will look amazing on your walls, but how do you cut those tricky angles? Most guides tell you to use a miter saw. But what if you only have a table saw? It feels like you’re stuck. Many people think it’s impossible or unsafe. They worry about ruining expensive trim or getting hurt. But there is a simple and safe way to get perfect results with the saw you already own. We will build a small jig and cut crown molding like a pro.
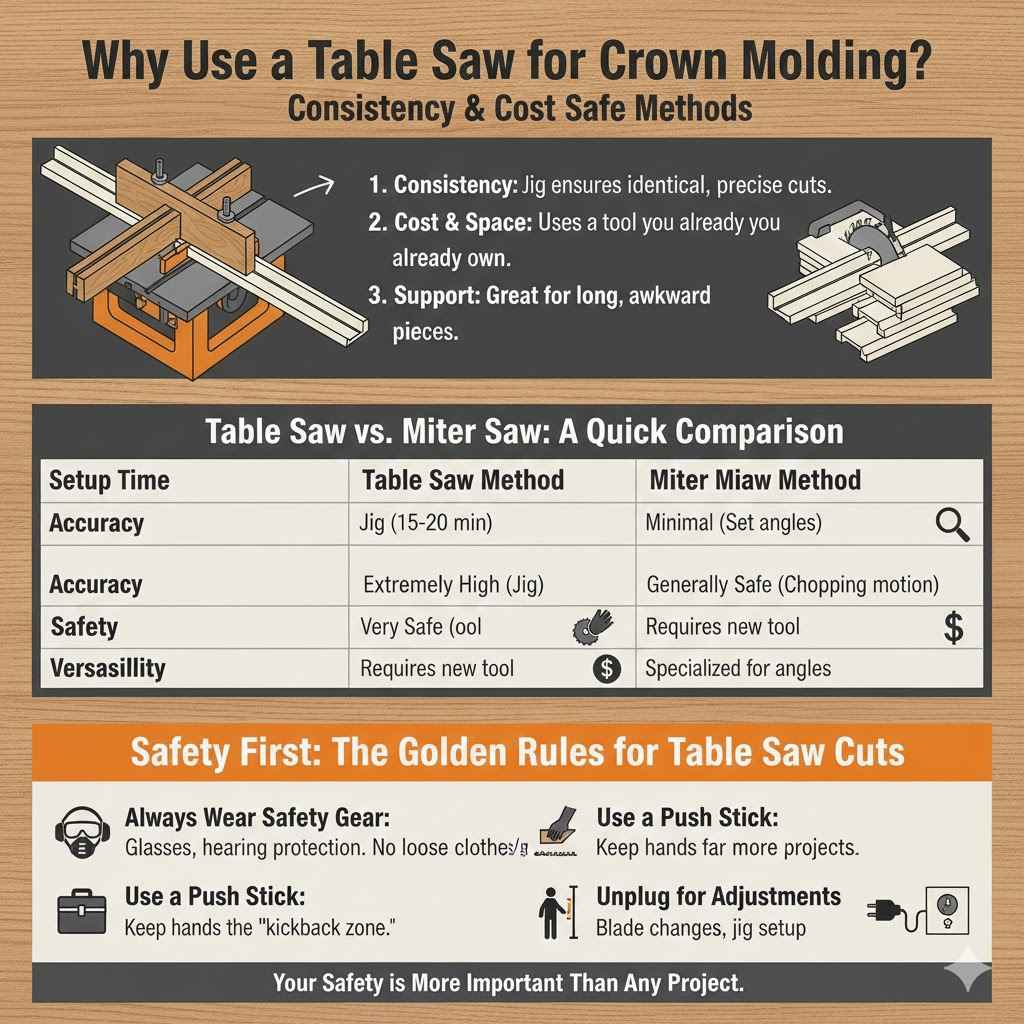
Why Use a Table Saw for Crown Molding?
You might be wondering, “Why would I even try this?” A miter saw is the go-to tool for crown molding, and for good reason. It’s designed for angled cuts. But not everyone has a dedicated miter saw, especially if you’re just starting out in woodworking or tackling a one-time project. Your table saw, however, is the versatile workhorse of the shop. Using it for crown molding can save you money and space.
The key benefit is consistency. Once you set up a jig on your table saw, every cut you make will be identical. This is a huge advantage for getting tight, seamless joints. A table saw also offers excellent support for long, awkward pieces of molding, which can be difficult to manage on a smaller miter saw. With the right technique, a table saw isn’t just a substitute; it can be a surprisingly precise and reliable tool for this classic trim job.
Table Saw vs. Miter Saw: A Quick Comparison
Let’s break down the main differences. This will help you understand why the table saw method works so well and what to expect.
| Feature | Table Saw Method | Miter Saw Method |
|---|---|---|
| Setup Time | Requires building a simple jig first. This takes about 15-20 minutes. | Minimal setup. Just set the miter and bevel angles and you’re ready to cut. |
| Accuracy | Extremely high. The jig holds the molding perfectly for repeatable cuts. | Very high, but can be prone to small errors if the saw isn’t calibrated perfectly. |
| Safety | Very safe when using a jig and proper technique. The blade is stationary. | Generally safe, but the chopping motion can sometimes cause small pieces to fly. |
| Cost | Uses a tool you already have. The jig can be made from scrap wood. | Requires purchasing a dedicated miter saw, which can be expensive. |
| Versatility | Learning this technique adds another skill to your table saw repertoire. | The saw is specialized for this type of cut, making it very fast and efficient. |
Safety First: The Golden Rules for Table Saw Cuts
Before we touch a piece of wood, we need to talk about safety. A table saw is a powerful tool and demands respect. The methods we’ll use are safe, but only if you follow the rules. Your safety is more important than any project.
- Always Wear Safety Gear: This is non-negotiable. Wear safety glasses to protect your eyes from dust and debris. Hearing protection is also a good idea, as table saws are loud. Avoid wearing loose clothing, gloves, or jewelry that could get caught in the blade.
- Use a Push Stick: Never use your hands to push the molding near the blade. Your jig will help, but a push stick gives you that extra layer of safety, keeping your fingers far from the danger zone.
- Stand Correctly: Don’t stand directly behind the blade. Stand slightly to the side. This keeps you out of the “kickback zone,” which is the path a piece of wood might travel if it gets thrown back by the blade.
- Unplug for Adjustments: Whenever you change the blade, adjust the fence, or attach your jig, unplug the saw. It only takes a second and prevents accidental startups.
- Understand Your Saw: Make sure you are familiar with your saw’s safety features, like the blade guard, riving knife, and anti-kickback pawls. For more information on table saw safety, the Occupational Safety and Health Administration (OSHA) provides excellent guidelines.
Understanding the Two Key Angles of Crown Molding
Crown molding looks complex because it sits at an angle between the wall and the ceiling. To cut it correctly, you need to know two simple angles. Don’t worry, this isn’t complicated math. It’s just about knowing how your specific molding sits.
You can find these angles printed on the molding’s packaging or by measuring it yourself.
1. The Spring Angle
This is the angle of the molding as it sits against the wall and ceiling. Imagine looking at the end of the molding. The spring angle is the angle between the back of the molding and the wall. Most common crown moldings have a spring angle of either 38 degrees or 45 degrees. The jig we build will hold the molding at this exact angle during the cut.
2. The Wall Angle
This is the angle of the corner in your room. For most rooms, this is a standard 90-degree corner. For a perfect 90-degree corner, you need to cut two pieces of molding at 45 degrees each (45 + 45 = 90). Our jig will be set up to make these 45-degree cuts perfectly.
So, the two numbers you need to remember are:
- The Spring Angle: How the molding leans.
- The Miter Angle: The cut needed for the corner (usually 45 degrees).
The Secret Weapon: Building a Simple Crown Molding Jig
The magic behind cutting crown molding on a table saw is a simple homemade jig. This jig is just a small cradle that holds the molding at its spring angle while you push it through the saw. It turns a complicated-looking cut into a straightforward 90-degree crosscut. You can make it in minutes from scrap wood.
Materials and Tools Needed
- Scrap Plywood or MDF: A piece about 24 inches long and 8 inches wide is perfect. It needs to be flat.
- A Straight Piece of Hardwood: About 24 inches long, 1 inch wide, and 3/4 inch thick. This will be your fence or cleat.
- Your Crown Molding: You’ll need a small test piece to set up the jig.
- Wood Glue and Screws or Nails: To attach the fence to the base.
- Measuring Tape and Pencil
- Table Saw
Step-by-Step Guide to Building Your Jig
Follow these simple steps. It should only take about 15 minutes.
- Prepare Your Base: Take your piece of plywood or MDF. This will be the base of your jig and will slide along your table saw’s miter gauge or a crosscut sled. Ensure its edges are straight.
- Find the Fence Position: Take a small piece of your crown molding. Place it “upside down” on the plywood base. This is important: when cutting crown molding, you always work with it upside down. The flat edge that goes against the ceiling should be flat on your jig’s base.
- Set the Spring Angle: Lean the molding against your hardwood fence piece until the top and bottom flat edges of the molding are both sitting perfectly flat against the base and the fence. This automatically sets the molding at its correct spring angle.
- Mark the Fence Line: Hold the molding and fence firmly in place. Use a pencil to draw a line along the back of the hardwood fence onto the plywood base. This line marks where you need to attach your fence.
- Attach the Fence: Remove the molding. Apply a thin bead of wood glue along your pencil line. Place the hardwood fence onto the glue line. Secure it with a few screws or nails from the bottom of the plywood base. Wipe away any excess glue.
- Let it Dry: Give the glue a few minutes to set. Your jig is now complete! It’s a simple sled with a fence that perfectly cradles your crown molding at the correct angle.
You’ve just created a custom tool that guarantees perfect cuts. This jig ensures that every piece of molding you cut will have the exact same orientation, leading to flawless corners.
How to Cut Crown Molding: Inside and Outside Corners
With your jig built and your safety gear on, it’s time to make some cuts. We will use the jig with your table saw’s miter gauge. Set your miter gauge to 45 degrees. The saw blade itself should be set at 90 degrees (a straight up-and-down cut).
Setting Up Your Saw for the Cut
- Attach the Jig: Secure your new jig to your miter gauge. You can clamp it or screw it on through the bottom. The jig should be stable and not wiggle.
- Set the Blade Height: Raise the saw blade so it is just tall enough to cut completely through the molding when it’s sitting in the jig. A blade that is too high is less safe.
- Position the Molding: Place your crown molding into the jig upside down, just like when you built it. The “ceiling” edge should be flat against the jig’s base, and the “wall” edge should be flat against the jig’s fence.
Cutting an Inside Corner (The Most Common Cut)
An inside corner is what you find in almost every room. You’ll need two pieces that form a “V” shape pointing into the corner.
- Cut the First Piece (Left Side): Set your miter gauge to 45 degrees to the right. Place your molding in the jig. Slide the jig and molding forward to make the cut. This will be the left-hand piece of your corner.
- Cut the Second Piece (Right Side): Now, set your miter gauge to 45 degrees to the left. Take your next piece of molding and place it in the jig. Make the cut. This will be the right-hand piece.
- Test the Fit: Bring the two pieces together on your workbench. They should form a perfect 90-degree inside corner. The long point of the miter cut will be at the back (or bottom) of the molding.
Cutting an Outside Corner
An outside corner is for walls that jut out into a room. The process is very similar, but the orientation of the molding is reversed in your mind.
- Cut the First Piece (Left Side): Set your miter gauge to 45 degrees to the left. Place your molding in the jig and make the cut. This will be the left piece for your outside corner.
- Cut the Second Piece (Right Side): Set your miter gauge to 45 degrees to the right. Place your second piece of molding in the jig and make the cut. This is your right piece.
- Test the Fit: When you bring these two pieces together, they should form a clean 90-degree outside corner. For an outside corner, the long point of the miter cut will be on the front (or top) face of the molding.
Helpful Angle Reference Table
Sometimes it helps to have a quick visual guide. Remember, the molding is always placed upside down in the jig.
| Type of Corner | Piece | Miter Gauge Setting | Resulting Cut |
|---|---|---|---|
| Inside Corner | Left Wall Piece | 45° to the Right | Cut angle points inward to the left. |
| Right Wall Piece | 45° to the Left | Cut angle points inward to the right. | |
| Outside Corner | Left Wall Piece | 45° to the Left | Cut angle points outward to the left. |
| Right Wall Piece | 45° to the Right | Cut angle points outward to the right. |
A great tip from woodworkers at University of New Hampshire Extension is to always cut your pieces a little long first. You can always trim a tiny bit more off, but you can’t add wood back on. This “sneaking up on the cut” method saves material and frustration.
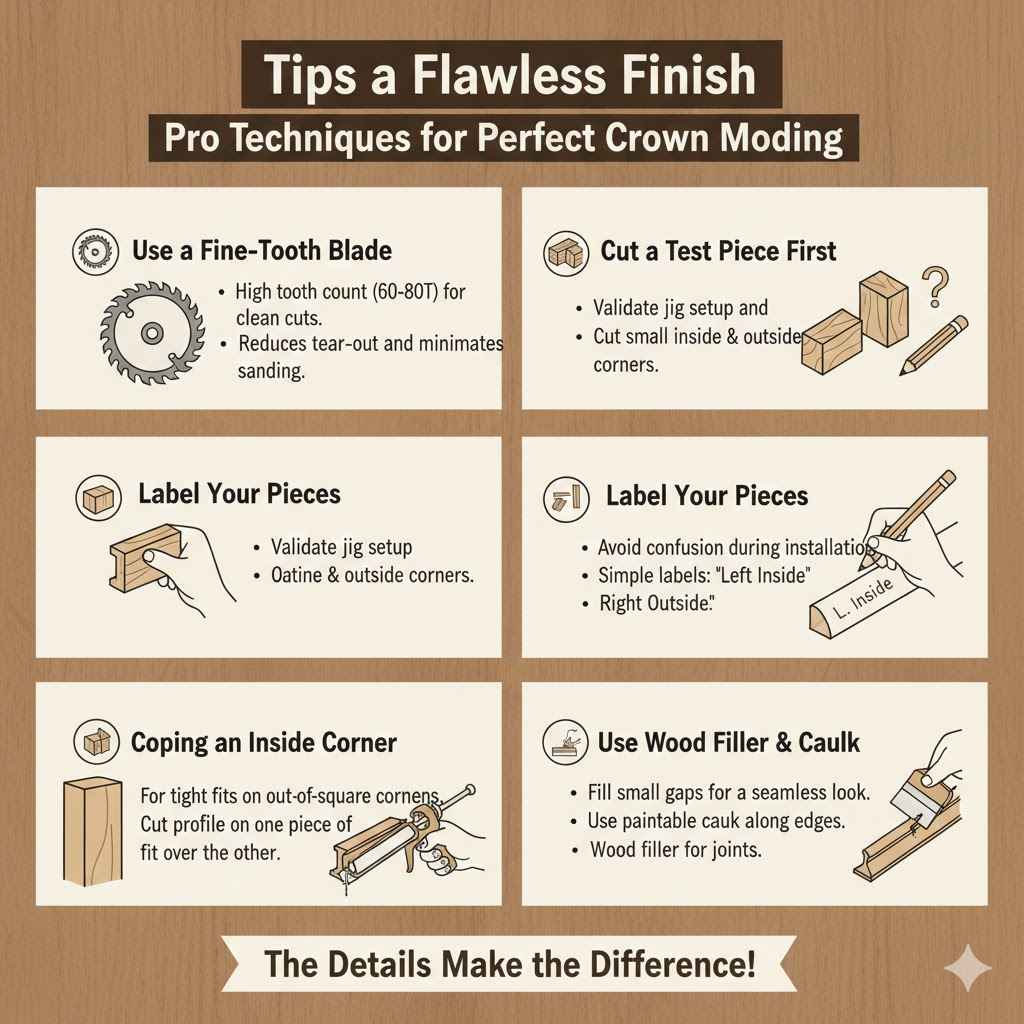
Tips for a Flawless Finish
Getting a perfect cut is the first step. Making it look professional on the wall is the goal. Here are a few extra tips to ensure your crown molding project is a success.
- Use a Fine-Tooth Blade: A saw blade with a high tooth count (60-80 teeth) will give you a much cleaner cut on trim and molding. It reduces tear-out and leaves a surface that needs very little sanding.
- Cut a Test Piece First: Before you cut your expensive molding, grab a piece of scrap and test your setup. Cut a small inside and outside corner to make sure your angles are perfect and your jig is working correctly.
- Label Your Pieces: Use a pencil to lightly label the back of each piece as you cut it. A simple “Left Inside” or “Right Outside” can save you a lot of confusion when it’s time for installation.
- Coping an Inside Corner: For inside corners that aren’t perfectly 90 degrees, a technique called “coping” provides a tighter fit. To do this, you make a straight cut on one piece that butts into the wall. Then, you use a coping saw to trace the profile of that cut on the second piece. This allows it to fit over the first piece like a puzzle.
- Use Wood Filler and Caulk: No corner is ever perfectly square. Small gaps are normal. After installation, use a bit of wood filler on the joints and a line of paintable caulk along the top and bottom edges. Once painted, your work will look seamless.
Frequently Asked Questions (FAQ)
1. Is it really safe to cut crown molding on a table saw?
Yes, it is very safe when done correctly. Using a well-made jig and a push stick keeps your hands far away from the blade. The process is controlled and stable, which often makes it feel safer than managing a large piece of trim on a miter saw.
2. What is the best saw blade for cutting crown molding?
A high-tooth-count blade is best. Look for a crosscut or combination blade with 60 to 80 teeth. A thinner kerf blade also helps reduce the amount of material removed, leading to cleaner cuts. Carbide-tipped teeth will stay sharp longer.
3. Can I cut crown molding without a jig on my table saw?
It is possible but not recommended for beginners. Advanced woodworkers can cut molding by laying it flat and using a combination of miter and bevel angles on the saw. This requires precise calculations and is much less intuitive than using a simple jig.
4. What if my walls are not a perfect 90-degree corner?
This is a very common problem. If your corner is, for example, 92 degrees, you would need to set your miter gauge to 46 degrees for each piece (92 divided by 2). An angle finder tool can help you determine the exact angle of your corner.
5. What’s the difference between MDF and wood crown molding?
MDF (Medium-Density Fiberboard) molding is less expensive, very smooth, and comes pre-primed. It’s easy to paint but can be brittle. Wood molding (like pine or poplar) is stronger, holds detail better, and can be stained. It’s also more forgiving if you need to sand or shape it slightly.
6. How do I join two long pieces of molding on a straight wall?
This is called a “scarf joint.” Instead of a straight 90-degree cut, you cut both pieces at an opposing 45-degree angle. When you overlap them and glue them together, the joint is almost invisible, especially after painting. It also provides more surface area for the glue to hold.
7. Do I need a crosscut sled for this?
While a crosscut sled works wonderfully with this jig, it’s not required. You can simply attach your jig directly to your saw’s miter gauge. The miter gauge will guide the jig and molding through the blade for a perfect cut.
You’re Ready to Conquer Crown Molding
See? It’s not so complicated after all. Cutting crown molding with a table saw is a clever technique that opens up a new world of possibilities for your projects. By taking a few minutes to build a simple jig, you turn your versatile table saw into a precision cutting machine for trim. You don’t need to go out and buy an expensive, specialized tool for a single job.
Remember to prioritize safety, measure carefully, and always cut a test piece first. The key is holding the molding at the correct spring angle, and your new jig handles that for you. Now you can approach this classic finishing touch with confidence. Go ahead and get those beautiful moldings up on the wall. You’ve got this!