
A circular saw blade can last anywhere from a few hours to a few years. A high-quality carbide blade cutting clean wood might last for 12 to 120 hours of actual cutting time. How you use it, what you cut, and how you care for it are the most important factors.
Hello there! Meraj here. If you’ve ever found yourself pushing your circular saw through a piece of wood, only to be met with smoke and a rough, splintery cut, you’ve probably asked this question. Wondering when to change a blade is a common puzzle for every DIYer. A good blade makes your work easy, safe, and clean. A dull one does the opposite. But don’t worry, figuring this out is simpler than you think. Together, we will learn how to spot a worn-out blade and make your good ones last as long as possible.
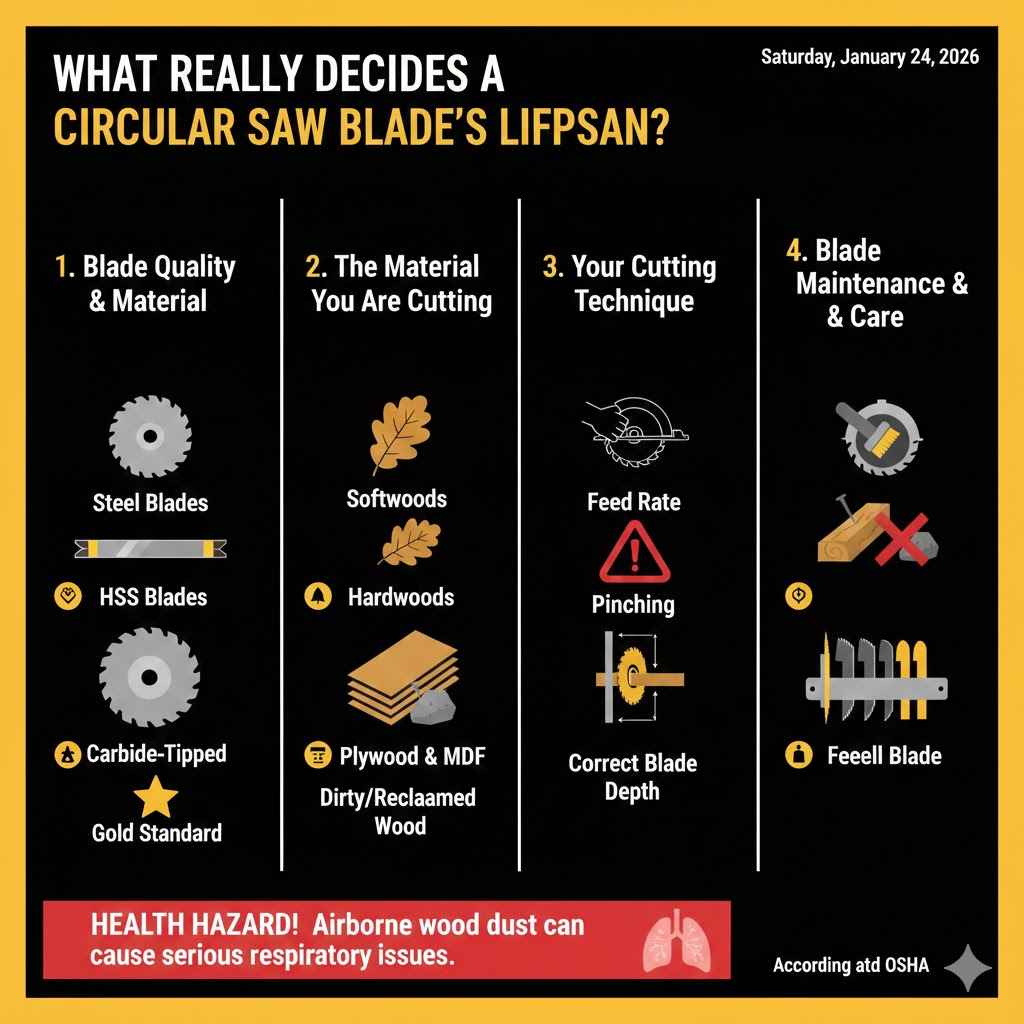
What Really Decides a Blade’s Lifespan?
It’s tempting to look for a simple answer, like “100 hours” or “six months.” But the truth is, a blade’s life is not measured in time on a calendar. It’s measured in the amount and type of work it does. Think of it like the tires on your car. How long they last depends on how much you drive, on what kinds of roads, and how well you take care of them. The same logic applies to your saw blades.
Several key things work together to determine how long you’ll get clean, easy cuts from a single blade.
1. Blade Quality and Material
Not all blades are created equal. The material the blade is made from, especially the teeth, is the biggest factor in its durability. When you’re shopping for blades, you’ll likely see these common types:
- Steel Blades: These are the most affordable but also the quickest to dull. They are best for softwoods and light-duty projects. If you use them on hardwood or manufactured wood like MDF, their lifespan will be very short.
- High-Speed Steel (HSS) Blades: HSS blades are a step up. They are harder than standard steel and can hold a sharp edge longer, even when they get hot. They are a good middle-of-the-road option for hobbyists.
- Carbide-Tipped Blades: This is the gold standard for most woodworkers and DIYers. The body of the blade is steel, but the cutting tips of the teeth are made from extremely hard tungsten carbide. They stay sharp much, much longer than steel blades and can handle tough materials like hardwood, plywood, and laminates with ease. They cost more upfront but save you money and frustration in the long run.
2. The Material You Are Cutting
What you feed your saw makes a huge difference. A blade will have a much different life depending on its diet.
- Softwoods (Pine, Fir, Cedar): Cutting soft, clean wood is easy on your blade. A good carbide blade can last for many projects cutting only these materials.
- Hardwoods (Oak, Maple, Cherry): These dense woods are tougher on the blade’s teeth. They create more heat and resistance, which dulls the edge faster.
- Plywood and MDF: Manufactured woods are surprisingly abrasive. The glues and resins used to bind the wood fibers together are very hard and act like sandpaper on your blade’s sharp edges. Cutting a lot of plywood will dull a blade much faster than cutting solid pine.
- Dirty or Reclaimed Wood: This is a blade’s worst enemy. Reclaimed wood can hide old nails, screws, staples, or even embedded dirt and rocks. Hitting a single nail can chip or break a carbide tooth instantly, ruining the blade. Always inspect old wood carefully before cutting.
3. Your Cutting Technique
How you operate the saw plays a huge role in blade life. A smooth, steady hand is a blade’s best friend.
- Feed Rate: Pushing the saw too fast, or “forcing” it through the wood, is a common mistake. It causes the motor to strain and the blade to overheat. This heat can soften the metal teeth, causing them to dull rapidly. Let the saw do the work. A good, sharp blade should pull itself through the cut with only gentle guidance from you.
- Blade Pinching: If the wood pinches the blade during a cut, it creates massive friction and heat. This can happen if the board is not properly supported or if it warps as you cut. This is not only bad for the blade but also a serious safety hazard that can cause kickback. The Occupational Safety and Health Administration (OSHA) highlights the importance of preventing kickback for user safety.
- Correct Blade Depth: Set your blade depth correctly. The ideal depth is when the bottom of a saw tooth (the gullet) is just visible below the material you are cutting, about 1/4 inch. A blade set too deep exposes more teeth to wear and increases the risk of kickback.
4. Blade Maintenance and Care
A little bit of care goes a long way. A blade that is cleaned and stored properly will always outlast one that is neglected.
- Cleaning: Wood pitch, sap, and resin build up on the blade’s teeth as you cut. This gunk creates friction and heat, which makes the saw work harder and dulls the blade faster. Cleaning this residue off regularly is one of the easiest ways to extend a blade’s life.
- Storage: Don’t just toss your blades in a drawer with other metal tools. Banging against other hard objects can easily chip the delicate carbide tips. Store them in their original packaging or in a dedicated blade holder to protect the teeth.
Top Signs Your Circular Saw Blade is Dull
Your saw will give you clear signals when its blade is ready for a change or a sharpening. Learning to recognize these signs will protect your projects from damage and keep you safe. A dull blade is a dangerous blade because it requires more force to use, increasing the chance of an accident.
1. Increased Resistance or Needing to Push Harder
This is usually the first thing you’ll notice. A sharp blade glides through wood. A dull blade needs to be forced. If you feel like you’re fighting the saw and having to put your shoulder into the cut, your blade’s teeth are no longer slicing the wood fibers—they’re tearing them. Stop and check your blade.
2. Burn Marks on the Wood
If you see black or brown scorch marks along the cut edge, that’s a classic sign of a dull blade. The burn marks are caused by friction. The dull teeth are rubbing against the wood instead of cutting it cleanly, generating intense heat that chars the surface. This can also be caused by a dirty blade covered in pitch, so try cleaning it first.
3. Excessive Chipping and Tear-Out
Look closely at the surface of your cut. A sharp blade leaves a clean, crisp edge. A dull blade will cause ugly chipping and splintering, especially on the top surface of plywood or on the exit side of a crosscut. This is called “tear-out.” If your projects are starting to look ragged, your blade is likely the culprit.
4. More Motor Noise or a Change in Sound
Listen to your saw. When you’re using a dull blade, the saw’s motor has to work much harder to spin it through the wood. You might hear the motor strain, dropping in RPMs and making a lower-pitched groaning sound. This is not only a sign of a dull blade but is also very hard on your saw’s motor over time.
5. Smoke or a Burning Smell
Where there’s smoke, there’s friction. If you see wisps of smoke coming from the cut, stop immediately. This is a severe sign that the blade is extremely dull and generating a dangerous amount of heat. It’s a fire hazard and a clear signal that the blade needs to be replaced or sharpened right away.
6. Chipped or Missing Teeth
This one is obvious but requires a visual inspection. Unplug your saw and carefully look at each tooth on the blade. Run your finger GENTLY along the side of the carbide tip (never the sharp edge). If you feel any chips, or if a tooth is missing entirely, the blade is done. A blade with damaged teeth will produce a terrible quality cut and is unsafe to use.
How to Make Your Circular Saw Blades Last Longer
You’ve invested in good blades, so let’s make sure you get every bit of value out of them. A few simple habits can double or even triple the life of your blade, saving you money and giving you better results.
Step-by-Step Guide to Cleaning Your Saw Blade
Cleaning pitch and resin off your blade is the single most effective maintenance task you can perform. It’s easy and takes just a few minutes.
Tools and Materials You’ll Need:
- A shallow pan or tray (an old baking sheet works well)
- A blade cleaning solution (citrus-based cleaners or simple green are great)
- A brass or nylon brush (avoid steel brushes, which can scratch the blade)
- Rubber gloves to protect your hands
- An old towel or rag
- Paste wax or blade lubricant (optional, but helpful)
The Cleaning Process:
- Safety First! Unplug your saw and carefully remove the blade. Always wear gloves when handling a saw blade.
- Soak the Blade: Lay the blade flat in your tray and spray it generously with the cleaning solution, covering both sides. Let it soak for 5-10 minutes. You’ll see the brown gunk start to dissolve.
- Scrub the Grime: Use your nylon or brass brush to gently scrub the teeth and the body of the blade. The pitch should come off easily. Pay special attention to the area around each carbide tooth.
- Rinse and Dry Thoroughly: Rinse the blade with water and dry it completely with an old towel. Any moisture left on the blade can lead to rust, so be sure it’s bone dry.
- Apply a Protectant (Optional): For extra protection, you can apply a thin coat of paste wax or a specific blade lubricant to the body of the blade. This helps prevent future pitch buildup and reduces friction. Buff it off before use.
Do this whenever you notice buildup or when the blade starts to feel a little sluggish. You will be amazed at how a clean blade cuts like new again.
Choose the Right Blade for the Job
Using the wrong blade is like using a screwdriver as a hammer—it might work, but it’s not right and will cause damage. Blades are designed for specific tasks.
| Blade Type (Tooth Count) | Best For | Why It Works |
|---|---|---|
| 24-Tooth (General Purpose/Framing) | Fast cuts in softwood, framing lumber (ripping and crosscutting). | Fewer, larger teeth with deep gullets clear away sawdust quickly. It’s a fast but rougher cut. |
| 40-Tooth (Combination) | Good all-around blade for crosscutting and ripping in plywood and hardwoods. | A great balance between speed and smoothness. A perfect choice if you only want one blade. |
| 60- to 80-Tooth (Fine Finish) | Ultra-smooth crosscuts in hardwoods, plywood, and melamine. Not for ripping. | More teeth take smaller bites, resulting in a glass-smooth edge with no tear-out. |
Using a fine-finish blade to rip a thick piece of hardwood will cause it to overheat and dull quickly because the small gullets can’t clear the sawdust fast enough. Always match your blade to your material and type of cut.
Store Your Blades Properly
Protect those precious carbide teeth! When you take a blade off your saw, don’t just toss it on a shelf.
- Keep the original packaging or buy a dedicated blade case.
- You can also make a simple blade holder from scrap plywood with slots cut into it.
- The goal is to prevent the teeth from clanking against each other or other metal tools.
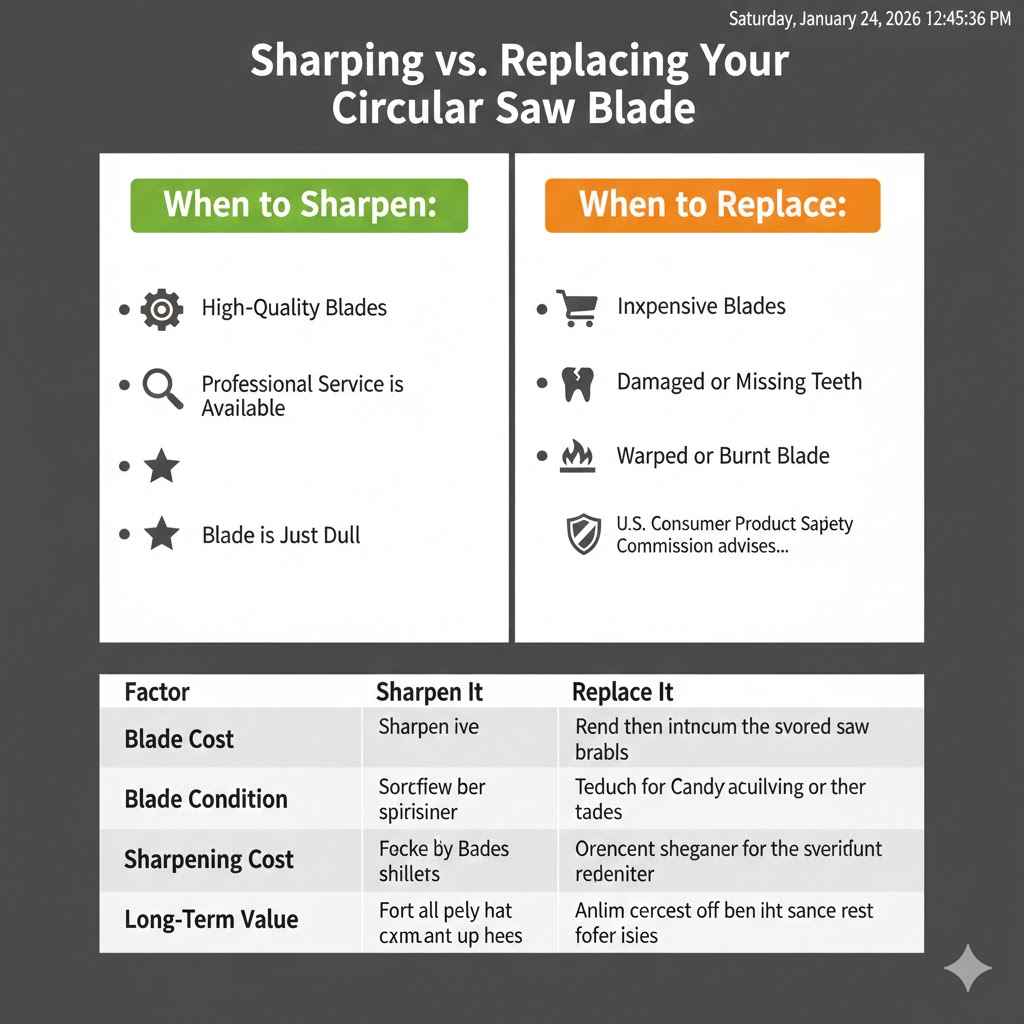
Sharpening vs. Replacing: Which is the Right Choice?
So, your blade is dull. Now what? You have two choices: get it sharpened or buy a new one. The right decision depends on the quality of the blade and the cost of sharpening.
For most DIYers, sharpening is often not worth the cost and effort for standard, inexpensive blades. However, for high-quality, expensive blades, sharpening can be a fantastic way to save money.
When to Sharpen:
- High-Quality Blades: If you invested in a premium blade (often costing $40 or more), it’s definitely worth sharpening. The steel body is high quality, and the carbide tips are thick enough to be ground down several times.
- Professional Service is Available: Look for a local sharpening service that specializes in carbide-tipped saw blades. They have the precise grinding equipment needed to restore the complex angles on each tooth. A professional sharpening can make a blade cut better than it did when it was new.
- The Blade is Just Dull, Not Damaged: Sharpening can fix a dull edge, but it can’t replace a broken tooth or fix a warped blade plate.
When to Replace:
- Inexpensive Blades: If your blade cost less than $20, it’s almost always cheaper and easier to just buy a new one. The cost of professional sharpening will likely be more than the blade is worth.
- Damaged or Missing Teeth: If you have chipped or missing carbide teeth, the blade is usually beyond repair. Replacing a single tooth is a specialized and expensive process.
- Warped or Burnt Blade: If the blade has gotten severely overheated, it may have blueish burn marks on the steel plate. This can cause the plate to warp, meaning it will no longer run true. A warped blade is unsafe and must be discarded. The U.S. Consumer Product Safety Commission advises inspecting tools for damage before each use as a key safety measure.
| Factor | Sharpen It | Replace It |
|---|---|---|
| Blade Cost | High-end, premium blade ($40+) | Inexpensive, economy blade (<$20) |
| Blade Condition | Evenly dull, no damage | Chipped teeth, missing teeth, warped plate |
| Sharpening Cost | Less than 50-70% of a new blade’s cost | More than the cost of a new blade |
| Long-Term Value | You can sharpen it 3-5 times, saving money | Quicker and more cost-effective to buy new |
Frequently Asked Questions (FAQ)
1. How can I tell what kind of material my blade is made for?
Look at the packaging or the information printed directly on the blade itself. It will often list the intended materials, such as “Framing,” “Plywood,” “Fine Finish,” or “Laminate.” The tooth count is also a big clue: fewer teeth for fast, rough cuts and more teeth for slow, smooth cuts.
2. Can I sharpen a circular saw blade myself?
While it’s technically possible, it’s not recommended for carbide-tipped blades. The geometry of the teeth is complex, with multiple angles that must be ground perfectly. Doing it by hand with a file is nearly impossible and will likely ruin the blade. It’s a job best left to professionals with specialized diamond grinding wheels.
3. How much does professional blade sharpening cost?
Prices vary by location, but you can typically expect to pay between $15 and $25 to sharpen a standard 7-1/4 inch circular saw blade. The price often depends on the number of teeth. It’s a great deal for a $60 blade, but not for a $15 one.
4. Does cutting pressure-treated wood dull blades faster?
Yes, it can. The chemicals used in pressure-treated lumber can be corrosive, and the wood is often wet, which increases friction. Additionally, the wood fibers can be tougher. It’s a good idea to use a tough, general-purpose blade and to clean it thoroughly after cutting pressure-treated wood to prevent corrosion. According to wood science resources from universities like this Penn State Extension guide, proper handling of treated wood is important for both tool and personal safety.
5. Is a thin-kerf blade better? Do they last as long?
A thin-kerf blade is thinner and removes less material with each cut (the “kerf”). This means less work for the saw, which is great for cordless or less powerful saws. Because they do less work, they can sometimes last longer per project. However, their thinner plate can be more prone to wobbling or warping if they overheat. They are an excellent choice for many applications.
6. Why did my brand-new blade get dull after just a few cuts?
This is almost always because the blade hit something it shouldn’t have. The most common culprits are an embedded nail or screw in the wood, a staple, or even a hard knot. Hitting a foreign object, even for a split second, can be enough to chip or dull a carbide tooth.
7. What is the best all-around blade for a beginner?
For a beginner who wants one blade to do most things well, a 40-tooth carbide-tipped combination or all-purpose blade is the perfect choice. It provides a good balance, offering reasonably fast rip cuts and clean enough crosscuts for most DIY projects in both solid wood and plywood.
Your Blade is Your Partner in Woodworking
Thinking about your saw blade as a critical tool, not just a disposable accessory, will change the way you work. Its lifespan isn’t a mystery—it’s a direct result of the choices you make. By choosing the right blade for the material, using good technique, and keeping it clean, you can make a single quality blade last through countless successful projects.
Don’t be afraid to stop and check your blade if something feels off. A sharp blade is a safe blade, and it’s the key to getting those clean, professional-looking results we all want. Now you have the knowledge to keep your saw cutting at its best. So go ahead, put on your safety glasses, and build something amazing.