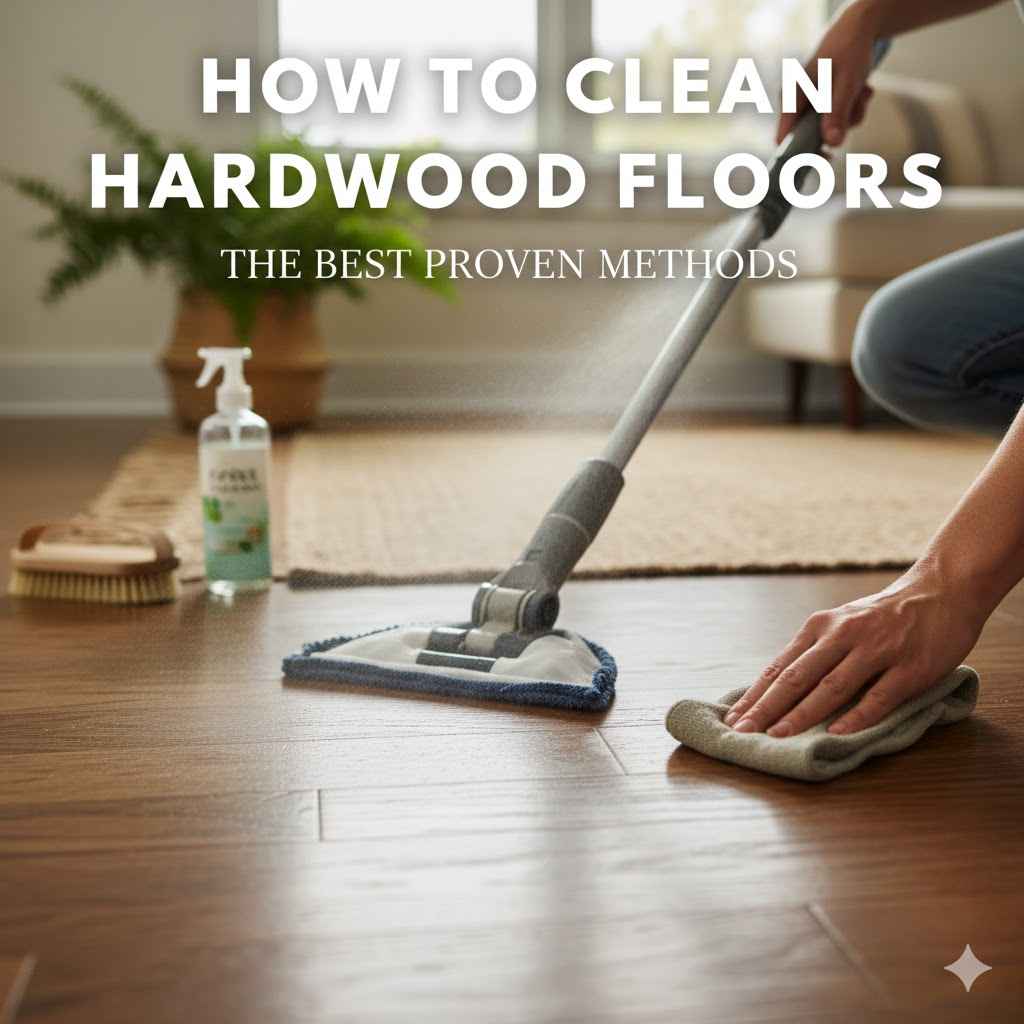
To clean hardwood floors, start by removing debris with a microfiber dust mop or a vacuum with a soft brush attachment. Next, use a microfiber mop lightly dampened with a pH-neutral wood floor cleaner. Wring the mop until it is almost dry to avoid water damage. Work in small sections and go with the grain for a streak-free finish.
Your beautiful hardwood floors are the heart of your home. But over time, they can get dull and grimy. You want them to shine, but you worry about causing damage. It feels like every cleaning product makes a different promise, and the wrong move could lead to costly repairs. Don’t worry, you’re in the right place. Keeping your floors looking their best is much simpler than you think. I’ll walk you through the proven methods that protect your wood and bring back its natural warmth. You can do this, and the results will speak for themselves.
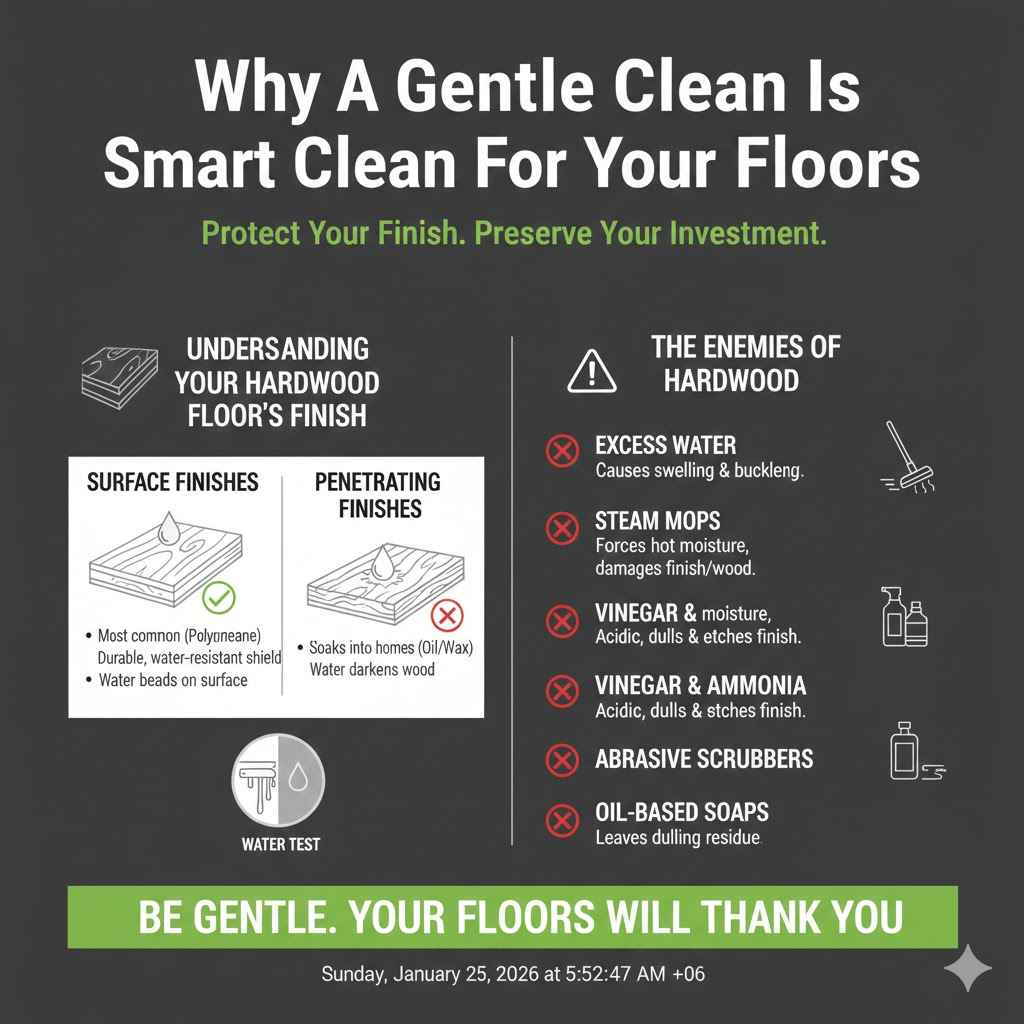
Why a Gentle Clean is a Smart Clean for Your Floors
Before we grab a mop, it’s important to understand what we’re working with. Hardwood floors aren’t just planks of wood; they’re a system, and the most important part of that system is the finish. The finish is the floor’s shield, protecting the wood from moisture, scratches, and stains. When you clean your floors, you’re really just cleaning the finish. Damaging this protective layer is what leads to big problems. That’s why a gentle approach is always the best approach.
Understanding Your Hardwood Floor’s Finish
Most modern hardwood floors have a surface finish, which acts like a clear coat on top of the wood. Older floors might have a penetrating finish that soaks into the wood. Knowing which one you have is key to proper cleaning.
- Surface Finishes (Polyurethane, Urethane, Polyacrylic): This is the most common type of finish on floors installed in the last few decades. It creates a durable, water-resistant barrier on the surface of the wood. If your floor has a slight sheen and water beads up on it, you likely have a surface finish. These are the easiest to clean and maintain.
- Penetrating Finishes (Oiled or Waxed): These finishes soak into the wood grain to protect it from within, often leaving a more natural, low-sheen look. They are more common in historic homes. These finishes require special care and are more vulnerable to water. You’ll need to use specific oil- or wax-based cleaning products and periodically reapply the finish.
If you’re unsure, find an inconspicuous spot (like inside a closet) and place a single drop of water on the floor. If it beads up and sits on the surface, you have a surface finish. If it soaks in after a few minutes and darkens the wood, you have a penetrating finish.
The Enemies of Hardwood: What to Avoid at All Costs
Using the wrong tools or cleaners can strip the finish, cause discoloration, or even warp the wood itself. Here’s a list of things you should never use on your hardwood floors:
- Excess Water: This is public enemy number one. Water can seep between boards, get under the finish, and cause the wood to swell, cup, or buckle. A mop should always be damp, never dripping wet.
- Steam Mops: While great for tile, steam mops force hot moisture into the wood grain and seams. This can damage the finish and the wood itself over time, often voiding the floor’s warranty.
- Vinegar and Ammonia: These are acidic and can dull or etch the floor’s finish over time. While some DIY recipes call for diluted vinegar, commercial pH-neutral cleaners are a safer and more effective choice for modern finishes.
- Abrasive Scrubbers or Steel Wool: These will scratch and scuff the finish, leaving it dull and vulnerable to damage.
- Oil-Based Soaps or Wax Cleaners: Products like Murphy Oil Soap can leave a sticky residue on modern polyurethane finishes that dulls the shine and attracts more dirt. Save these for floors with the appropriate oil or wax finish.
- Harsh All-Purpose Cleaners: Many household cleaners are too alkaline or contain chemicals that can strip your floor’s protective layer.
Your Essential Hardwood Floor Cleaning Toolkit
You don’t need a closet full of expensive gadgets to keep your floors beautiful. The right tools are simple, effective, and designed to protect your investment. Having these items on hand will make your cleaning routine quick and easy.
- Microfiber Dust Mop: This is your best friend for daily cleaning. The microfiber pad uses static electricity to grab dust, pet hair, and small debris much more effectively than a traditional broom, which often just pushes dirt around.
- Vacuum with a Soft Brush Attachment: For a deeper clean, a vacuum is great for getting grit out of the edges and cracks. The key is to use a soft-bristle head and turn off the beater bar. A rotating beater bar can scratch or dent hardwood.
- Microfiber Mop for Damp Mopping: Look for a flat-head microfiber mop with a removable, washable pad. It allows you to control the amount of water you use and provides a gentle, streak-free clean.
- Two Buckets: The two-bucket method is a pro tip for keeping your floors truly clean. One bucket holds your cleaning solution, and the other holds clean rinse water. This prevents you from putting dirty water back on your floor.
- pH-Neutral Wood Floor Cleaner: This is the safest and most effective choice for modern polyurethane finishes. These cleaners are formulated to remove dirt without damaging the finish. You can find them at any hardware or grocery store.
- Soft Cloths: Keep a few clean, soft microfiber cloths handy for wiping up spills immediately and for spot-treating tough spots.
The Ultimate Step-by-Step Guide to Cleaning Hardwood Floors
With your toolkit ready, it’s time to get to work. This simple, proven process works perfectly for weekly or monthly cleaning. Follow these steps, and your floors will look fantastic without any risk of damage.
Step 1: Clear the Area
Before you begin, remove any small furniture, chairs, and area rugs from the room. This gives you a clear, open space to work and ensures you don’t miss any spots under furniture. It’s also a great opportunity to clean your rugs while the floor dries.
Step 2: The Dry Clean (Dust and Debris Removal)
This is the most critical step. You must remove all loose dirt, dust, and grit before you introduce any moisture. If you don’t, you’ll just be pushing around abrasive particles, which can create tiny scratches in your floor’s finish. It’s like sanding your floor with dirty water.
- First Pass with a Dust Mop: Start by running your microfiber dust mop over the entire floor. Go with the grain of the wood planks. Pay special attention to corners, edges, and under the lip of cabinets where dust bunnies love to hide.
- Second Pass with a Vacuum: For a more thorough job, follow up with a vacuum. Make sure to use the soft brush attachment (often called a hard floor head). If your vacuum has a rotating brush or “beater bar,” turn it off. The stiff bristles of a carpet brush can damage a wood floor’s finish. Vacuuming is excellent for pulling debris from the small gaps between floorboards.
Step 3: Prepare Your Cleaning Solution
Now it’s time to mix your cleaner. Always follow the manufacturer’s instructions on the bottle. Using too much cleaner can leave a sticky, dulling residue. A little goes a long way.
- Fill one bucket with the recommended amount of pH-neutral cleaner and cool water.
- Fill your second bucket with clean, cool water only. This will be your rinse bucket.
Step 4: The Damp Mop (Less is More)
Remember, we are damp-mopping, not wet-mopping. The goal is to use just enough liquid to loosen dirt, which will then be picked up by the microfiber pad. Your floor should air dry in under a minute. If it takes longer, your mop is too wet.
- Dip and Wring: Submerge your clean microfiber mop pad in the bucket with the cleaning solution. Then, wring it out completely until it is just damp to the touch, not dripping.
- Work in Sections: Start at the farthest corner of the room and work your way toward the exit so you don’t have to walk on the clean, damp floor. Mop a small section at a time (e.g., 5 feet by 5 feet).
- Follow the Grain: Mop in the same direction that the wood planks are laid. This helps prevent streaks and cleans out the small grooves in the wood.
- Rinse and Repeat: After cleaning a section, rinse the dirty mop pad in the second bucket of clean water. Wring it out thoroughly before dipping it back into the cleaning solution for the next section. This simple step is what keeps you from spreading dirty water all over your clean floor.
Step 5: Tackle Tough Spots and Scuffs
For stubborn spots that the mop doesn’t lift, you can spot-treat them. For sticky residue or food spills, spray a small amount of your cleaner directly onto a soft cloth (not the floor) and gently rub the spot. For black scuff marks from shoes, a clean tennis ball or a pencil eraser can often rub them away without damaging the finish.
Step 6: Dry and Admire
A properly damp-mopped floor will air dry very quickly, usually in a minute or two. There is no need to rinse the floor, as a good pH-neutral cleaner is designed to be left on. If you see any spots with excess water, wipe them up immediately with a dry, soft cloth. Once the floor is completely dry, you can move your furniture and rugs back into place.
Choosing the Right Cleaner: A Simple Guide
The cleaning aisle can be confusing. To simplify things, here is a breakdown of the most common options and when to use them. For 99% of modern floors, a commercial pH-neutral cleaner is your best bet.
| Cleaner Type | Best For | Pros | Cons |
|---|---|---|---|
| pH-Neutral Wood Cleaner | Modern floors with polyurethane or other surface finishes. | Specially formulated to be safe and effective; leaves no residue; won’t dull the finish. | Can be more expensive than DIY options. |
| Water & Mild Dish Soap | A backup option for sealed floors if you’re in a pinch. | Inexpensive and readily available. | Can leave a soapy film if not used sparingly (1-2 drops per gallon of water). |
| Commercial Wood Floor Polish | Dull, scuffed floors with a surface finish that need a temporary shine boost. | Fills in microscopic scratches and restores sheen. | Can cause buildup over time; should only be used every few months. Not a cleaner. |
| DIY Vinegar Solution (Use with Caution) | Sometimes used for deep cleaning sticky residue on very durable finishes. | Very cheap; effective at cutting grease. | Highly acidic; can dull or damage many finishes over time, especially with frequent use. Not recommended by most flooring manufacturers. |
Deep Cleaning vs. Daily Maintenance
Consistent, light cleaning is far better for your floors than infrequent, heavy-duty scrubbing. A simple routine will keep your hardwood looking great and prevent the buildup of damaging dirt and grit.
Your Daily and Weekly Routine
A little bit of effort each day goes a long way. This simple schedule prevents dirt from accumulating and protects your floor’s finish from wear and tear.
- Daily: Use your microfiber dust mop to quickly sweep high-traffic areas like entryways, hallways, and the kitchen. This takes only a couple of minutes and removes the most abrasive grit before it gets tracked through the house.
- Weekly: Perform a more thorough dry clean of the entire floor with your dust mop and/or vacuum. Follow this with a damp mop using your pH-neutral cleaner, as detailed in the steps above.
- Immediately: Wipe up any spills the moment they happen using a soft, dry cloth. For sticky spills, use a cloth slightly dampened with water or your floor cleaner. This prevents moisture from penetrating the finish and causing stains. The U.S. Environmental Protection Agency offers guidance on safer cleaning practices that are good for your home and family.
When to Deep Clean or Polish
Even with regular cleaning, your floors may eventually start to look a bit dull, especially in high-traffic zones. This is when a deep clean or polish can help.
A “deep clean” doesn’t mean scrubbing harder. It means using a slightly stronger product, like a commercial hardwood deep cleaner, to remove stubborn buildup from other cleaning products or grime. You would apply this with a damp mop just like your regular cleaner.
Polishing is different from cleaning. A floor polish is a product that adds a protective layer and restores shine. It can help fill in tiny surface scratches and make the floor look new again. You should only polish your floors every 2 to 4 months at most. Over-polishing can lead to a hazy buildup. Always use a polish that is compatible with your floor’s finish and never polish a floor that is dirty.
Special Cases: Cleaning Oiled or Waxed Hardwood Floors
If you have an older home or floors with a penetrating oil or wax finish, the cleaning rules are different. These floors are more like seasoned wood than a sealed surface. Water is their enemy, and they need to be nourished with oils or waxes to stay protected.
- Avoid Water: Never use water-based cleaners, vinegar, or even a damp mop on these floors. Moisture can easily stain the wood.
- Use a Specific Cleaner: You must use a cleaning product specifically designed for oiled or waxed hardwood floors. These products clean and condition the finish simultaneously.
- Buff Regularly: Regular buffing with a soft cloth or a machine buffer can restore the sheen and keep the finish looking even.
- Reapply the Finish: These floors require periodic re-oiling or re-waxing to maintain their protective layer. The frequency depends on how much traffic the floor gets. For detailed guidelines, it’s best to consult an expert resource like the National Wood Flooring Association (NWFA).
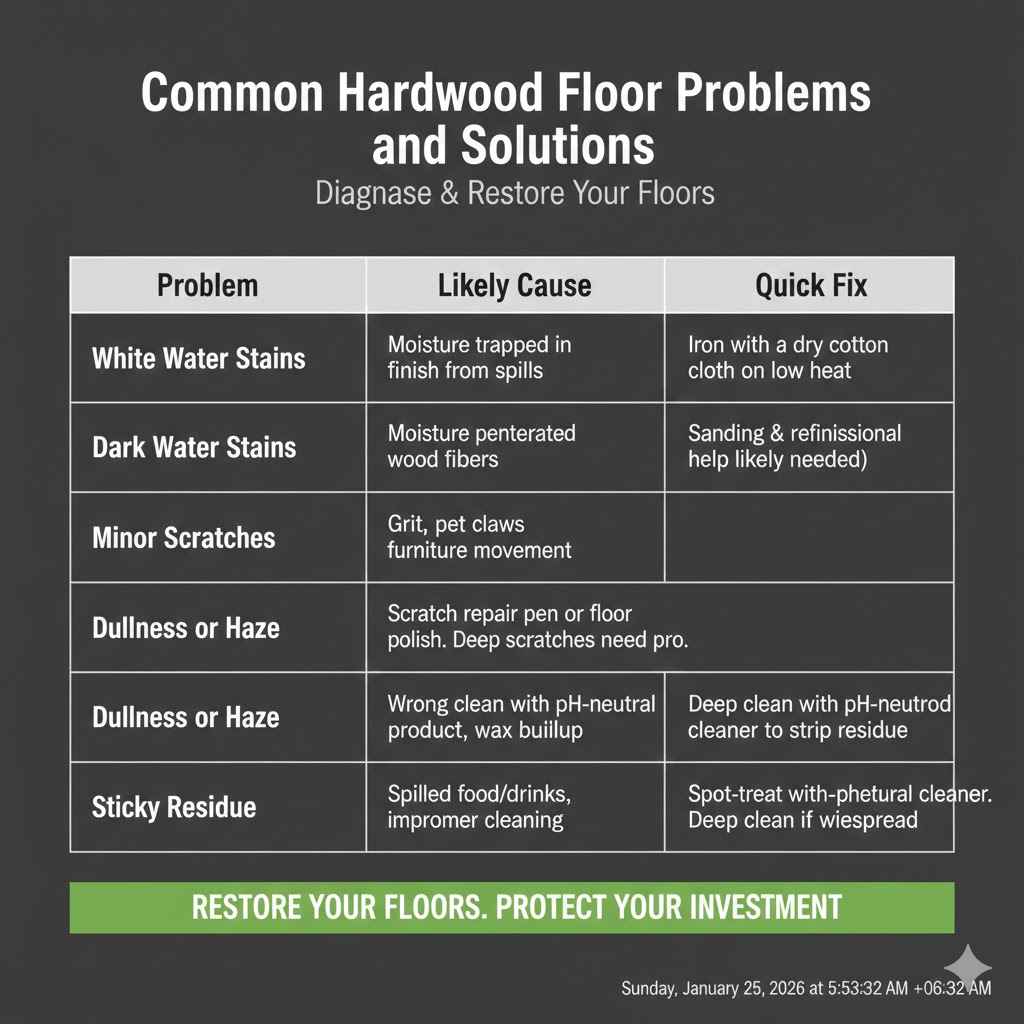
A Table of Common Hardwood Floor Problems and Solutions
Even with the best care, accidents happen. Here’s a quick guide to fixing some of the most common hardwood floor issues.
| Problem | Likely Cause | Quick Fix |
|---|---|---|
| White Water Stains | Moisture trapped in the top layer of the finish. Often from a glass left on the floor. | Place a dry cotton cloth over the stain and gently iron it on a low, no-steam setting for a few seconds. The heat can draw the moisture out. |
| Dark Water Stains | Moisture that has penetrated the finish and stained the wood fibers black. | This is a more serious issue that often requires sanding and refinishing the affected area. May require a professional. |
| Minor Scratches | Grit, pet claws, or furniture being dragged across the floor. | For very light scratches in a polyurethane finish, a scratch repair pen or a bit of floor polish can help conceal them. Deeper scratches may need professional attention. |
| Dullness or Haze | Buildup from using the wrong cleaner, too much cleaner, or wax-based products on a sealed floor. | Clean the floor with a recommended hardwood deep cleaner to strip away the residue. You may need to do this a couple of times. |
| Sticky Residue | Spilled food or drinks, or residue from improper cleaning products. | Spot-treat with a soft cloth and your pH-neutral cleaner. If widespread, a deep clean may be needed to remove the film. |
Frequently Asked Questions (FAQ)
Can I use vinegar to clean my hardwood floors?
It’s best to avoid it. Vinegar is acidic and can break down and dull modern polyurethane finishes over time. While heavily diluted vinegar might not cause immediate damage, pH-neutral cleaners specifically designed for wood floors are a much safer and more effective option.
Is it okay to use a steam mop on hardwood?
No. Steam mops use high-pressure steam to clean, which forces hot moisture into the seams and grain of your wood floor. This can lead to finish damage, warping, and cupping over time. Most flooring manufacturers will void your warranty if you use a steam mop.
How often should I clean my hardwood floors?
You should dust mop or vacuum high-traffic areas daily or every other day to remove abrasive grit. A full damp mop of the entire floor is typically only needed once a week, or every two weeks for low-traffic homes.
What’s the best tool for dusting hardwood floors?
A wide microfiber dust mop is the best tool for daily dust and pet hair removal. The electrostatic charge of the fibers traps dirt and allergens much more effectively than a traditional broom, which tends to push debris into the air.
Can I use Murphy Oil Soap on my modern hardwood floors?
You should not use oil soaps on floors with a modern polyurethane or urethane finish. These products can leave a dull, oily residue that attracts more dirt and can prevent future coats of finish from adhering properly. They are only suitable for older, unsealed or oil-finished floors.
How do I get rid of scuff marks?
For simple scuff marks from shoes, you can often just rub them out with a clean tennis ball or a pencil eraser. Apply gentle pressure, and the mark should lift right off the finish without any damage.
A Beautiful Finish for a Lifetime
Your Final Takeaway
Caring for your hardwood floors doesn’t have to be complicated or stressful. The secret isn’t in harsh chemicals or heavy scrubbing; it’s in consistent, gentle maintenance. By keeping grit off the floor with daily dusting and using a simple damp mop with the right cleaner, you protect the finish that shields the wood. Think of it as a small investment of your time that pays off with decades of beautiful, warm, and welcoming floors. You have the tools and the knowledge now. Go enjoy the timeless beauty of your well-cared-for hardwood.