
Cutting a 120-degree angle on a miter saw can be tricky. It requires precision and the right technique.
Many DIY enthusiasts and woodworkers face this challenge. A perfect 120-degree cut is essential for various projects, like making custom frames or intricate designs. Understanding the right steps and tips can make this task much easier. In this guide, we will break down the process in simple steps.
You’ll learn how to set up your miter saw and make accurate cuts. This will help you achieve professional results in your projects. So, let’s dive in and master the art of cutting a 120-degree angle on a miter saw!
Necessary Tools
Cutting a 120-degree angle on a miter saw requires a precise setup. Adjust the saw to 60 degrees and make two cuts. Ensure accuracy for perfect joints every time.
To cut a 120-degree angle on a miter saw, you need the right tools. Having the proper equipment ensures accuracy and safety. Below, we’ll outline the essential tools and safety gear you need for this task.
List Of Required Tools
First, you will need a miter saw. A miter saw is crucial for making precise angled cuts. Next, a protractor or angle finder helps measure the exact 120-degree angle. A measuring tape is also necessary for accurate measurements.
Additionally, you will need a pencil for marking your measurements. Clamps are essential to secure the wood in place. Lastly, having a piece of scrap wood is helpful for test cuts.
Safety Equipment
Safety should always come first. Wear safety goggles to protect your eyes from wood chips. Ear protection is important to guard against the loud noise of the saw. Gloves can help protect your hands, though be cautious not to get them caught in the saw.
Make sure your workspace is clean and free of distractions. A tidy area helps you focus and reduces the risk of accidents.
Now, you are ready to start your project with confidence. Having the right tools and safety gear makes all the difference. Happy cutting!
Credit: mdfskirtingworld.co.uk
Safety Precautions
Always wear safety goggles and gloves when cutting a 120-degree angle on a miter saw. Secure the wood firmly to avoid slipping.
Cutting a 120-degree angle on a miter saw requires precision and attention to detail. However, before you even start, it’s crucial to prioritize safety. Proper safety precautions can prevent accidents and ensure a smooth cutting process. Let’s delve into the key safety measures you need to take.
Personal Protective Gear
Always wear safety goggles to protect your eyes from sawdust and debris.
Hearing protection is also important, as miter saws can be quite loud.
Consider wearing gloves to protect your hands, but make sure they fit snugly to avoid getting caught in the saw.
Safe Work Environment
Ensure your workspace is well-lit so you can see clearly.
Keep the area around your saw clean and free of clutter to prevent tripping or interference.
Make sure your saw is on a stable, flat surface to avoid any wobbling during cuts.
Before you start cutting, double-check that the miter saw is in good working condition.
Inspect the blade for any signs of damage or wear. Replace it if necessary to ensure clean cuts and avoid accidents.
Do you have any specific safety tips you follow when working with power tools? Share them in the comments below.
Preparing The Miter Saw
Preparing the miter saw is crucial for cutting a 120-degree angle. Proper setup ensures accuracy and safety. Follow these steps to get your saw ready.
Setting Up The Saw
First, place the miter saw on a stable surface. Ensure it does not wobble. Stability is key to precise cuts. Next, plug in the saw and turn it on briefly. Check that it runs smoothly. If there are issues, resolve them before continuing. Safety first.
Adjusting The Blade
Now, adjust the blade to the correct angle. Most miter saws have an adjustable gauge. Set it to 60 degrees. Remember, two 60-degree cuts make a 120-degree angle. Lock the angle adjustment to prevent movement. Ensure the blade is tight. Loose blades can be dangerous.
Double-check your settings. Accurate adjustments lead to precise cuts. Proper preparation of the miter saw sets the stage for a successful project.
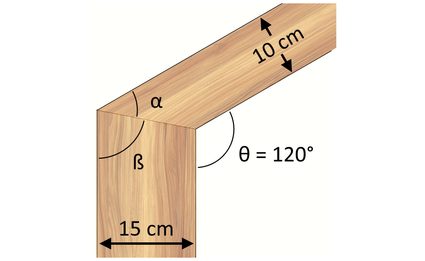
Credit: www.omnicalculator.com
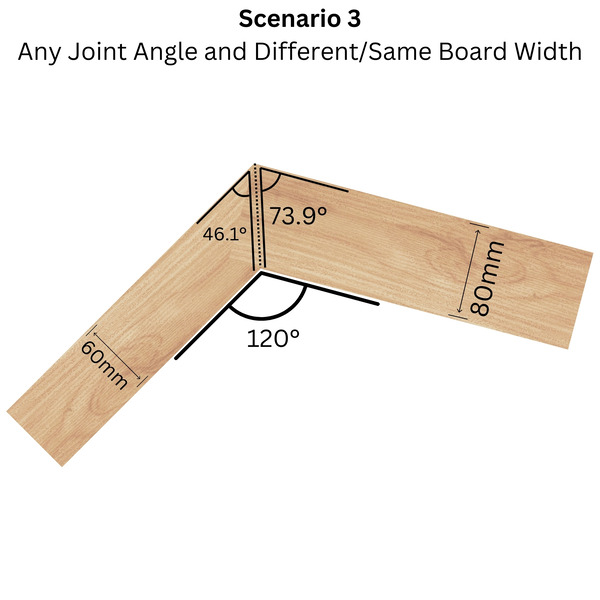
Measuring And Marking The Wood
Measuring and marking the wood accurately is crucial for cutting a 120-degree angle on a miter saw. This step ensures your cuts are precise, leading to better-fitting joints and a professional finish. Follow these guidelines to measure and mark your wood effectively.
Accurate Measurement Techniques
First, ensure your measuring tools are reliable. Use a ruler or tape measure for accuracy. Align the wood piece properly and measure twice to confirm your dimensions. Consistency in measuring prevents mistakes.
Place the wood on a flat surface. This avoids any wobble that might affect your measurements. Hold the tape measure firmly against the wood and mark the length you need. Double-check your measurements to prevent errors.
Marking The Cut Line
Use a pencil to mark the cut line clearly. Make a straight line with the help of a ruler or straight edge. The pencil mark should be visible but not too thick.
Position the wood on your workbench and ensure it is stable. Carefully draw the line where you will make the cut. A precise mark helps guide your saw, ensuring an accurate cut.
Consider using a protractor to verify the angle. Place the protractor on the wood and check the 120-degree angle. Mark the intersecting lines to visualize your cut. This step is key for exact angles.
Setting The Miter Saw Angle
Cutting a 120-degree angle on a miter saw may seem challenging. But with the right steps, it becomes easy. The key is to set the miter saw to the correct angle. Follow these instructions to make precise cuts.
Calculating The Angle
First, you need to understand the math. A 120-degree angle requires two 60-degree cuts. Each cut should equal half of the total angle. So, divide 120 degrees by two. This will give you 60 degrees for each cut.
Adjusting The Miter Gauge
Next, adjust your miter gauge to 60 degrees. Look at the angle scale on your saw. Find the 60-degree mark. Move the gauge to this position. Lock the gauge in place to secure it.
Make sure the blade is clear of the wood. Turn on the saw and make your cut. Repeat the process for the second piece. Both pieces should fit together to form a 120-degree angle.
Making The Cut
Making a precise 120-degree angle cut on a miter saw might seem challenging. With the right steps, it becomes much easier. Here, we will break down the process into simple steps. Follow these steps, and you will have your perfect cut.
Positioning The Wood
Start by setting up your miter saw. Adjust the saw to a 30-degree angle. This setting will help achieve the desired 120-degree cut. Place the wood securely on the saw table. Ensure it is flush against the fence. A stable position is crucial for an accurate cut.
Executing The Cut
With the wood in place, hold it firmly. Use a clamp if needed. Lower the saw blade slowly. Make sure it aligns with your mark. Start the saw and make the cut. Move the blade steadily through the wood. Do not rush this part. A slow, steady cut ensures precision. Once done, lift the blade and remove the wood.
Finishing Touches
After making the 120-degree angle cut on your miter saw, it’s crucial to focus on the finishing touches. This step ensures your project has a polished and professional look.
Even the most precise cuts can benefit from a little extra care. These final steps will elevate the quality of your work.
Sanding The Edges
Sanding the edges is essential for a smooth finish. Grab some fine-grit sandpaper and gently sand the cut edges. This removes any rough spots or splinters.
Work in small, circular motions. This technique helps achieve an even surface. Be sure to sand all visible edges. This ensures a uniform look across your project.
Inspecting The Cut
Inspect the cut closely to ensure accuracy. Check for any uneven edges or imperfections. Use a protractor to verify the angle.
If the angle isn’t correct, consider making minor adjustments. Sometimes, a slight touch-up with the saw is needed. Make sure the cut aligns perfectly with your project requirements.
Remember, a detailed inspection guarantees that the cut meets your expectations.
Common Mistakes To Avoid
Cutting a 120-degree angle on a miter saw can be tricky. Many people make common mistakes that lead to poor results. Understanding these mistakes can help you avoid them. This section will cover the most frequent errors and how to steer clear of them.
Incorrect Measurements
One of the most frequent errors is taking incorrect measurements. Precise measurements are crucial for cutting accurate angles. Always double-check your measurements before making a cut. Use a reliable measuring tool and ensure it is aligned correctly. Even a small error can lead to a bad cut.
Improper Saw Adjustments
Another common mistake is improper saw adjustments. Your miter saw must be set correctly to achieve the desired angle. Check the saw settings and make sure the bevel and miter angles are accurate. If the adjustments are off, your cut will not be precise. Always calibrate your saw before starting your project.
Advanced Tips
Cutting a 120-degree angle on a miter saw requires precision and practice. Set the saw to 60 degrees and make two cuts. Ensure each cut is accurate for the perfect fit.
Cutting a 120-degree angle on a miter saw requires precision and skill. Once you’ve mastered the basics, advancing to more complex techniques can elevate your craftsmanship. Let’s dive into some advanced tips to ensure every cut is perfect and your miter saw performs at its best.
Using A Jig For Precision
A jig is a fantastic tool for achieving precise angles.
It helps hold the material steady and guides your saw accurately.
To create a jig, you can use scrap wood and align it to the desired angle.
Secure the jig firmly to your miter saw table.
This setup ensures the material doesn’t shift during the cut, which is crucial for maintaining accuracy.
Have you ever found your cuts slightly off? A jig could be the solution.
Maintaining Your Miter Saw
Keeping your miter saw in top condition is vital for consistent performance.
Regularly clean the blade to remove sawdust and debris.
Lubricate the moving parts to ensure smooth operation.
Sharpening the blade is essential for precise cuts.
A dull blade can cause splintering and inaccurate angles.
When was the last time you checked your saw’s alignment?
Ensuring it’s correctly aligned can drastically improve your cut accuracy.
Take the time to inspect and adjust your miter saw regularly.
These maintenance steps are simple but can make a significant difference in your woodworking projects.
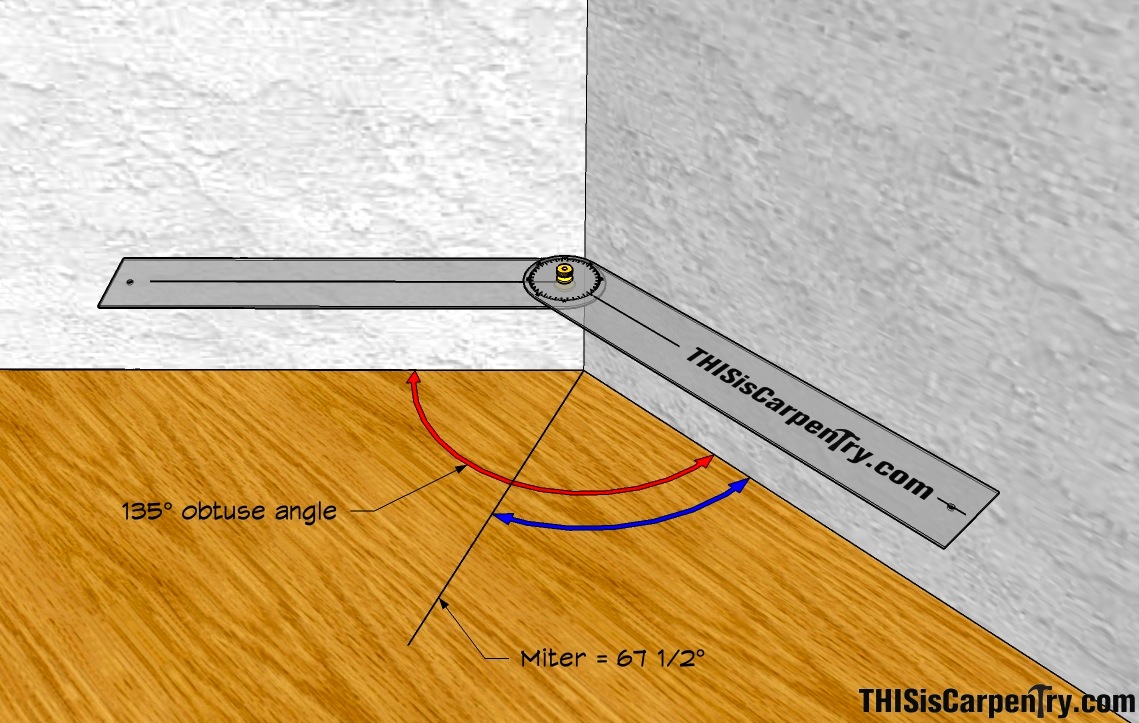
Credit: www.thisiscarpentry.com
Frequently Asked Questions
What Is The Miter Cut At A 135 Degree Angle?
A miter cut at a 135-degree angle involves cutting two pieces of material at 67. 5 degrees each. This creates a 135-degree joint.
What Is The Maximum Angle For A Miter Saw?
The maximum angle for a miter saw is typically 45 degrees. Some models can adjust up to 60 degrees. Always check your saw’s specifications.
How To Cut Angles Greater Than 45 Degrees On A Mitre Saw?
Set the mitre saw to 45 degrees. Use a protractor to mark the desired angle on the workpiece. Cut along the marked line.
How To Miter Corners Greater Than 90 Degrees?
To miter corners greater than 90 degrees, set your miter saw to half the corner angle. For a 120-degree corner, set the saw to 60 degrees. Cut each piece at this angle for a perfect fit.
Conclusion
Cutting a 120-degree angle on a miter saw is manageable. Follow the steps carefully. Measure and mark your wood. Adjust the saw to 60 degrees. Make precise cuts. Always wear safety gear. Practice makes perfect. Soon, you’ll cut angles like a pro.
Remember, patience and accuracy are key. Happy woodworking!