
Cutting crown molding with a table saw is possible with the right technique. It ensures precise angles and a professional finish.
Crown molding adds elegance to any room, but cutting it can be tricky. Using a table saw simplifies the process, making it easier to achieve perfect cuts. This guide will show you how to cut crown molding with a table saw.
We’ll cover the tools you need, the steps to follow, and tips for getting the best results. By the end, you’ll feel confident in tackling this project on your own. Let’s get started!
Credit: www.popularwoodworking.com
Introduction To Crown Molding
Learn the basics of cutting crown molding with a table saw. Follow simple steps to create precise and decorative cuts for your home projects.
Crown molding adds elegance to any room. It creates a smooth transition between walls and ceiling. Cutting crown molding with a table saw requires precision. But, the results are worth the effort. Let’s explore what crown molding is and its benefits.
What Is Crown Molding?
Crown molding is a decorative trim. It is placed where the wall meets the ceiling. It often features intricate designs. Made from wood, plaster, or polyurethane. It enhances the visual appeal of a room.
Benefits Of Crown Molding
Crown molding adds value to your home. It gives rooms a finished look. It hides gaps and imperfections. It can make ceilings appear higher. It adds a touch of elegance and style.
“`
Essential Tools And Materials
Gather essential tools and materials like a table saw, measuring tape, pencil, and safety gear. Ensure you have crown molding, clamps, and a miter gauge.
Cutting crown molding with a table saw can seem intimidating at first, but with the right tools and materials, it becomes a manageable task. Understanding the essential tools and materials needed is crucial for achieving those perfect, clean cuts. Let’s dive into what you’ll need to get started.
Required Tools
To cut crown molding with precision, you’ll need a few key tools. First, a reliable table saw is a must. Ensure it’s equipped with a fine-tooth blade for cleaner cuts.
You’ll also need a miter gauge. This helps you make accurate angled cuts, which are essential for crown molding.
Don’t forget a protractor. This handy tool helps you measure the angles of your walls and ceilings accurately.
A tape measure is another essential. Precise measurements are critical to ensure your cuts fit perfectly.
Lastly, safety gear is non-negotiable. Use safety glasses and ear protection to protect yourself during the cutting process.
Choosing The Right Materials
Selecting the right crown molding material is just as important as having the right tools. Wood is a popular choice because of its durability and classic look. Pine and oak are common options.
If you’re working on a budget, MDF (Medium-Density Fiberboard) is a great alternative. It’s more affordable and easier to cut, but it doesn’t have the same strength as wood.
Consider the design of the crown molding as well. There are various styles, from simple to intricate designs. Choose one that complements your room’s decor.
What materials have you found easiest to work with in your home projects? Share your experiences in the comments below.
In conclusion, having the right tools and selecting the appropriate materials makes cutting crown molding with a table saw a straightforward task. Don’t forget to measure accurately and always prioritize safety. Ready to start your project? Let’s get cutting!
Safety Precautions
Always wear safety goggles and gloves. Keep hands clear of the blade. Secure the crown molding firmly before cutting.
Cutting crown molding with a table saw can be a rewarding DIY project. However, it’s crucial to prioritize safety to prevent accidents. This section covers essential safety precautions, ensuring your project goes smoothly and safely.
Personal Protective Equipment
Always wear safety glasses to protect your eyes from flying debris. Even a small piece of wood can cause significant injury.
Use hearing protection. Table saws are loud, and prolonged exposure can damage your hearing.
Wear a dust mask. Cutting wood generates fine particles that can irritate your respiratory system.
Gloves are a double-edged sword. While they protect your hands, they can also get caught in the blade. Use them wisely, and consider fingerless gloves for better control.
Safe Handling Of The Table Saw
Before starting, ensure your table saw is on a stable surface. A wobbly saw is a recipe for disaster.
Check the blade guard. Make sure it is in place and functioning correctly. It’s there to prevent accidental contact with the blade.
Use a push stick. This simple tool keeps your fingers away from the blade, reducing the risk of injury.
Double-check the fence alignment. An improper alignment can cause kickback, which is both dangerous and damaging to your workpiece.
Never rush. Take your time to ensure every cut is precise and safe. It’s better to be slow and safe than fast and sorry.
Have you ever had a close call with power tools? It’s a reminder of why these precautions matter.
Remember, safety is your top priority. Equip yourself with the right gear, handle your tools with care, and you’ll have a successful and injury-free project.

Credit: www.pinterest.com
Preparing The Table Saw
Setting up the table saw correctly is crucial for cutting crown molding. Ensure the blade is sharp and adjust the saw to the appropriate angle. Secure the molding firmly for precise cuts.
Preparing the Table Saw
Cutting crown molding with a table saw can be a breeze if you take the right steps to prepare your saw properly. This preparation not only ensures precision but also enhances safety. Let’s dive into the essential steps you need to follow.
Setting Up The Saw
Before you start, make sure your table saw is on a stable surface. A wobbly saw can ruin your cuts and pose a safety risk.
Check that the saw is clean and free of any debris. Dust and wood chips can interfere with your work.
Ensure you have a proper fence setup. The fence helps guide the wood for straight cuts. Adjust it for accuracy.
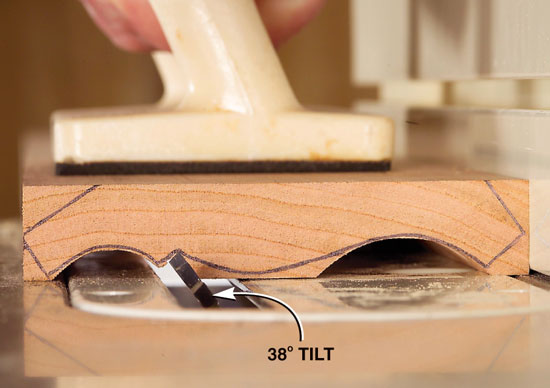
Adjusting The Blade
Set the blade to the correct height. It should be just above the thickness of the crown molding. This prevents kickback and ensures a cleaner cut.
Tilt the blade to the correct angle for your crown molding. Most crown molding cuts require a specific angle, usually 45 degrees. Refer to the manufacturer’s instructions for exact angles.
Lock the blade securely in place. A loose blade can shift during cutting, causing inaccuracies and potential hazards.
Now, take a moment to double-check everything. Are all adjustments tight? Is the work area clear?
By preparing your table saw meticulously, you set yourself up for success. What steps do you usually overlook when setting up your saw? Share your experiences and learn from others!
Measuring And Marking
Cutting crown molding with a table saw requires precise measuring and marking. Accurate cuts ensure a perfect fit. Always double-check angles and lengths before cutting.
When it comes to cutting crown molding with a table saw, measuring and marking are critical steps. Accurate measurements ensure a perfect fit, while precise marking guides your cuts. Both processes require attention to detail and a steady hand.
Accurate Measurements
Before you start, make sure you have a reliable tape measure. Measure the length of the wall where the crown molding will be installed.
Write down the measurements. This reduces the chance of forgetting or mixing up numbers.
Consider using a digital angle finder for corners. This tool can give you precise angles, making your cuts more accurate.
Double-check your measurements. Always measure twice to avoid mistakes that could waste material.
Marking The Molding
Use a sharp pencil to mark your measurements on the molding. This ensures clear, visible lines.
Align the molding with the wall. This helps you see how it fits and where adjustments are needed.
Mark the back side of the molding. This way, pencil marks won’t be visible once installed.
When marking angles, use a protractor. It ensures your cuts match the wall angles perfectly.
A quick tip: keep a small piece of scrap wood handy. Practice your cuts on it before moving to your actual molding.
By following these steps, you’ll ensure your crown molding fits perfectly. Have you ever measured and cut molding before? What tips do you have?
Cutting Techniques
Cutting crown molding with a table saw can seem challenging. However, understanding the right techniques simplifies the process. In this section, we’ll explore two primary methods: Straight Cuts and Angled Cuts. These techniques will help you achieve perfect results.
Straight Cuts
Straight cuts are the simplest method for cutting crown molding. Begin by setting your table saw blade to a 90-degree angle. Measure the length of the molding piece carefully. Mark the cut line with a pencil. Align the molding on the saw table. Ensure it is steady and secure. Turn on the saw. Slowly guide the molding through the blade. Keep your hands clear of the cutting path. Maintain a steady pace for a smooth cut.
Angled Cuts
Angled cuts are essential for fitting crown molding in corners. Start by setting the table saw blade to the desired angle. Common angles are 45 degrees. Measure the molding piece. Mark the cutting angle on the molding. Position the molding on the saw table. Ensure the angle aligns with the blade. Secure the molding firmly. Turn on the saw. Guide the molding through the blade carefully. Check the cut for accuracy. Adjust the angle if needed.
Common Mistakes To Avoid
Cutting crown molding with a table saw can be challenging. Many people make common mistakes that lead to frustration. Avoiding these mistakes will save time and effort. Let’s dive into some frequent errors.
Incorrect Measurements
One common mistake is incorrect measurements. Precise measurements are crucial for crown molding. Always double-check your measurements before cutting. Use a reliable measuring tape. Incorrect measurements can ruin your project. Take your time to measure accurately.
Improper Saw Setup
Another mistake is improper saw setup. Ensure your table saw is set up correctly. Check the blade angle for accurate cuts. Use clamps to secure the molding. Adjust the fence for stability. Improper setup can lead to uneven cuts. Verify your saw settings each time.
Finishing Touches
The final step in cutting crown molding with a table saw is all about the finishing touches. This step ensures your crown molding looks perfect and professional. Attention to detail is key here. Let’s break it down into two main parts: sanding and smoothing, and painting and staining.
Sanding And Smoothing
Start by sanding the edges of your crown molding. Use fine-grit sandpaper for a smooth finish. Focus on removing any rough spots or splinters. Move the sandpaper in a circular motion. This helps achieve an even surface. Don’t forget the corners and edges. They need to be smooth too. After sanding, wipe the molding with a damp cloth. This removes dust and debris. Let it dry completely before moving to the next step.
Painting And Staining
Choose a paint or stain that matches your decor. For painting, use a primer first. This helps the paint adhere better. Apply the primer evenly and let it dry. Then, apply your chosen paint in thin, even coats. Use a brush or roller for best results. For staining, apply the stain with a clean cloth. Wipe off any excess. Let it dry, then add a clear coat for protection. This enhances the wood’s natural beauty.
Expert Tips And Tricks
Cutting crown molding with a table saw can be tricky. With the right tips and tricks, you can achieve perfect cuts every time. These expert suggestions will help you make precise cuts and maintain your tools efficiently.
Achieving Perfect Cuts
First, measure twice, cut once. Accurate measurements are key. Use a reliable measuring tape and mark your cut lines clearly. This prevents mistakes and ensures clean cuts.
Next, set the table saw blade to the correct angle. Crown molding often requires angled cuts. Adjust the blade to the needed angle before cutting. This ensures the pieces fit together perfectly.
Use a miter gauge for precise angles. The miter gauge helps guide the wood as you cut. This tool keeps the molding steady and reduces errors.
Slow and steady wins the race. Cut slowly to avoid splintering the wood. A steady pace ensures smooth edges and better fitting pieces.
Maintaining Your Tools
Clean your table saw regularly. Dust and debris can affect the saw’s performance. Wipe down the surface and vacuum any sawdust.
Sharpen the saw blade often. A sharp blade makes cleaner cuts. Dull blades can cause rough edges and inaccurate cuts.
Lubricate moving parts. Proper lubrication reduces wear and tear. This keeps your saw running smoothly.
Check for loose parts. Tighten any screws or bolts. This prevents accidents and ensures precise cuts.

Credit: www.youtube.com
Frequently Asked Questions
Can You Cut Molding With A Table Saw?
Yes, you can cut molding with a table saw. Use a miter gauge or sled for precise angled cuts.
What Is The Trick To Cutting Crown Molding?
To cut crown molding accurately, use a compound miter saw. Position the molding upside down in the saw. Adjust the saw to match the molding’s angles.
What Angle To Set Saw For Crown Molding?
Set the saw at a 45-degree angle for crown molding. For precise cuts, use a miter saw and a coping saw.
What Is The Danger When Using A Table Saw?
The #1 danger when using a table saw is kickback. This can cause serious injuries if precautions aren’t taken.
Conclusion
Cutting crown molding with a table saw requires patience and precision. Follow the steps carefully. Practice makes perfect. Measure twice, cut once. Use a stable work surface. Keep safety in mind. With these tips, your molding projects will look professional.
Happy woodworking!