
To finish maple wood, start by preparing the surface. Sand it smooth and clean off any dust.
Then, choose a finish like oil or polyurethane. Apply it in thin, even coats, allowing each layer to dry thoroughly. Maple wood is known for its beautiful grain and smooth texture. Finishing it can enhance its natural beauty and protect the wood.
Whether you’re working on furniture, flooring, or small projects, the right finish can make a big difference. Understanding the steps and choosing the right products is crucial. In this guide, we’ll explore the best methods and materials for finishing maple wood. By the end, you’ll have the knowledge to achieve a perfect finish and bring out the best in your maple wood projects. So, let’s dive in and get started!

Credit: www.youtube.com
Choosing The Right Tools
Selecting the right tools ensures a smooth finish on maple wood. Use fine-grit sandpaper and high-quality brushes for best results. Properly chosen tools make the process easier and more effective.
Choosing the right tools is crucial when finishing maple wood. The right equipment ensures a smooth, professional look and saves time. Let’s dive into the essentials you need for this project.
Essential Sanding Equipment
Sanding is the foundation of a smooth finish. You’ll need a good quality orbital sander. It provides even sanding and reduces the chance of gouging the wood.
Hand sanding is also important for detailed work. Use fine-grit sandpaper, around 220 grit, for maple wood. It helps in achieving a silky-smooth surface.
Don’t forget a sanding block. It gives you better control and keeps the sandpaper flat against the wood. This ensures even pressure distribution.
Top Brushes And Applicators
Choosing the right brush is key for a flawless finish. A high-quality, natural bristle brush works best for applying oil-based finishes. It spreads the finish evenly without leaving streaks.
For water-based finishes, go for a synthetic bristle brush. They are less likely to swell and soften when exposed to water-based products.
Foam brushes are great for quick touch-ups. They offer smooth application and are disposable, making clean-up a breeze.
Have you ever used a cloth applicator? It’s perfect for applying stains. It allows you to work the stain into the wood grain, enhancing its natural beauty.
Remember, the right tools make all the difference. What tools have you found indispensable in your woodworking projects? Sharing your experiences could help someone else achieve a perfect maple wood finish.
Preparing The Surface
Preparing the surface of maple wood is essential for a smooth finish. Proper preparation ensures the stain or varnish adheres well. This step involves cleaning and sanding the wood. Let’s explore these steps in detail.
Cleaning The Maple Wood
First, remove any dust or debris from the wood. Use a soft cloth to wipe down the surface. For sticky spots, dampen the cloth with water and mild soap. Avoid soaking the wood, as excess moisture can cause damage. Dry the surface completely before moving on to sanding.
Sanding Techniques
Sanding is crucial for a smooth finish. Start with a medium-grit sandpaper, around 120-grit, to remove any rough spots. Sand in the direction of the wood grain to avoid scratches. Once the surface is even, switch to a finer grit, like 220-grit, for a smoother finish. Clean the dust off the wood with a tack cloth. This ensures no particles remain to mar the finish.
Selecting The Finish
Choosing the right finish for your maple wood project is important. The finish you select will affect the look and durability of the wood. It also influences how easy it is to maintain. Here we discuss two popular types of finishes: oil and varnish. We will also look at stain options.
Oil Vs. Varnish
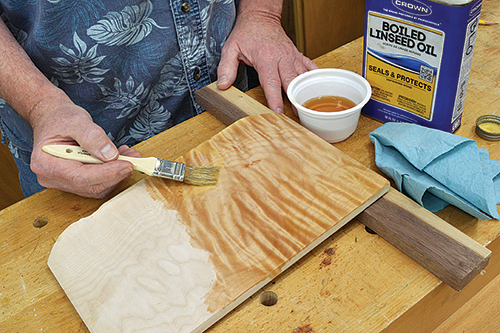
Oil finishes soak into the wood. They enhance the natural look of maple. Oil finishes are easy to apply. They need reapplication over time. Common oils include tung oil and linseed oil.
Varnish finishes create a hard surface. They protect wood from water and wear. Varnish is more durable than oil. It can be tricky to apply. Varnish can be glossy or matte. Polyurethane is a popular type of varnish.
Stain Options
Staining maple wood can change its color. Stains come in many shades. You can choose light or dark colors. Stains highlight the wood grain. Some stains may blotch on maple. Use a pre-stain conditioner to avoid blotching. Gel stains work well on maple. They offer even color application.
Applying The Finish
Finishing maple wood gives it a beautiful and protective layer. It’s essential to apply the finish correctly to achieve a smooth and durable surface. Maple wood can be tricky due to its dense grain, but with the right techniques, you can get excellent results.
Step-by-step Application
Start by sanding the wood with fine-grit sandpaper. This helps remove any imperfections. Wipe off the dust with a clean cloth. Apply a wood conditioner to ensure an even absorption of the finish.
Next, choose a high-quality finish. Oil-based finishes are durable, while water-based finishes dry faster. Use a brush or cloth to apply the first coat. Let it dry according to the manufacturer’s instructions.
Once dry, lightly sand the surface with fine-grit sandpaper. This removes any raised grain and smoothens the surface. Apply additional coats, sanding between each layer until the desired finish is achieved.
Avoiding Common Mistakes
Avoid rushing the process. Each coat needs time to dry properly. Skipping this step results in a sticky or uneven finish.
Don’t forget to sand between coats. This step ensures a smooth and professional look. Ignoring it leaves rough spots.
Ensure a dust-free environment. Dust particles can settle on the wet finish, creating imperfections. Work in a clean space to avoid this issue.
Choose the right finish for your project. Not all finishes are suitable for maple wood. Research and select the best option for a long-lasting result.
Drying And Curing
Drying and curing maple wood ensures a smooth finish. Proper drying prevents warping and cracking. Curing enhances the wood’s durability and appearance.
Drying and curing maple wood is a critical step to ensure that your final finish is both beautiful and durable. The drying process allows the wood to stabilize, preventing warping and cracking. Curing, on the other hand, ensures that the finish sets properly, providing long-lasting protection and shine. Let’s dive into the specifics of creating the ideal drying conditions and understanding the timeframes for different finishes.
Ideal Drying Conditions
Creating the perfect environment for drying your maple wood is essential. You’ll want to keep the area well-ventilated to help moisture escape. A fan can be a great help here.
Maintain a consistent temperature, ideally between 65°F and 75°F. Extreme temperatures can cause issues with drying too fast or too slow.
Humidity levels should be moderate. Too much moisture in the air can prolong drying time, while too little can lead to cracking.
Timeframes For Different Finishes
Understanding how long each type of finish needs to dry and cure can save you a lot of frustration.
Oil-based finishes typically take longer to dry, around 24 to 48 hours. These finishes are great for deep, rich color but require patience.
Water-based finishes dry much quicker, often within 4 to 6 hours. They are ideal if you’re short on time but still want a quality finish.
Polyurethane finishes can vary. Some dry in about 24 hours, but it’s best to wait a full 48 hours to ensure complete curing. This finish provides excellent durability.
Have you ever rushed a project only to find the finish didn’t look right? Taking the time to let your wood dry and cure properly can make all the difference.
Whether you’re a seasoned woodworker or a weekend DIY enthusiast, the drying and curing stages are your keys to success. Take your time, follow these guidelines, and you’ll achieve a stunning result.

Credit: www.amazon.com
Buffing And Polishing
Buffing and polishing maple wood ensures a smooth and shiny finish. After sanding, use a buffing wheel to remove any scratches. Finish with a polishing compound to achieve a glossy surface.
Buffing and polishing maple wood can transform a simple piece into a stunning masterpiece. Whether you’re working on furniture or a decorative item, mastering these techniques will make your projects shine. Let’s delve into the specifics of choosing the right buffing pads and polishing techniques.
Choosing The Right Buffing Pads
Selecting the correct buffing pads is crucial for achieving a smooth, glossy finish on maple wood.
Soft pads are ideal for gentle polishing, while firmer pads work better for more intense buffing. If you’re unsure which to choose, consider the condition of your wood.
For slightly rough surfaces, firmer pads can help smooth out imperfections. On the other hand, if your wood is already fairly smooth, soft pads will add that final touch of brilliance.
Polishing Techniques
Applying polish correctly can make all the difference. Begin by applying a small amount of polish to your chosen pad.
Use circular motions to distribute the polish evenly across the wood surface. Avoid applying too much polish at once to prevent streaks and buildup.
As you polish, notice how the wood’s natural grain starts to shine. This is a sign you’re doing it right.
Have you ever wondered how professionals achieve that flawless finish? The key lies in patience and consistency.
Do you have a favorite technique that works wonders for you? Sharing your experiences can help others perfect their craft too.
Maintaining The Finish
Maintaining the finish of maple wood ensures its beauty lasts. With proper care, your maple wood furniture or flooring will remain stunning. This section will guide you through essential cleaning tips and touch-up procedures.
Cleaning Tips
Regular cleaning keeps maple wood looking fresh. Use a soft cloth to dust the surface. Avoid using harsh chemicals. Instead, opt for a mild soap solution. Mix a few drops of dish soap with warm water. Dampen the cloth and wipe the wood gently. Dry the surface with a clean, dry cloth.
Avoid excess moisture. Water can damage the finish. Never soak the wood. For stubborn spots, use a soft-bristle brush. Gently scrub the area, then dry it immediately. Protect the finish by using coasters under drinks. This prevents water rings and stains.
Touch-up Procedures
Small scratches can be fixed easily. Use a wood stain marker that matches your maple wood. Gently fill in the scratch. Wipe away excess stain with a cloth. For deeper scratches, use wood filler. Apply it to the scratch and let it dry. Sand it lightly, then apply matching stain.
For worn-out areas, lightly sand the surface. Use fine-grit sandpaper. Clean the dust and apply a new coat of finish. Allow it to dry completely. Regular touch-ups keep your maple wood looking new. Follow these steps to maintain its natural charm and durability.
Troubleshooting Issues
Troubleshooting issues while finishing maple wood is essential for achieving a smooth, polished surface. Even with careful preparation, problems can arise. Addressing these issues promptly can make the difference between a perfect finish and a flawed one. Let’s dive into some common problems and how to fix them.
Fixing Surface Imperfections
Surface imperfections like dents, scratches, and rough patches can ruin the look of finished maple wood. Sand the surface with fine-grit sandpaper. This will smooth out minor imperfections. Use a sanding block for even pressure.
For deeper dents or scratches, try using a wood filler. Apply the filler with a putty knife. Let it dry completely. Then sand it smooth to match the surrounding surface.
Dealing With Discoloration
Discoloration can occur due to uneven stain absorption. Start by sanding the wood evenly. This helps the stain to penetrate consistently. Clean the surface to remove dust.
If discoloration persists, try using a wood conditioner. Apply it before staining. This helps the wood absorb the stain more evenly. Follow the manufacturer’s instructions for the best results.
Credit: www.woodworkersjournal.com
Frequently Asked Questions
What Is A Good Finish For Maple Wood?
A good finish for maple wood includes polyurethane, tung oil, or lacquer. These finishes enhance durability and highlight the wood’s natural beauty.
How Do You Finish Raw Maple?
Sand the maple wood smoothly. Apply a wood conditioner. Stain the wood if desired. Finish with polyurethane or varnish. Let it dry completely.
What Is The Best Treatment For Maple Wood?
The best treatment for maple wood is a clear polyurethane finish. This protects and enhances its natural beauty. Ensure proper sanding before application for a smooth finish.
How Do You Finish Maple Without Yellowing?
Use a water-based polyurethane finish to avoid yellowing. Apply thin coats, sanding lightly between them. This keeps maple looking natural.
Conclusion
Finishing maple wood can be a rewarding project. Follow the steps carefully. Choose the right finish for your needs. Sand the wood smoothly. Apply the finish evenly. Allow proper drying time. Your maple wood will look beautiful and last longer.
Enjoy your woodworking journey.