
To get the best wood for your project, start by identifying the right species for your needs, like oak for strength or pine for affordability. Visit a local lumberyard or sawmill for the best selection and expert advice. Always inspect each board for defects like warping, cracks, or excessive knots before you buy to ensure a legendary result.
Hello there, fellow maker! My name is Meraj Murad, and I’ve spent countless hours in my workshop. I know the feeling well. You have a brilliant project in your mind—a beautiful bookshelf, a sturdy coffee table, or a unique gift. But then you hit the first, and biggest, hurdle: getting the right wood. It can feel like a frustrating quest. You go to a big box store and see warped boards and high prices. You hear terms like “quarter sawn” and “moisture content” and your head starts to spin. It’s enough to make you put your tools away. But don’t worry.
Finding great wood is a skill, and it’s one you can learn right now. I’m here to guide you through every step, making it simple and even fun. Let’s turn that frustration into confidence and find you some truly legendary wood for your next masterpiece.
What Makes a Piece of Wood “Legendary”?
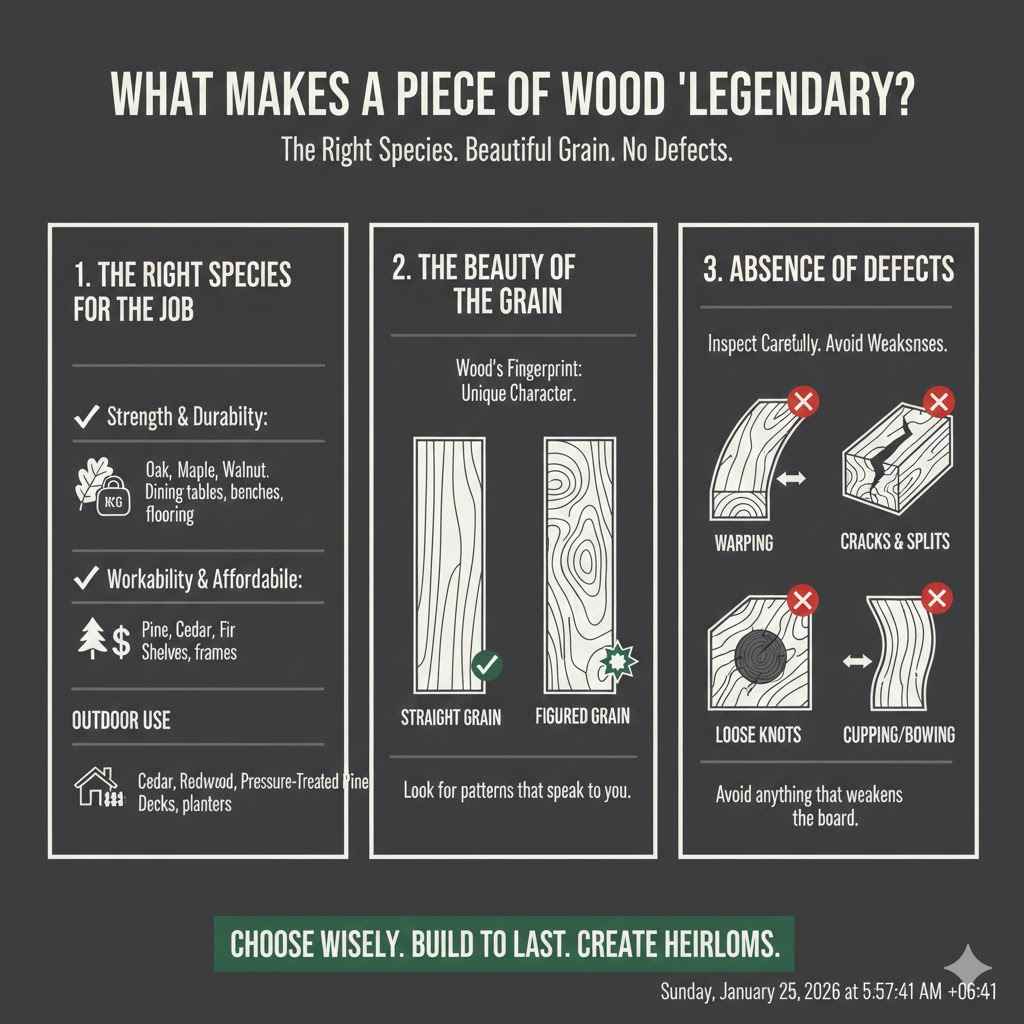
Before we go hunting, let’s talk about what we’re looking for. You might hear seasoned woodworkers talk about finding a “perfect” or “legendary” board. They’re not just being dramatic! A truly great piece of wood can elevate a simple project into a work of art. It’s the difference between a wobbly table that lasts a year and a family heirloom that lasts generations. So, what are the key ingredients of a legendary piece of wood?
The Right Species for the Job
Not all wood is created equal. Different tree species produce wood with vastly different characteristics. Choosing the right one is the first step on your quest. Think about what your project needs to do.
- Strength and Durability: For projects that will see a lot of use, like a dining table, workbench, or flooring, you need a hardwood. Oak, maple, and walnut are fantastic choices. They resist dents and scratches and can hold up for decades.
- Workability and Affordability: If you’re just starting out or working on a decorative project like a picture frame or a small shelf, softwoods are your friend. Pine, cedar, and fir are generally less expensive and easier to cut and shape with basic hand tools.
- Outdoor Use: For a planter box, deck, or outdoor bench, you need wood that can fight off moisture and insects. Cedar, redwood, and pressure-treated pine are champions in this category due to their natural resistance to rot and decay.
The Beauty of the Grain
The grain is the wood’s fingerprint. It’s the pattern of fibers you see on the surface, and it’s what gives each board its unique character. A straight, consistent grain can look clean and modern. A swirling, figured grain, like you might find in curly maple or bird’s-eye maple, can be breathtakingly beautiful and become the centerpiece of your project. When you’re at the lumberyard, take a moment to look at the patterns. Don’t just grab the first board on the stack. Look for one that speaks to you.
Absence of Defects
This is where a sharp eye pays off. A “defect” is anything that weakens the board or makes it difficult to work with. Some common issues to watch out for include:
- Warping: This is when a board isn’t flat. It can cup (curve across the width), bow (curve along the length), or twist. Lay the board on a flat surface to check.
- Cracks and Splits: Look closely at the ends of the board. Cracks, also called “checks,” can spread and ruin your project.
- Knots: Knots are the dark circles where branches once grew. Small, tight knots can add character. Large, loose knots can fall out and weaken the board significantly.
Finding a board with the right species, a beautiful grain, and minimal defects is the goal. This is the wood that makes your projects easier to build and more stunning to look at.
Where to Get Wood: Your Treasure Map
Now that you know what to look for, where do you go to find it? Your options are much wider than the local home improvement store. Knowing how to get wood legends arceus-style means knowing where the hidden gems are. Let’s explore the best hunting grounds.
The Big Box Home Improvement Store
This is where most beginners start, and that’s okay! Places like Home Depot or Lowe’s are accessible and convenient. They are great for construction-grade lumber like pine 2x4s and common project boards.
- Pros: Convenient locations, easy to navigate, good for standard-sized lumber and plywood.
- Cons: Limited selection of hardwood species, wood quality can be inconsistent (you’ll have to dig through the stack to find good boards), and prices for specialty woods can be high.
- Best For: Framing, simple shelving projects, and getting pressure-treated lumber for outdoor use.
The Local Lumberyard
This is a major step up. A dedicated lumberyard is a woodworker’s paradise. They specialize in wood, and their staff are usually incredibly knowledgeable. This is the place to go when you need high-quality hardwoods like oak, cherry, maple, or walnut.
- Pros: Huge selection of high-quality domestic and exotic hardwoods, knowledgeable staff who can offer advice, and the ability to buy wood in various thicknesses and lengths. You can often find much better quality boards than at a big box store.
- Cons: Can be intimidating for a beginner, and you might need to know some specific terminology. Prices can vary.
- My Tip: Don’t be afraid to ask for help! Tell the staff what you’re building. They want to help you succeed. This is the best place to learn.
The Sawmill
For the truly adventurous, going directly to a sawmill is an amazing experience. A sawmill is where logs are cut into boards. Here, you can often find unique local species and buy “rough-sawn” lumber that hasn’t been smoothed or planed yet.
- Pros: Fantastic prices (often the cheapest option), access to unique wood species native to your area, and the ability to find large, unusual slabs (perfect for tables or benches).
- Cons: The wood is rough and will require more work to prepare (you’ll need a planer and jointer or a lot of hand-tool skill). The wood may also not be properly dried, requiring you to dry it yourself.
- Best For: Woodworkers with some experience and the tools to mill their own lumber.
Online Wood Suppliers
Believe it or not, you can order high-quality wood online and have it shipped to your door. This is a great way to get your hands on exotic species or specific sizes you can’t find locally.
- Pros: Virtually unlimited selection of wood from all over the world, convenient, and you can order specific dimensions.
- Cons: You can’t inspect the wood before you buy, shipping can be expensive, and there’s always a risk of receiving a board you’re not happy with.
- My Tip: Stick to reputable suppliers with good return policies. Read reviews from other woodworkers before placing a large order.
Reclaimed Wood Sources
Reclaimed wood is lumber salvaged from old buildings, barns, or even wine barrels. It has a rich history and a unique character that you can’t replicate with new wood.
- Pros: Environmentally friendly, incredible character with old nail holes and saw marks, and often features wood from old-growth forests that is very stable.
- Cons: Can be expensive, may contain hidden nails or screws that can damage your tools, and requires careful cleaning and inspection.
- Where to Find It: Look for architectural salvage yards or specialized reclaimed lumber dealers. Sometimes you can find it on local marketplaces.
| Wood Source | Best For | Selection | Price | Effort Required |
|---|---|---|---|---|
| Big Box Store | Beginners, Construction Lumber | Low | Medium | Low |
| Local Lumberyard | All Skill Levels, Hardwoods | High | Medium-High | Low |
| Sawmill | Intermediate/Advanced, Bulk Buys | Varies (Local Species) | Very Low | High |
| Online Supplier | Specific/Exotic Species | Very High | High (with shipping) | Low |
| Reclaimed Dealer | Character Pieces, Rustic Projects | Unique | High | Medium |
A Beginner’s Checklist for Inspecting Wood
You’ve arrived at the lumberyard. In front of you is a towering stack of beautiful wood. It’s exciting! But now it’s time to put on your inspector’s hat. Taking a few extra minutes to inspect each board will save you hours of frustration later. Here’s your simple checklist.
Step 1: The Eye Test
Start by just looking at the board. Pull it from the stack and hold it up. Look down its entire length from one end, like you’re aiming a rifle. This is the best way to spot any warping.
- Check for Bow: Does it curve along its length like a banana?
- Check for Cup: Does it curve across its width like a shallow bowl?
- Check for Twist: Do the corners lift off the ground like a propeller? A slight warp can often be fixed with milling, but avoid anything that looks like a pretzel.
Step 2: Surface Inspection
Run your eyes and hands over the flat faces and edges of the board. What do you see?
- Knots: Are there any large knots? Are they “tight” (solid) or “loose” (look like they could fall out)? Avoid boards where large knots are near the edge, as this is a weak point.
- Cracks (Checks): Look very closely at the ends of the board. Small hairline cracks are common, but avoid anything deep or long, as these will only get worse.
- Grain Pattern: Is the grain straight or figured? Does it look like something you want to feature in your project?
Step 3: Consider the Moisture Content
This is a more advanced step, but it’s crucial. Wood shrinks and moves as it dries. If you build with “wet” wood, your project can warp, crack, and pull itself apart over time. Lumber sold for furniture should be kiln-dried to a moisture content (MC) of about 6-8%. Reputable lumberyards will sell properly dried wood, but it never hurts to check. A moisture meter is a fantastic tool for a serious woodworker. It has two small pins that you press into the wood to get an instant reading.
Step 4: Think About Your Project
Always buy more wood than you think you’ll need. A good rule of thumb is to add at least 20% to your final measurements. This gives you room to cut away any defects at the ends of the boards and to account for any mistakes you might make. It’s always better to have a little leftover than to run out and have to make another trip.
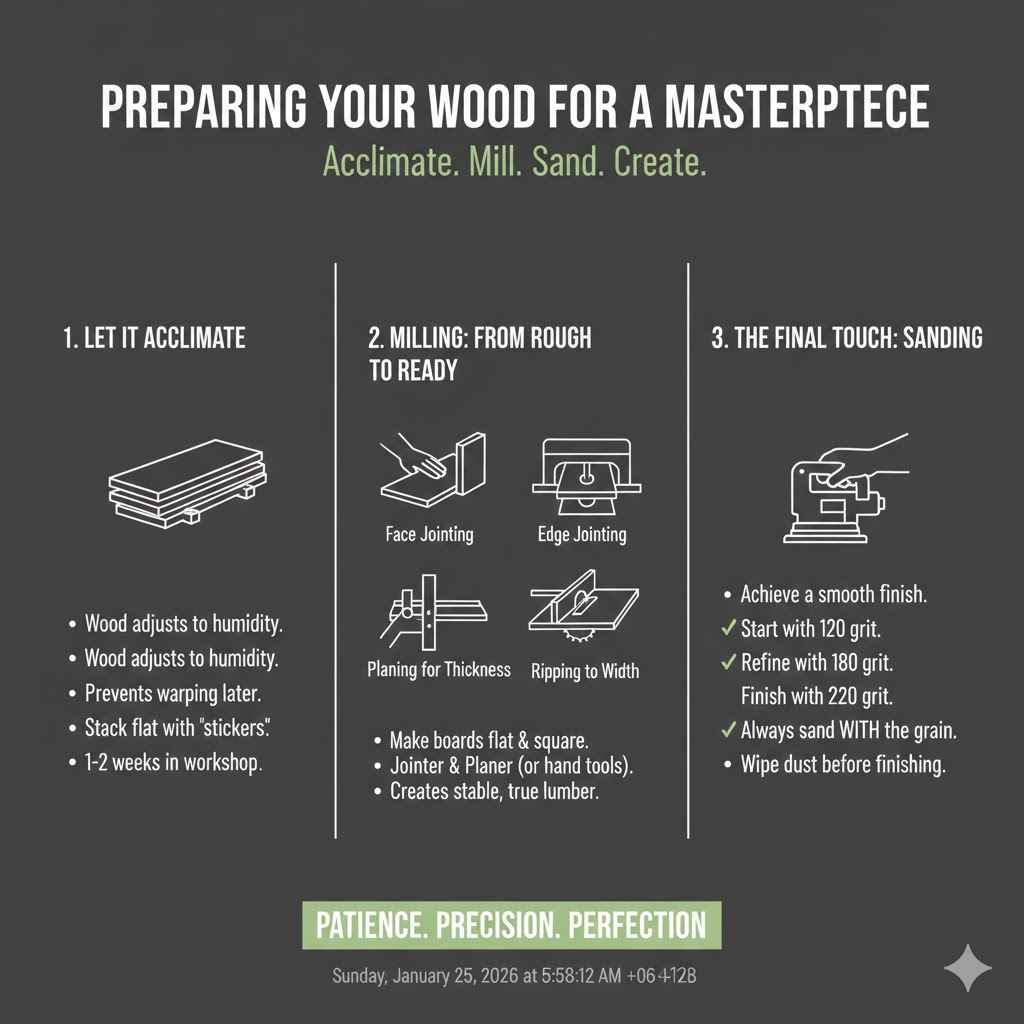
Preparing Your Wood for a Masterpiece
You’ve successfully navigated the lumberyard and brought home a beautiful stack of wood. Congratulations! But don’t start cutting just yet. Proper preparation is the final, crucial step to ensure your project is a success.
Let It Acclimate
Wood is like a sponge; it absorbs and releases moisture from the air around it. Your workshop has a different humidity level than the lumberyard where the wood was stored. You need to let the wood get used to its new home before you start working with it. This process is called acclimation.
Lay the boards flat in your workshop, separated by small sticks (called “stickers”) to allow air to flow around all sides. Let them sit for at least a week—two weeks is even better. This allows the wood to stabilize and finish any moving it’s going to do. Skipping this step is a common cause of projects warping after they’re built.
Milling: From Rough to Ready
If you bought rough-sawn lumber, or if your boards have a slight warp, you’ll need to mill them. Milling is the process of making your boards perfectly flat, square, and consistent in thickness. The typical process uses two machines: a jointer and a planer.
- Face Jointing: The first step is to create one perfectly flat face on the board using a jointer.
- Edge Jointing: Next, you press that flat face against the jointer’s fence to create one perfectly square edge.
- Planing for Thickness: Now you take the board to the thickness planer. With the flat, jointed face down, the planer cuts the opposite face parallel, making the board a consistent thickness.
- Ripping to Width: Finally, you use a table saw to rip the board to its final width, placing the jointed edge against the fence for a perfectly parallel cut.
If you don’t have a jointer and planer, you can achieve similar results with hand planes, but it takes more time and skill. Some lumberyards also offer milling services for a fee, which can be a great option for beginners.
The Final Touch: Sanding
Sanding is what makes your wood feel silky smooth and ready for a finish. The key is to work your way up through different grits of sandpaper. Don’t skip grits!
- Start with a medium grit, like 120, to remove any machine marks.
- Move up to 180 grit to refine the surface.
- Finish with 220 grit for a super-smooth feel.
Always sand with the grain of the wood, not against it, to avoid creating visible scratches. After your final sanding, wipe the wood down with a cloth to remove all the dust before applying your stain or finish.
Frequently Asked Questions (FAQ)
What’s the best wood for a beginner’s “legendary” project?
Poplar is a fantastic choice for a first hardwood project. It’s relatively inexpensive, easy to work with, and takes paint beautifully. For a stained project, consider cherry. It’s a bit more expensive but is very stable and has a gorgeous color that deepens with age.
How can I tell if wood is dry enough to use without a meter?
It’s tricky, but you can look for clues. Kiln-dried wood from a reputable dealer is usually safe. If you’re using reclaimed or air-dried wood, look for weight and sound. Drier wood is lighter than wet wood of the same size. Tapping it should produce a clear, ringing sound, not a dull thud. However, a moisture meter is the only way to be certain.
Is it cheaper to buy rough-sawn wood?
Yes, rough-sawn lumber is almost always cheaper than pre-surfaced lumber (often labeled S4S, for “surfaced four sides”). However, you must factor in the cost of the tools needed to mill it (jointer, planer) or the time it will take to do it by hand. For your first few projects, buying S4S wood is often the more practical choice.
What is “reclaimed wood” and is it hard to work with?
Reclaimed wood is lumber recycled from old structures. It’s prized for its character and stability. It can be challenging to work with because it often contains old nails, dirt, and uneven surfaces. Always go over it carefully with a metal detector before cutting, and be prepared for some extra cleaning and milling work.
How do I store wood properly once I get it home?
The best way to store wood is to stack it horizontally on a flat, level surface. Separate each layer of boards with evenly spaced stickers (small, dry sticks of wood) to allow for good airflow. This prevents the wood from trapping moisture and warping. Avoid storing wood directly on a concrete floor.
Can I use wood I find in my backyard?
Using wood from a fallen tree on your property can be very rewarding, but it’s a long process. This “green” wood needs to be sealed on the ends immediately to prevent cracking and then stacked and air-dried for a very long time—a general rule is one year per inch of thickness. For more information on safely and legally sourcing wood, check resources from your state’s Department of Natural Resources or the USDA Forest Service.
Should I buy hardwood or softwood?
It depends entirely on your project. Use hardwoods (like oak, maple, walnut) for furniture, cutting boards, and anything that needs to be durable and long-lasting. Use softwoods (like pine, fir, cedar) for construction framing, outdoor projects, or simple indoor projects where you want a rustic look or plan to paint.
| Wood Type | Common Examples | Pros | Cons | Best For |
|---|---|---|---|---|
| Hardwood | Oak, Maple, Cherry, Walnut | Durable, Strong, Beautiful Grain | More Expensive, Harder to Work | Fine Furniture, Cabinets, Flooring |
| Softwood | Pine, Fir, Cedar, Spruce | Affordable, Lightweight, Easy to Cut | Dents Easily, Less Durable | Construction, Shelving, Outdoor Projects |
Your Quest Awaits
Finding the right wood is more than just a chore; it’s the first, most exciting step of the creative process. It’s a treasure hunt. The feeling of discovering that one perfect board—the one with the mesmerizing grain and the perfect color—is a joy that never gets old. It connects you to your project long before you make the first cut. You now have the map and the knowledge you need. You know what to look for, where to look, and how to prepare your prize when you get it home.
Don’t be intimidated. Walk into that lumberyard with confidence. Ask questions. Take your time. The perfect piece of wood for your next legendary project is out there waiting for you. Now go and find it.