
Making shiplap boards with a table saw is easier than you think. You can create beautiful, rustic walls right at home.
Shiplap boards add a charming look to any space. They are popular in many home design projects. Whether you want to update your living room or give your bathroom a fresh feel, shiplap can help. It is cost-effective and straightforward to make.
All you need is a table saw and some basic materials. In this guide, you will learn how to cut and prepare shiplap boards. No special skills are required. Even beginners can handle this project. So, let’s dive in and see how you can transform your home with homemade shiplap boards.
Introduction To Shiplap Boards
Shiplap boards have become a favorite among DIY enthusiasts and interior designers. Their rustic charm and versatility make them a perfect choice for various projects, from accent walls to furniture. If you’ve ever wondered how to make your own shiplap boards using a table saw, you’re in the right place.
What Is Shiplap?
Shiplap is a type of wooden board used commonly for constructing barns, sheds, and homes. The defining feature of shiplap is the rabbet, or groove, cut into the edges of each board. This allows the boards to overlap, creating a tight seal that is both functional and visually appealing.
Many people recognize shiplap from its prominent use in modern farmhouse designs. It offers a clean, yet textured look that can transform any room into a cozy space. What’s more, making shiplap boards at home is a rewarding project that allows for customization in both size and finish.
Benefits Of Shiplap
Shiplap boards bring several benefits to your home decor. Firstly, their overlapping design ensures a sturdy and durable surface. This makes shiplap an excellent choice for both interior and exterior projects.
Secondly, shiplap is highly versatile. Whether you’re adding it to a living room wall or using it to create custom furniture, it offers a timeless appeal that blends well with different styles. Additionally, shiplap can be painted or stained to match your desired aesthetic.
Finally, making your own shiplap boards can be cost-effective. Purchasing pre-made shiplap can be expensive, but with a table saw and some basic woodworking skills, you can create high-quality boards at a fraction of the cost. Have you ever tried creating something unique for your home? The satisfaction of DIY projects is unparalleled, and making shiplap boards is no exception.
Are you excited to get started on your own shiplap project? Let’s dive deeper into the process and discover how you can transform plain wood into beautiful shiplap boards using a table saw.
Essential Tools And Materials
Creating shiplap boards with a table saw is a rewarding project. To achieve the best results, you need the right tools and materials. Below, we break down the essentials you’ll need for this task.
Table Saw
The table saw is the heart of this project. Ensure your table saw is powerful and reliable. A saw with adjustable settings will help you make precise cuts. Keep your saw blade sharp for clean, smooth edges on your shiplap boards.
Measuring Tape
Accurate measurements are crucial. Use a reliable measuring tape to mark your wood correctly. Double-check your measurements to avoid mistakes. Precision ensures your shiplap boards fit together perfectly.
Safety Gear
Safety should always be a priority. Wear safety goggles to protect your eyes from wood dust and debris. Use ear protection to shield your ears from loud noises. Consider wearing gloves to protect your hands from splinters and sharp edges.
Wood Selection
Choose the right type of wood for your project. Pine, cedar, and reclaimed wood are popular choices. Ensure the wood is straight and free from knots or warping. Proper wood selection affects the final look and durability of your shiplap boards.
Preparing Your Workspace
Set up your workspace by clearing clutter and ensuring good lighting. Secure the table saw on a stable surface for safety. Organize necessary tools within easy reach.
Preparing your workspace is the first step in making shiplap boards with a table saw. A well-organized space can make the process smoother and safer. Let’s dive into how you can set up your table saw and ensure safety measures.
Setting Up The Table Saw
Begin by placing your table saw on a sturdy, flat surface. This ensures stability while cutting. Make sure there’s enough space around the saw for you to move freely.
Adjust the blade height to match the thickness of your wood. This ensures precise cuts without damaging the wood.
Use a measuring tape to align the rip fence accurately. This will help you make straight and even cuts. Remember, precision is key when working with wood.
Ensuring Safety Measures
Safety should always be your top priority. Wear safety goggles to protect your eyes from sawdust and wood chips. Ear protection is also essential to guard against the loud noise of the saw.
Make sure the table saw is unplugged before making any adjustments. This simple step can prevent accidental starts and potential injuries.
Keep a push stick handy to guide the wood through the saw. This keeps your hands at a safe distance from the blade.
Is your workspace well-lit? Proper lighting helps you see the cutting line clearly, reducing the risk of mistakes.
Have you ever had a near-miss while working with power tools? It can be a wake-up call to double-check your safety measures. Always take a moment to review your setup before you start cutting.
By following these steps, you’ll create a safe and efficient workspace, ready for your shiplap board project.
Measuring And Marking The Wood
Measuring and marking the wood are crucial steps in making shiplap boards with a table saw. Accurate measurements ensure each board fits perfectly. Proper marking guidelines help in precise cuts. Let’s dive into the details for perfect shiplap boards.
Accurate Measurements
First, measure the length and width of each board. Use a tape measure for this. Ensure the measurements are exact. Write them down. Double-check your numbers. Accuracy is vital for a perfect fit.
Measure twice, cut once. This old saying is true. Mistakes in measuring can lead to wasted wood. Take your time. Be careful. Use a ruler or a straight edge for straight lines. Keep your pencil sharp. A dull pencil can make lines hard to see.
Marking Guidelines
Start by marking your measurement points. Use a pencil or chalk. Make clear, visible marks. Draw lines where you will cut. Use a straight edge to guide your pencil. Ensure your lines are straight and even.
Marking guidelines helps in cutting. Follow your marks closely. This ensures the boards are cut to the right size. Double-check your marks. Make adjustments if needed. Precision is key for perfect shiplap boards.
Making The First Cut
Learn how to make shiplap boards with a table saw. Start by measuring and cutting the boards to size. Ensure precise cuts for a perfect fit.
Making the First Cut is a critical step in creating shiplap boards with a table saw. This process requires precision and attention to detail to ensure your shiplap boards fit together perfectly. Let’s walk through this first cut with clear, actionable steps.
Adjusting The Table Saw
Before you make your first cut, you need to adjust your table saw properly. Set the blade height to match the thickness of your wood. This ensures you cut through the board without damaging it.
Next, adjust the fence. The distance from the blade to the fence should be the width you want for your shiplap boards. Double-check these measurements for accuracy.
Make sure your blade is sharp and suitable for cutting wood. A dull blade can result in rough edges and uneven cuts.
Executing The Cut
With your table saw adjusted, it’s time to make the cut. Place your board flat on the table, against the fence. Hold the board firmly but don’t force it.
Turn on the saw and slowly push the board through the blade. Keep your hands a safe distance from the blade and use a push stick if necessary.
After the cut, inspect the board. The edge should be smooth and even. If not, you may need to adjust your saw or technique slightly.
Have you ever noticed how a small adjustment can make a big difference? Pay attention to the details, and you’ll get better results. Now, you’re ready to proceed with confidence to the next steps in creating your shiplap boards.
Would you like to learn more about making precise cuts or other woodworking tips? Let me know in the comments!
Credit: thecraftsmanblog.com
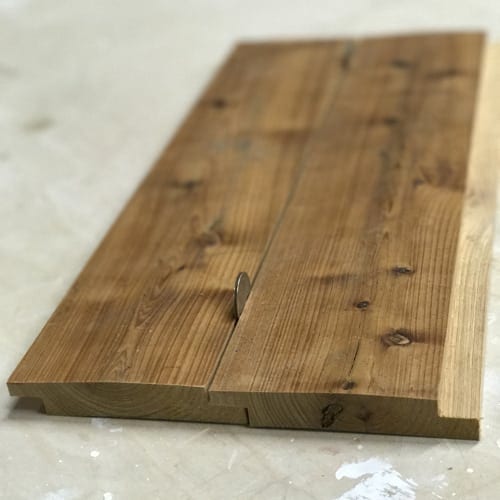
Creating The Rabbets
Creating the rabbets is a crucial step in making shiplap boards. Rabbets are grooves cut into the edges of the boards. These grooves allow the boards to overlap neatly. This creates a smooth and professional finish for your shiplap wall.
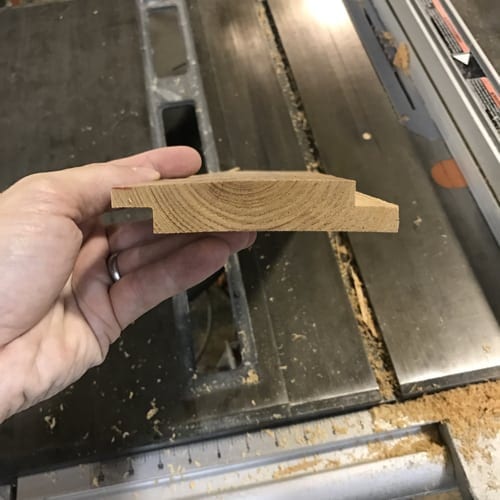
Setting Blade Depth
First, set the blade depth on your table saw. The blade depth should match the desired depth of your rabbets. Measure the thickness of your shiplap boards. Set the blade to cut about halfway through the board’s thickness. This ensures a strong and secure fit.
Cutting The Rabbets
Next, position the board on the table saw. Align the edge with the blade. Turn on the saw. Carefully push the board through the blade. Keep your hands at a safe distance. Repeat this process for each board. Ensure each rabbet is cut evenly.
For a cleaner cut, use a featherboard. A featherboard helps keep the board steady. It also reduces the risk of kickback. This makes the cutting process safer and more precise.
Smoothing And Finishing
Smoothing and finishing your shiplap boards is crucial. It gives your project a polished look. Proper sanding and finishing ensure durability and aesthetics. Let’s dive into the steps for a smooth finish.
Sanding The Edges
First, sand the edges of your shiplap boards. Use medium-grit sandpaper. This removes any rough spots and splinters. Work your way around all edges. Make sure every edge feels smooth to touch. This step is essential for a neat appearance.
After medium-grit, switch to fine-grit sandpaper. This further smooths out the edges. It also prepares the wood for the finish. Don’t rush this process. Take your time to achieve the best results.
Applying Finish
Next, apply the finish to your shiplap boards. Choose a finish that suits your project. Stains, oils, and paints are common options. Use a brush or cloth to apply the finish evenly. Make sure to cover all surfaces, including edges.
Allow the first coat to dry completely. Check the drying time on the product label. After the first coat dries, lightly sand the surface again. Use fine-grit sandpaper. This step helps the second coat adhere better.
Apply a second coat of the finish. This ensures a smooth, durable surface. Let it dry completely before handling or installing the boards. Now, your shiplap boards are ready to shine.

Credit: www.youtube.com
Installing Shiplap Boards
Installing shiplap boards can transform the look of any room. Whether you aim for a rustic charm or a modern touch, it’s a beautiful addition. Follow these steps for a smooth installation process.
Preparation For Installation
Start with a clean workspace. Remove any furniture or obstacles from the area. Gather all necessary tools: nails, a hammer, a level, and a measuring tape. Ensure your shiplap boards are cut to the desired length.
Measure the wall where you plan to install the shiplap. Mark the studs with a pencil. These marks will guide you during the nailing process. It’s crucial to nail into the studs for a secure fit.
Mounting The Boards
Begin at the bottom of the wall. Place your first shiplap board level and nail it into the studs. Use a level to ensure it’s straight. This first board sets the standard for the rest.
Continue placing boards on top of each other. Ensure the tongue and groove fit snugly. Use spacers if needed to keep consistent gaps between boards. Nail each board into the studs for stability.
Check each row with a level. Make adjustments as needed. This will keep your installation looking professional. Once all boards are mounted, fill any nail holes with wood filler. Sand the filled spots smooth.
Maintenance Tips
Maintaining your shiplap boards is crucial for their longevity and appearance. With the right care, your boards will stay looking great for years. Here are some maintenance tips to keep in mind.
Routine Care
Regular dusting helps keep shiplap boards clean. Use a soft cloth or duster. Avoid harsh chemicals that can damage the wood. A mild soap and water solution works well for deeper cleaning. Dry the boards thoroughly after washing. This prevents moisture damage.
Handling Damages
Accidents happen, and boards may get scratched or dented. For minor scratches, use a wood filler that matches your board’s color. Sand the area lightly and apply the filler. For deeper dents, a wood patch might be needed. Follow the manufacturer’s instructions for the best results.
If a board is severely damaged, it might need replacing. Carefully remove the damaged board and install a new one. Ensure the new board matches the existing ones in size and color.
Credit: thecraftsmanblog.com
Frequently Asked Questions
What Is The Best Tool For Making Shiplap?
The best tool for making shiplap is a table saw with a dado blade. It ensures precise cuts.
What Saw Blade Is Best For Shiplap?
A carbide-tipped saw blade with 40 to 60 teeth is best for cutting shiplap. It ensures smooth, clean cuts.
Can You Make Tongue And Groove With A Table Saw?
Yes, you can make tongue and groove joints with a table saw. Use a dado blade for best results. Make precise cuts to ensure a snug fit. Always follow safety guidelines while operating the saw.
Is It Cheaper To Make Your Own Shiplap?
Yes, making your own shiplap can be cheaper. Costs depend on materials and tools you already have.
Conclusion
Creating shiplap boards with a table saw is rewarding. This DIY project saves money and adds charm to any space. Remember to measure carefully and work safely. Practice makes perfect, so don’t get discouraged. With patience, your shiplap boards will look great.
Enjoy adding a rustic touch to your home. Happy woodworking!