
Mounting a woodworking vice is straightforward. It involves proper placement and secure attachment.
This guide will help you mount a woodworking vice with ease. A woodworking vice is essential for any woodworking project. It holds your workpiece steady, making cutting, sanding, and drilling much easier. Mounting a vice correctly ensures it functions properly and lasts longer.
You need to select the right spot on your workbench and secure it firmly. This guide will walk you through the steps, providing tips and tricks for a secure mount. Whether you’re a beginner or an experienced woodworker, this process is simple and doable. Let’s get started and make your woodworking tasks more efficient and enjoyable.

Credit: timbertime.uk
Introduction To Woodworking Vices
Woodworking vices are essential tools for any woodworker. They hold your workpiece securely, allowing you to focus on precision and detail without worrying about movement. Whether you are a novice or an experienced craftsman, understanding the importance and functionality of a woodworking vice is crucial for your projects.
Imagine working on a delicate carving or trying to cut a precise joint without a vice. It can be frustrating and inefficient. A woodworking vice eliminates these challenges, providing stability and control. Let’s dive into the different types and benefits of these indispensable tools.
Types Of Woodworking Vices
There are several types of woodworking vices, each designed for specific tasks and preferences.
- Front Vice: Attached to the front edge of a workbench, it is ideal for holding workpieces horizontally.
- End Vice: Mounted at the end of the bench, it is perfect for securing long boards and performing intricate tasks.
- Quick-Release Vice: Allows for rapid adjustments, saving time when switching between workpieces.
- Leg Vice: A traditional style, often used in heavy-duty woodworking for its strong grip.
Each type serves a unique purpose, so consider your specific needs before choosing one. I remember choosing a quick-release vice for my first project. It made changing workpieces a breeze!
Benefits Of Using A Vice
A woodworking vice offers numerous benefits that enhance your woodworking experience.
- Stability: Keeps your workpiece firmly in place, allowing for precise cuts and detailed work.
- Safety: Reduces the risk of accidents by preventing the workpiece from moving unexpectedly.
- Efficiency: Speeds up your workflow by providing a secure hold, so you can focus on the task at hand.
Have you ever struggled to hold a piece steady while trying to make a precise cut? A vice solves this problem effortlessly. The stability and control it provides are unmatched.
Do you use a woodworking vice in your projects? If not, what’s holding you back? Consider adding one to your workshop and experience the difference it makes!
Credit: woodbin.com
Selecting The Right Vice
Mounting a woodworking vice is essential for any woodworking project. Selecting the right vice can make your work easier and more efficient. Different vices offer various features suited for specific tasks. This section will guide you through choosing the best vice for your needs.
Factors To Consider
Several factors can influence your choice of a woodworking vice. First, think about the type of projects you will be working on. Large projects need a heavy-duty vice. Smaller tasks may require a lighter, more maneuverable option.
Consider the size and weight of the vice. Bigger vices are sturdy but may take up more space. A smaller vice can be more versatile and easier to handle.
Material is another key factor. Most vices are made from cast iron. It’s durable and strong. Some are made from steel. Steel vices are also durable but may be lighter.
Jaw width and opening capacity are crucial. Wider jaws hold larger pieces. A greater opening capacity allows for handling thicker materials.
Ease of installation is important. Some vices are easier to mount than others. Look for vices with clear instructions and fewer mounting requirements.
Popular Brands And Models
Several brands offer high-quality woodworking vices. Irwin is a well-known brand. Their vices are durable and reliable. The Irwin 6-inch Woodworking Vice is popular for its sturdiness.
Wilton is another trusted brand. Wilton vices are known for their precision and strength. The Wilton 63144 is a favorite among woodworkers for its robust design.
Yost is also a reputable name in woodworking tools. Yost vices are versatile and affordable. The Yost M9WW Rapid Action Woodworking Vice is highly recommended.
Remember to check reviews and ratings. They provide insights into the performance and reliability of the vice.
Gathering Necessary Tools And Materials
Mounting a woodworking vice properly is crucial for ensuring it provides the stability and support needed for your projects. Before you dive into the installation process, gathering the necessary tools and materials is a vital first step. Being prepared can save you a lot of time and frustration. Let’s break down what you’ll need.
Essential Tools
First, you’ll need a few basic tools that are likely already in your toolbox.
- Screwdriver: A sturdy one, preferably with a good grip.
- Drill: An electric drill will make the job much easier.
- Measuring Tape: Precision is key, so ensure you have a reliable tape measure.
- Pencil: For marking where to drill.
- Wrench: Useful for tightening bolts and screws.
These tools will help you measure, mark, and secure your woodworking vice. If you don’t have one of these, you might want to borrow or purchase it. Trust me; it’s worth having the right tools.
Required Materials
Next, let’s talk about the materials you’ll need. These are just as important as your tools.
- Woodworking Vice: Choose a vice that suits your bench and projects.
- Mounting Bolts: Ensure they are strong enough to hold the vice securely.
- Washers: These help distribute the load and protect the surface.
- Wood Screws: Essential for securing the vice to your workbench.
- Protective Gear: Safety glasses and gloves to protect yourself while working.
Having these materials ready ensures you won’t have to make a mid-project run to the hardware store. It’s always better to have a little extra on hand than to come up short.
Have you ever started a project only to find out you’re missing something crucial? It can be very frustrating. By preparing all your tools and materials beforehand, you avoid these setbacks and can focus on doing a great job. So, are you ready to get started?
Preparing Your Workbench
Before mounting a woodworking vice, your workbench needs preparation. A sturdy and well-prepared workbench enhances your woodworking experience. Follow these steps for a smooth setup.
Choosing The Location
Find a spot that offers maximum functionality. The vice should be easily accessible. Consider the height of the workbench. Ensure the location is not obstructed by other tools. It should be at a comfortable reach.
Marking The Mounting Points
Position the vice where you want it mounted. Use a pencil to mark the holes. Double-check the alignment of the marks. They should match the holes on the vice. Accuracy is key for stability.
Drill pilot holes where you marked. Pilot holes guide the screws. They prevent wood from splitting. Make sure the holes are straight. This ensures a secure fit for the vice.
Drilling Holes For The Vice
Drilling holes for the vice is a crucial step in mounting your woodworking vice. Precise drilling ensures the vice stays secure during use. Follow these steps to drill the holes correctly.
Safety Precautions
Always prioritize safety before drilling. Wear safety goggles to protect your eyes. Secure loose clothing and tie back long hair. Ensure the workspace is clear of obstructions. Use clamps to hold the wood steady.
Drilling Techniques
Mark the drill points on the wood with a pencil. Use a center punch to create small indentations at these points. This helps guide the drill bit and prevents slipping. Select the correct drill bit size for your vice bolts.
Start drilling at a low speed. Apply steady pressure without forcing the drill. Keep the drill perpendicular to the wood. This ensures straight holes. Once the holes are drilled, clean out any wood shavings. This prepares the holes for the vice installation.
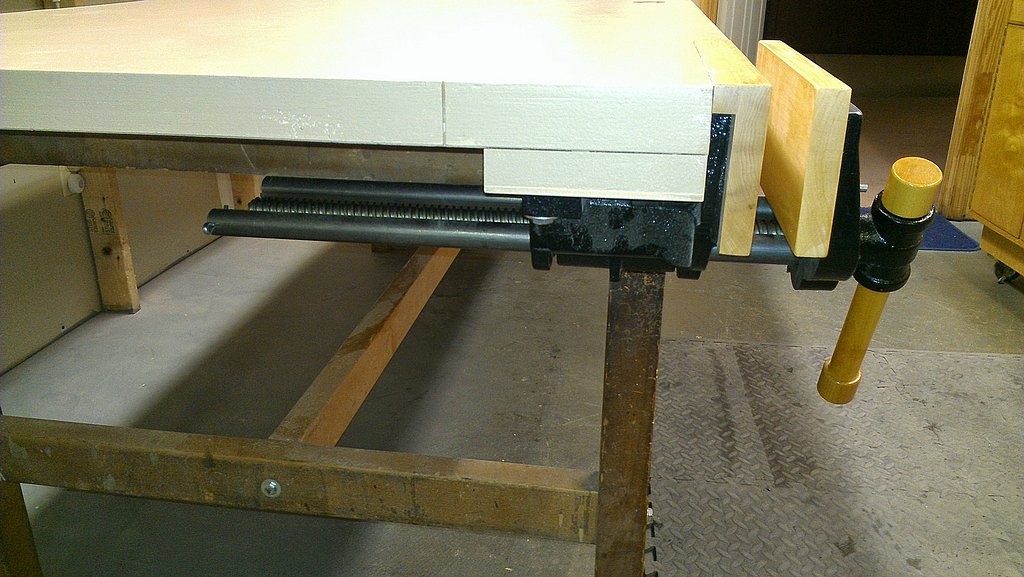
Attaching The Vice To The Workbench
Mounting a woodworking vice involves securing it firmly to the workbench with bolts. This ensures stability while working on projects. Proper alignment and tight fastening are crucial for effective use.
Attaching the Vice to the Workbench
Mounting a woodworking vice to your workbench is an essential step for any woodworker. It ensures that your projects remain steady and secure while you work. Let’s dive into the practical steps of attaching the vice to your workbench.
Inserting Bolts And Screws
First, align the vice with the edge of your workbench. This will make sure you have easy access while working on your projects.
Next, mark the holes on the workbench where the bolts and screws will go. Use a pencil for clear visibility.
Drill pilot holes where you marked. These holes will guide the bolts and screws into place without splitting the wood.
Ensuring Stability
After inserting the bolts and screws, check the vice for stability. Shake it gently to see if it moves. You don’t want any wobbling when you’re working on a delicate project.
Tighten all the bolts and screws securely. Use a wrench or screwdriver to ensure they are snug.
Test the vice with a piece of wood. Clamp it down and try some light work. This will show if the vice is holding steady.
Have you ever had a vice come loose mid-project? It’s frustrating, right? Properly mounting it prevents such mishaps.
What steps will you take to ensure your vice is securely attached? Share your thoughts in the comments!
Aligning And Adjusting The Vice
Mounting a woodworking vice can be a game-changer for your workshop. However, it’s crucial to align and adjust the vice properly to ensure it functions effectively. This section will guide you through the process of checking alignment and making necessary adjustments.
Checking Alignment
Before you tighten any screws, ensure the vice is aligned with your workbench.
Use a straight edge or a level to check the alignment. Place it along the edge of the vice and the workbench.
If the vice is not level, your projects could suffer. Uneven clamping can lead to inaccurate cuts and measurements.
Take your time with this step. A little patience now can save you a lot of hassle later.
Making Necessary Adjustments
If you find that the vice is not aligned, don’t worry. Adjusting it is straightforward.
Loosen the mounting screws slightly. This gives you some wiggle room to make the necessary adjustments.
Re-check the alignment with your straight edge or level. Adjust the position of the vice until it lines up perfectly with your workbench.
Once aligned, tighten the screws securely. Double-check the alignment to ensure it hasn’t shifted during tightening.
Remember, a well-aligned vice means better precision and efficiency in your woodworking projects. Have you ever struggled with an uneven vice? Share your experience in the comments below!
Maintaining Your Woodworking Vice
Maintaining your woodworking vice is crucial for its longevity and performance. Regular care will keep it functioning smoothly and efficiently. A well-maintained vice ensures precise and secure clamping, making your woodworking projects easier and more enjoyable.
Regular Cleaning
Clean your woodworking vice after each use. Remove sawdust, wood chips, and debris. Use a brush or compressed air for thorough cleaning. Wipe it down with a clean, dry cloth. This prevents buildup and keeps the vice in good condition.
Lubrication Tips
Lubricate the moving parts of your vice regularly. Use a light machine oil for this purpose. Apply the oil to the screw and guide rods. This reduces friction and ensures smooth operation. Avoid over-lubricating, as excess oil can attract dust and debris.
Troubleshooting Common Issues
When you’re working on mounting a woodworking vice, you might run into a few common issues. Knowing how to troubleshoot these can save you time and frustration. Below, I’ll share some tips on handling loose vices and misalignment problems.
Loose Vice
A loose vice can be a real headache, especially when you’re in the middle of a project. If your vice keeps slipping, it could be due to a few reasons.
- Check the bolts: Make sure they are tight. Loose bolts can cause the vice to shift.
- Inspect the mounting surface: If the surface is uneven, it might cause the vice to wobble.
- Use a locking mechanism: Some vices come with a locking feature. Ensure it’s engaged properly.
I remember mounting my first vice and overlooking the bolt tightness. It kept moving, making my work difficult. Tightening the bolts fixed the issue instantly.
Misalignment Problems
Misalignment can mess up your precision. If your vice is not aligned correctly, here’s what you can do:
- Double-check measurements: Ensure the vice is mounted at the correct height and angle.
- Use a level: Place a level on the vice to confirm it’s straight.
- Adjust mounting points: Sometimes, shifting the mounting points slightly can correct alignment issues.
Misalignment happened to me once when I was in a hurry. I skipped checking the level. Later, I had to redo the entire setup. Taking a few extra minutes to ensure alignment saves a lot of trouble.
Have you ever faced issues with your woodworking vice? What steps did you take to resolve them? Share your experiences in the comments below! Your insights might help someone else.

Credit: www.youtube.com
Frequently Asked Questions
Where To Mount A Woodworking Vise?
Mount a woodworking vise on the edge of a sturdy workbench. Position it near a corner for versatility. Ensure it’s at a comfortable height for your work.
What Is The Best Position For A Woodworking Vise?
The best position for a woodworking vise is at the front-left corner of the workbench. This placement offers optimal support and accessibility for right-handed users.
What Should Be Avoided When Mounting Work In A Vise?
Avoid using excessive force, clamping irregular shapes, over-tightening, placing hands near clamping areas, and using a damaged vise.
What Clamping Position Should Be Considered When Mounting A Vise On A Workbench?
Place the vise near the front edge of the workbench for optimal accessibility and stability. Ensure it’s positioned for comfortable use.
Conclusion
Mounting a woodworking vice can seem tricky at first. But, with these simple steps, you’ll have it done in no time. Remember to measure twice and drill once. Secure your vice tightly for best results. A properly mounted vice will make your projects easier.
Happy woodworking!