
Removing finishing nails from wood can be tricky. It requires care to avoid damaging the surface.
Finishing nails, though small, can be a challenge to remove without the right technique. Whether you’re tackling a home improvement project or fixing a furniture piece, knowing how to safely remove these nails is essential. The right tools and methods can make this task much easier and prevent damage to your woodwork.
In this guide, we’ll explore straightforward steps and tips to help you effectively remove finishing nails from wood. Ready to get started? Let’s dive into the process and ensure your wood stays in great shape.
Preparing The Workspace
Preparing your workspace before removing finishing nails from wood is crucial for a smooth and safe operation. With the right setup, you can avoid damage to the wood and ensure your safety. Let’s dive into the steps needed to get your workspace ready for this task.
Gather Necessary Tools
First, gather all the tools you’ll need. This includes a hammer, pliers, a pry bar, and a piece of scrap wood. These tools will help you remove the nails efficiently without damaging the wood.
Having everything within reach saves time and keeps your focus on the task. Consider laying out the tools on a clean cloth or tray to keep them organized.
Remember to check the condition of your tools. Sharp or damaged tools can cause more harm than good.
Ensure Safety Measures
Before you start, think about safety. Wear safety goggles to protect your eyes from flying debris. Gloves are also a good idea to protect your hands from splinters and sharp edges.
Clear the area of any unnecessary items. You don’t want to trip over anything while working. A clutter-free workspace is not just safer, but it also makes the job less stressful.
Consider the lighting in your workspace. Good lighting ensures you can see what you’re doing clearly, reducing the risk of mistakes and injuries.
Have you ever started a project without proper preparation and faced setbacks? Taking these simple steps can make a world of difference. What other safety measures do you think are essential?

Credit: www.youtube.com
Using A Claw Hammer
Removing finishing nails from wood can be a daunting task. Using a claw hammer is one of the most effective methods. A claw hammer helps you remove nails quickly and safely. This section will guide you through the proper techniques. It ensures you do not damage the wood or hurt yourself.
Proper Grip Technique
Hold the hammer firmly for a good grip. Place your thumb along the handle. This helps control the hammer better. Always use both hands for better stability. One hand on the handle, the other near the claw. This gives you more control and precision.
Removing Nails Safely
Position the claw under the nail head. Press down gently to avoid damaging the wood. Lift the hammer slowly to pull the nail out. If the nail is stubborn, wiggle it slightly. This loosens the nail for easier removal. Always pull the nail straight out. This prevents bending or breaking the nail.
Leveraging A Nail Puller
Removing finishing nails from wood can be a tricky task. One effective method is leveraging a nail puller. This tool makes the job easier and safer. Let’s dive into the process of choosing the right nail puller and how to use it effectively.
Choosing The Right Nail Puller
First, understand the types of nail pullers available. Each type serves a different purpose. The most common types include the cat’s paw, the pry bar, and the end-cutting pliers.
The cat’s paw is great for digging into the wood and pulling the nail out. It’s perfect for flush or slightly protruding nails. The pry bar works well for larger nails. It offers good leverage and reduces the risk of damaging the wood. End-cutting pliers are ideal for smaller nails and delicate tasks. They grip the nail head and pull it out with minimal damage.
Choose a nail puller based on the nail size and the wood’s condition. Ensure the tool is in good shape. A dull or damaged tool can damage the wood further.
Step-by-step Process
Begin by positioning the nail puller near the nail head. For a cat’s paw, place the curved end under the nail head. Tap it gently with a hammer if needed. This helps to lift the nail slightly.
For a pry bar, slide the flat end under the nail head. Use a gentle rocking motion. This helps to loosen the nail. With end-cutting pliers, grip the nail head firmly. Apply steady pressure to pull the nail out.
Apply even pressure while pulling the nail. This prevents damage to the wood. If the nail resists, try wiggling it slightly. This can help to loosen it. Once the nail is out, check the wood for any damage. Fill any holes with wood filler if needed.
Utilizing Pliers
Removing finishing nails from wood can be a tricky task, but utilizing pliers can make the job easier. Pliers offer a firm grip and precise control, making them an essential tool for this task. Let’s dive into the types of pliers you can use and how to effectively remove nails with them.
Types Of Pliers
There are several types of pliers that can be used for removing finishing nails:
- Needle-nose pliers: These have long, slender jaws that can reach into tight spaces.
- Slip-joint pliers: Adjustable and versatile, perfect for gripping nails of various sizes.
- End-cutting pliers: Designed specifically for cutting and pulling nails, offering maximum leverage.
Choosing the right type of pliers depends on the nail’s location and the amount of precision needed.
Effective Nail Removal
Start by gripping the nail firmly with your chosen pliers. Ensure the grip is strong to avoid slipping.
Gently wiggle the nail back and forth. This loosens it from the wood, making it easier to pull out.
Once the nail is loose, slowly pull it out while maintaining a firm grip. This prevents damage to the wood.
Have you ever struggled with removing finishing nails without damaging the wood? Using pliers can save you time and effort.
Remember, patience is key. Rushing can lead to splintered wood or broken nails.
If a nail is particularly stubborn, consider using a combination of pliers. Start with needle-nose pliers for precision, then switch to end-cutting pliers for leverage.
Utilizing pliers effectively makes the process smoother and less frustrating. Next time you face the challenge of removing finishing nails, reach for your pliers and follow these steps.
What type of pliers do you find most effective for nail removal? Share your thoughts and experiences below!
Employing A Pry Bar
A pry bar can easily remove finishing nails from wood. Place the pry bar under the nail head and gently lift. This method prevents wood damage and ensures clean removal.
Removing finishing nails from wood can be a tricky task. One of the most effective tools for this job is a pry bar. This method ensures you can remove the nails without causing significant damage to the wood. Let’s delve into how to use a pry bar effectively and the best practices to follow.
Best Practices
When using a pry bar, always start by assessing the area around the nail. Ensure the wood is stable and won’t splinter easily. Position the pry bar under the nail head carefully. Apply gentle pressure to avoid any sudden jerks that might damage the wood.
Use a small block of wood as a fulcrum under the pry bar. This helps distribute the pressure evenly, making it easier to lift the nail. If the nail resists, wiggle the pry bar slightly to loosen it gradually. Patience is key here.
Avoiding Wood Damage
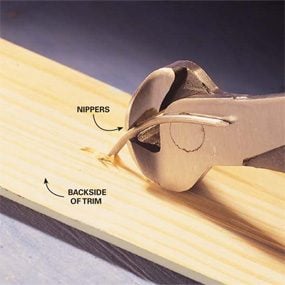
To protect the wood, always use a thin, flat pry bar. Thicker bars can cause more damage. Insert the pry bar under the nail head as shallowly as possible. This reduces the risk of gouging the wood surface.
Use a cloth or piece of cardboard under the pry bar to prevent scratches. This simple step can save you a lot of time in repairs later. If the nail is stubborn, consider using a pair of pliers to pull it out gently instead of forcing it with the pry bar.
Remember, the goal is to remove the nail without leaving a mark. Take your time and handle the wood with care. Have you ever tried using a pry bar to remove nails? What challenges did you face? Share your thoughts and tips below!
Credit: www.familyhandyman.com
Applying Heat
If you’ve ever tried to remove finishing nails from wood, you know it can be a tricky task. Sometimes, those nails just don’t want to budge. One effective method to make the process easier is applying heat. By using heat, you can loosen the grip of the nails, making them easier to extract without damaging the wood.
Using A Heat Gun
A heat gun is a handy tool for this job. I remember the first time I tried it. It was a game-changer. You simply direct the heat gun at the area around the nail for a few seconds. The heat softens the wood fibers and the adhesive that might be holding the nail in place. This makes it easier to pull out the nail with minimal effort.
When using a heat gun, keep it moving to avoid scorching the wood. You don’t need a professional-grade tool; a basic model will do the trick. Just be sure to follow safety precautions, like wearing gloves and working in a well-ventilated area.
Benefits Of Heat Application
Applying heat has several benefits. Firstly, it reduces the risk of splitting the wood, which can happen if you forcefully pry out the nails. Heat application makes the wood more pliable, reducing damage.
Secondly, using heat can save you time. Instead of struggling with stubborn nails, a few seconds of heat can loosen them up, making the removal process quicker. Lastly, it’s less physically demanding. You won’t need to exert as much force, which can be a relief if you’re working on a large project.
Have you ever struggled with removing finishing nails? Maybe it’s time to give heat a try. Your woodwork projects will thank you for it!
Handling Stubborn Nails
Removing finishing nails from wood can be tricky. Use a small pry bar or pliers for better control. Protect the wood surface with a thin piece of cardboard or scrap wood.
Handling stubborn nails can be a real challenge, especially when you’re dealing with finishing nails deeply embedded in wood. These nails are designed to be discreet and strong, making them difficult to remove without damaging the wood. However, with the right techniques and a bit of patience, you can handle even the toughest nails without causing harm to your project.
Techniques For Tough Nails
First, try using a claw hammer. Position the claw under the nail head and gently rock the hammer back and forth. This motion helps loosen the nail without splitting the wood.
If the claw hammer doesn’t work, switch to a pry bar. Insert the pry bar under the nail head and apply steady pressure. This tool provides more leverage, making it easier to pull out stubborn nails.
For exceptionally tough nails, consider using a nail puller. This specialized tool grips the nail and allows you to extract it with minimal effort. It’s especially useful for nails that are flush with the surface.
Common Mistakes To Avoid
Avoid using excessive force. Prying too hard can damage the wood around the nail, leaving unsightly marks. Instead, apply steady, controlled pressure.
Don’t use the wrong tools. A flathead screwdriver, for instance, lacks the necessary leverage and can slip, causing injury or damage.
Resist the urge to cut corners. Removing nails carefully ensures your wood remains intact. Taking shortcuts often leads to more work in the long run.
Have you ever damaged a piece of furniture while removing a nail? Share your story below, and let’s learn from each other’s experiences.
Post-removal Care
Remove finishing nails carefully to avoid damaging the wood. Use a pry bar or pliers for precision. Clean up the area after removal for a smooth finish.
Removing finishing nails from wood can be a meticulous task, but the post-removal care is equally crucial. Proper care ensures that the wood remains in good condition and is ready for any future projects. Let’s dive into the essential steps for repairing the wood surface and cleaning up after nail removal.
Repairing Wood Surface
Once the nails are out, inspect the wood for any damage.
Small holes or dents: Fill them with wood filler. Use a putty knife to press the filler into the hole. After it dries, sand it down to create a smooth surface.
Larger damage: For deeper gouges or splits, you might need a more robust solution. Consider using epoxy wood filler, which can be molded and shaped to match the wood’s texture.
Refinishing: If the wood surface looks uneven, lightly sand the entire area. This helps in blending the filled spots with the surrounding wood. After sanding, you can stain or paint the wood to give it a fresh look.
Cleaning Up
Cleaning up after removing nails is often overlooked, but it’s important for maintaining a safe and tidy workspace.
Collect debris: Gather any loose nails and wood shavings. Use a vacuum or a broom to ensure no small pieces are left behind, which could cause accidents later.
Wipe down surfaces: Use a damp cloth to wipe down the wood. This removes any dust and ensures the wood is ready for any finishing touches you plan to add.
Store tools properly: Make sure to clean and store your tools in their designated places. This extends the life of your tools and keeps your workspace organized.
Have you ever found an unexpected use for leftover wood filler or discovered a unique way to repair wood? Share your experiences in the comments!
Taking the time to care for your wood post-nail removal can make all the difference in your next project. Your attention to detail will pay off, ensuring a smooth and professional finish.

Credit: www.reddit.com
Frequently Asked Questions
How Do You Remove Finishing Nails Easily?
Use a pry bar or pliers to remove finishing nails. Protect the surface with a scrap piece of wood.
How To Remove Nails From Wood Without Damaging Wood?
Use a claw hammer or pry bar gently. Place a thin piece of wood under the tool to protect the surface. Rock the tool side-to-side to slowly remove the nail.
How Do You Hide Finishing Nails In Wood?
To hide finishing nails in wood, countersink them slightly below the surface. Fill the holes with wood filler, then sand smoothly. Finally, stain or paint to match the wood.
How To Remove Fascia Board Nails?
Use a pry bar or hammer to gently lift the fascia board. Grip the nail head with pliers and pull out. Repeat for each nail.
Conclusion
Removing finishing nails from wood can be simple with the right technique. Always use the proper tools. Patience is key to avoid damaging the wood. Practice makes perfect, so don’t be afraid to learn. Following these steps ensures a smooth process.
Your wood projects will look cleaner and more professional. Keep these tips in mind for future projects. Happy woodworking!