
Using a miter saw can be safe if you follow proper guidelines. These saws are powerful tools that need careful handling to avoid accidents.
Whether you’re a DIY enthusiast or a professional, knowing how to safely use a miter saw is crucial. This tool can make precise cuts, but it can also be dangerous if not used correctly. Understanding the basics of miter saw safety can prevent injuries and help you achieve better results in your projects.
In this guide, we will cover the essential safety tips and practices for using a miter saw. By following these guidelines, you can work confidently and keep your workspace safe. Let’s get started on making your cutting tasks efficient and secure.
Credit: m.youtube.com
Introduction To Miter Saws
Using a miter saw can be a game-changer for your woodworking projects. It offers precision, ease, and speed that hand tools just can’t match. But before you dive in, it’s crucial to understand the basics of this powerful tool.
What Is A Miter Saw?
A miter saw is a specialized tool designed to make precise crosscuts and miters in a workpiece. It’s often used in woodworking, carpentry, and for DIY home improvement projects. The saw blade is mounted on a swing arm that pivots left or right to produce angled cuts.
The first time I used a miter saw, I was amazed at how accurately I could cut angles for my picture frames. It saved me hours compared to using a manual saw. Have you ever struggled to get perfect angles by hand?
Types Of Miter Saws
There are several types of miter saws, each suited to different tasks. Understanding these can help you choose the right one for your needs.
- Basic Miter Saw: Ideal for simple, straight cuts. It’s perfect if you’re new to woodworking and need a reliable, easy-to-use tool.
- Compound Miter Saw: This type allows you to tilt the blade for beveled cuts in addition to the standard miter cuts. It’s great for projects like crown molding.
- Sliding Compound Miter Saw: This saw has a sliding feature for cutting wider boards. If you often work with large pieces of wood, this is a must-have.
- Dual Compound Miter Saw: This advanced saw can tilt both left and right, offering maximum versatility and precision.
Each type has its advantages. For instance, the sliding compound miter saw helped me complete a deck renovation much faster. Have you thought about which type would best suit your projects?
Understanding these basics ensures you can make an informed decision and use the tool safely. So, which miter saw do you think will elevate your next woodworking project?
Essential Safety Gear
Wearing safety glasses protects eyes from flying debris. Ear protection reduces noise exposure. Gloves offer grip and hand safety.
Safety is paramount when using a miter saw. Neglecting protective gear can lead to severe injuries. Equip yourself properly before you start.
Protective Eyewear
Always wear protective eyewear. Miter saws can produce flying debris that can cause serious eye injuries. Invest in high-quality safety glasses with side shields for maximum protection.
Once, a small wood chip flew into my eye. Luckily, I was wearing safety glasses. It could have been much worse without them.
Hearing Protection
Miter saws are loud, often exceeding safe noise levels. Prolonged exposure can damage your hearing. Use earplugs or earmuffs to protect your ears.
I used to skip ear protection, thinking it wasn’t necessary. After a few headaches and ringing ears, I learned my lesson.
Proper Clothing
Avoid loose clothing. It can get caught in the saw, leading to accidents. Wear fitted clothes, and always tie back long hair.
Once, my loose sleeve got too close to the blade. It scared me enough to always wear snug-fitting clothes now.
Each piece of safety gear plays a crucial role. What safety gear do you prioritize when working with power tools?
Setting Up Your Workspace
Arrange your tools and materials neatly before starting. Ensure proper lighting and a clear, stable work surface. Always wear safety goggles and keep fingers away from the blade while using the miter saw.
Setting up your workspace properly is crucial for safely using a miter saw. A well-organized and safe environment can make all the difference in achieving precise cuts and avoiding accidents. Let’s delve into the key aspects you need to consider.
Stable Work Surface
Your miter saw should be placed on a stable and flat surface. This ensures that your saw won’t wobble during cutting, which could lead to inaccurate cuts or even dangerous slips. I remember the first time I used a miter saw on an uneven table; it was a nerve-wracking experience, and my cuts were all over the place. Don’t make the same mistake.
Consider using a dedicated workbench or a miter saw stand. These are designed to keep your saw secure and at a comfortable working height. If you don’t have these, a sturdy table will do. Just make sure it doesn’t shake when you push down on it.
Adequate Lighting
Good lighting is essential when working with power tools. Poor visibility can lead to mistakes and accidents. Make sure your workspace is well-lit, so you can clearly see your cutting lines and the material you’re working with.
Natural light is ideal, but if that’s not an option, invest in some good quality work lights. Position them so that there are no shadows cast on your work area. You’d be surprised how much easier and safer your work becomes with proper lighting.
Workspace Cleanliness
A clean workspace isn’t just about aesthetics; it’s a safety necessity. Keep your work area free of debris, sawdust, and offcuts. These can create tripping hazards or get in the way of your saw’s operation.
I once tripped over a piece of scrap wood while carrying a freshly cut piece, nearly losing my balance. Ever since, I make it a point to clean up as I go. Use a shop vacuum or a broom to keep your area tidy. It also helps in maintaining the longevity of your tools by preventing dust build-up.
How do you maintain your workspace? Do you have any tips or tricks that make your setup more efficient? Share in the comments below.
Pre-use Inspection
Inspect the miter saw for damages before use. Check for any loose parts and ensure the blade is sharp. Confirm safety features are working properly.
Before diving into your woodworking project, it’s crucial to perform a pre-use inspection on your miter saw. This step ensures your safety and the precision of your cuts. Let’s break it down into three key tasks.
Check Blade Condition
Inspect the blade for any signs of damage or wear. Look for chipped or dull teeth. A damaged blade can lead to inaccurate cuts and increase the risk of accidents.
Think back to the last time you tried cutting with a dull blade. Did your cuts come out clean? Probably not.
Make it a habit to check your blade before every use. You wouldn’t drive a car with a flat tire, so don’t cut wood with a faulty blade.
Ensure Proper Blade Installation
Make sure the blade is securely installed. A loose blade can wobble and cause uneven cuts.
Check the arbor nut and tighten it if necessary. If you’re unsure how tight it should be, consult your miter saw’s manual.
Remember, a securely installed blade is not just about precision; it’s about safety. Would you trust a saw with a loose blade? Neither should you.
Verify Saw Calibration
Calibration is key to accurate cuts. Check the angle settings and ensure they match the intended cut.
Use a square to verify the alignment of the blade to the table. If it’s off, adjust it.
Think of calibration like setting a GPS. You wouldn’t start a journey without confirming your destination. The same applies to your miter saw.
Taking these steps can save you from potential mishaps. Have you ever skipped a pre-use inspection and regretted it later? Share your thoughts below.
Safe Operating Techniques
Miter saws are powerful tools. They can make precise cuts in wood, metal, and plastic. But, they can also be dangerous if not used correctly. Learning safe operating techniques is crucial. This ensures you stay safe while getting the job done efficiently.
Proper Hand Placement
Always keep your hands away from the blade. Place your hands on the saw’s handles. This helps you maintain control. Never reach over the blade, even if the saw is off.
Securing The Workpiece
Ensure your workpiece is clamped securely. Loose pieces can shift and cause accidents. Use a clamp or a miter saw fence. This prevents the workpiece from moving during the cut. Stability is key to safety.
Avoiding Kickback
Kickback happens when the saw binds in the cut. This can send the workpiece flying. To avoid this, cut slowly and steadily. Do not force the saw through the material. Let the saw do the work. Ensure the blade is sharp and clean. Dull blades can cause binding and kickback.
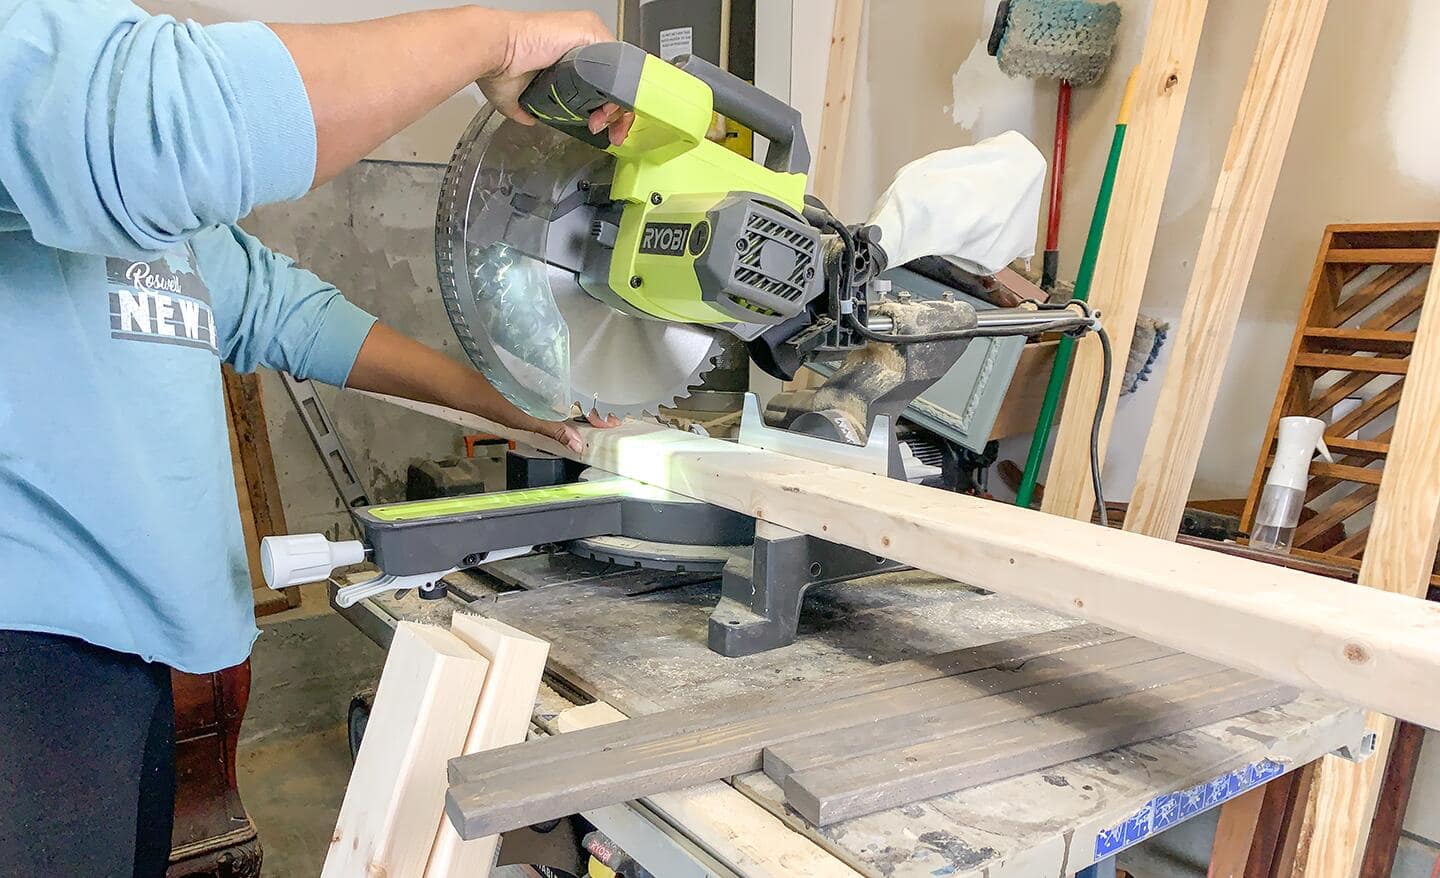
Credit: www.homedepot.com
Making Accurate Cuts
Making accurate cuts with a miter saw is essential for any woodworking project. It ensures pieces fit together perfectly, maintaining structural integrity and a polished finish. Below, we explore crucial steps to achieve precise cuts with a miter saw.
Measuring And Marking
Begin by measuring your material carefully. Use a reliable tape measure for precision. Double-check your measurements to avoid errors. Mark your cut line clearly with a pencil or chalk. Ensure the mark is visible and straight. This step is vital for accurate cuts.
Using A Stop Block
A stop block helps in making repetitive cuts with the same length. Attach the stop block to your miter saw’s fence. Position it at the desired length. Slide the material against the stop block for each cut. This technique saves time and enhances accuracy.
Adjusting Angles
Adjusting angles on a miter saw is straightforward. Unlock the angle adjustment lever. Set the saw to the required angle using the built-in scale. Lock the lever to secure the angle. Make a test cut on scrap material to verify accuracy. Adjust if necessary.
These steps are crucial for making precise cuts with a miter saw. Proper measuring, marking, using a stop block, and adjusting angles will ensure your woodworking projects are successful.
Maintenance And Care
Ensure the miter saw is clean before each use. Always wear safety glasses and keep hands away from the blade. Secure the material firmly to avoid accidents.
Maintaining and caring for your miter saw ensures its longevity and optimal performance. Routine maintenance is essential for safety and precision in your woodworking projects. Let’s dive into some practical steps to keep your miter saw in top shape.
Cleaning The Saw
After each use, clean your miter saw to prevent dust buildup. Use a brush or compressed air to remove sawdust from the blade, table, and motor vents.
Wipe the saw’s exterior with a damp cloth to remove any residual dust. This keeps the components free from clogging and ensures smooth operation.
Lubricating Moving Parts
Lubricating the moving parts of your miter saw is crucial for smooth functioning. Focus on areas like the pivot points, hinges, and the slide rails.
Apply a few drops of machine oil or a specialized lubricant to these parts. Regular lubrication reduces friction and wear, prolonging the saw’s lifespan.
Storing The Saw Safely
Proper storage of your miter saw is often overlooked but equally important. Store your saw in a dry, dust-free environment to prevent rust and corrosion.
Consider using a protective cover to shield the saw from dust and moisture. If you have children or pets, ensure the saw is stored out of reach to avoid accidents.
Maintaining your miter saw not only extends its life but also ensures your safety during use. Have you found any creative ways to keep your tools in great condition? Share your tips in the comments!
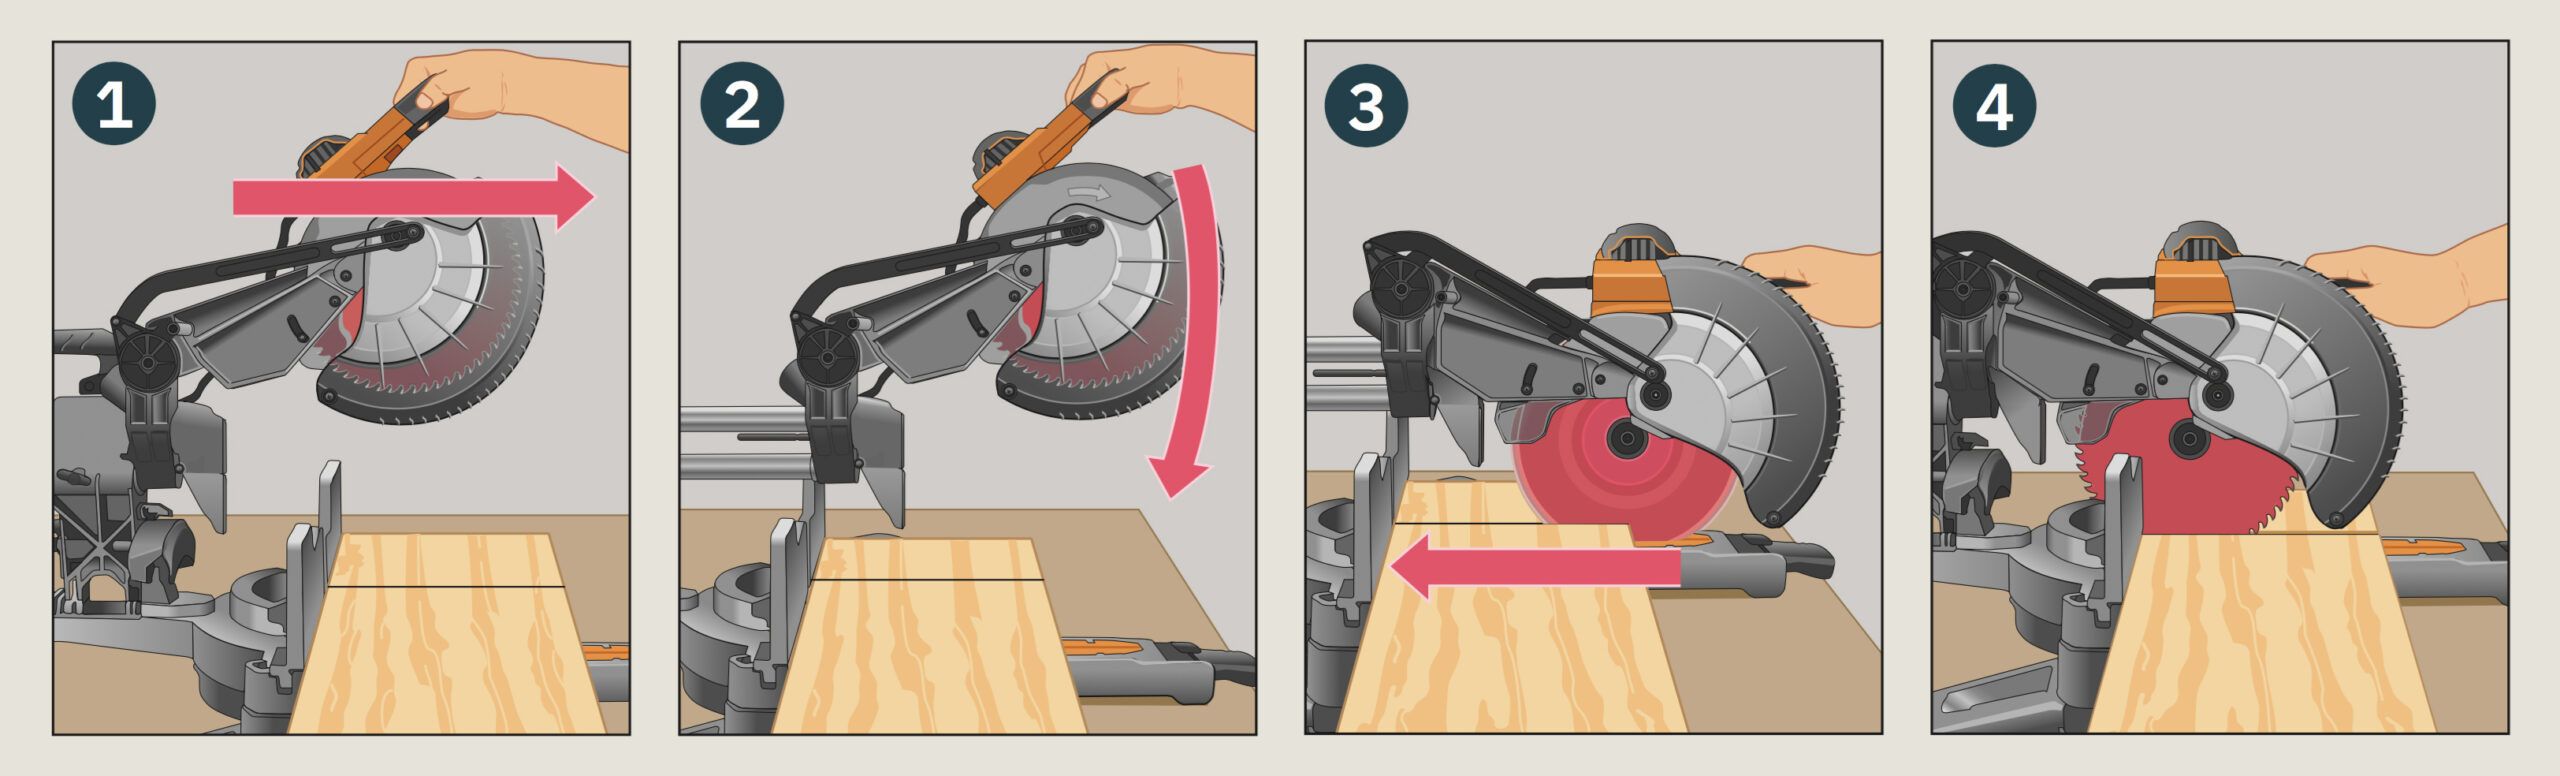
Credit: www.thisoldhouse.com
Troubleshooting Common Issues
Using a miter saw can sometimes be challenging, especially when you encounter unexpected issues. But don’t worry, most of these problems have straightforward solutions. Let’s dive into some common issues you might face and how to troubleshoot them effectively.
Blade Binding
Blade binding can be frustrating and dangerous. It usually happens when the wood pinches the blade. Ensure the wood is properly supported and avoid pushing too hard.
I remember the first time my blade bound mid-cut; it was terrifying. What I learned is that a sharp blade and smooth, steady pressure can make a huge difference. Check if your blade is dull and replace it if needed.
Using a blade with the right number of teeth for the material you’re cutting can also help. Are you using a fine-tooth blade for hardwood? Switch to a coarse one to see if it alleviates the issue.
Motor Problems
Motor issues can bring your project to a halt. If your motor isn’t starting, check the power source first. Is it plugged in securely? Try another outlet to rule out power issues.
Overheating is another common problem. Is your saw hot to the touch? Give it a break and let it cool down. Clean the vents to ensure proper airflow.
If the motor still doesn’t run smoothly, it might be an internal issue. Consult your user manual for troubleshooting tips specific to your model. Sometimes, a simple reset is all it takes to get it running again.
Inconsistent Cuts
Inconsistent cuts can ruin your project. Are your cuts not aligning as expected? First, check the miter saw’s settings. A misaligned fence or bevel can throw off your cuts.
Secure the wood firmly against the fence. Use clamps if necessary. Loose or wobbly wood can shift and result in uneven cuts.
Maintaining a steady hand is crucial. Practice makes perfect. Make a few test cuts on scrap wood to get the feel of it. Are you rushing the cut? Slow and steady ensures precision.
Troubleshooting these common issues doesn’t have to be daunting. With a bit of patience and the right approach, you can keep your miter saw in top condition and your projects on track. What challenges have you faced with your miter saw? Share your experiences in the comments below!
Frequently Asked Questions
What Are 5 Major Safety Rules When Working With The Miter Saw?
1. Wear safety goggles to protect your eyes. 2. Keep fingers at least 6 inches away from the blade. 3. Secure the workpiece firmly before cutting. 4. Use the miter saw on a stable surface. 5. Disconnect the power when changing blades.
How To Properly Use A Miter Saw?
Use a miter saw on a stable surface. Secure the material tightly. Align the blade with the cut line. Keep hands clear of the blade. Wear safety gear and operate with focus.
What Is The Biggest Hazard When Using A Miter Saw?
The biggest hazard when using a miter saw is kickback. It can cause severe injuries. Always use proper safety measures.
What Should You Avoid When Using A Mitre Saw?
Avoid wearing loose clothing. Keep hands away from the blade. Do not remove safety guards. Avoid using dull blades. Ensure the material is securely clamped.
Conclusion
Using a miter saw safely is crucial for every DIY enthusiast. Always wear safety gear. Keep your workspace clean and well-lit. Follow the manufacturer’s instructions closely. Double-check the blade’s alignment before each use. Never rush your cuts. Maintain a firm grip on the saw.
Regularly inspect and maintain your miter saw. Proper care extends its lifespan. Stay focused and alert while operating. Safe practices ensure successful and enjoyable projects. Remember, safety first leads to great results.