Building a safe wooden wheelchair ramp is all about following a proven plan. The best blueprints use a 1:12 slope, meaning one inch of rise requires one foot of ramp length. Use pressure-treated wood for durability, secure it with galvanized hardware, and always include handrails. This guide provides the simple, step-by-step plans you need for a successful build.
Building a wheelchair ramp can feel like a huge project. You want it to be safe, strong, and reliable. Many plans online are confusing or too technical. It is easy to feel overwhelmed before you even start. But building a wooden ramp is one of the most rewarding DIY projects you can do. It adds freedom and accessibility to your home. With the right guidance, you can build a ramp you are proud of. This guide will give you clear, proven blueprints to get the job done right.
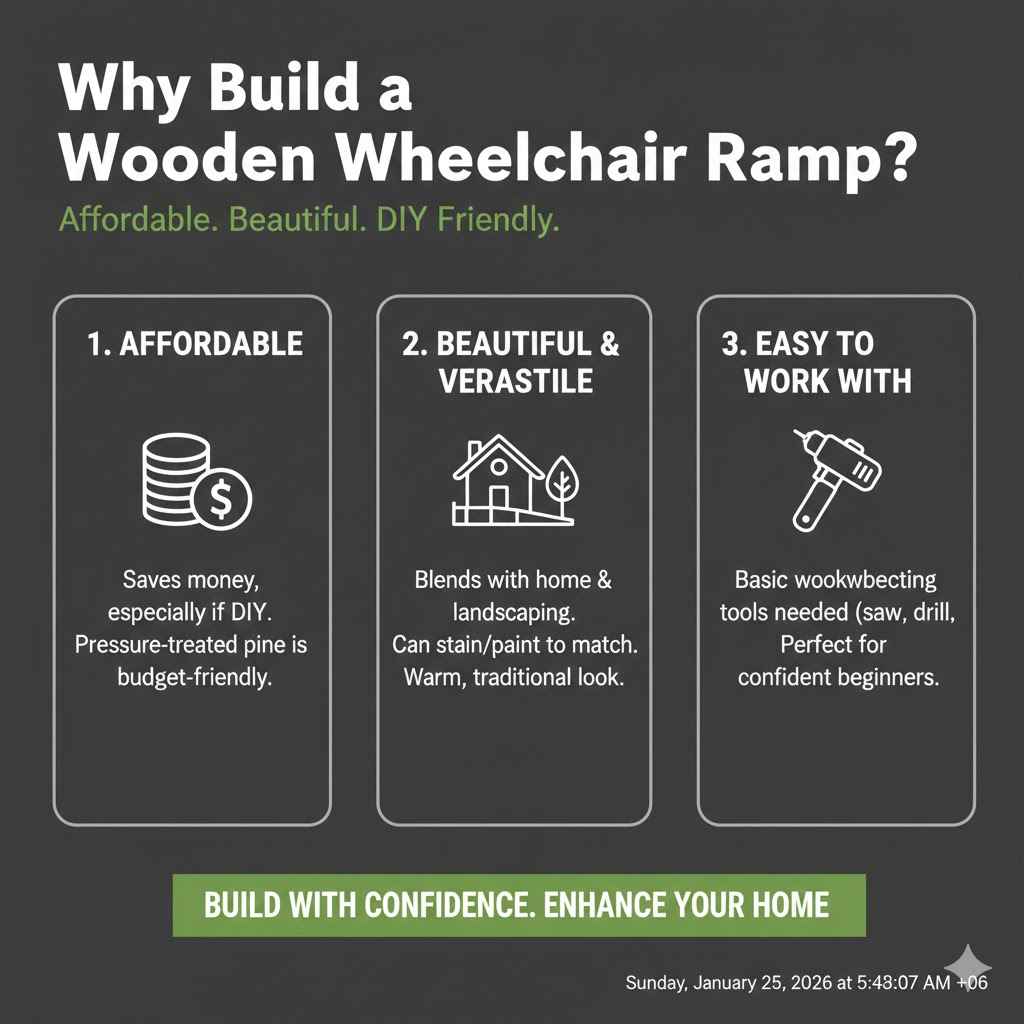
Why Build a Wooden Wheelchair Ramp?
When you need to add a ramp to your home, you have a few material choices. Concrete is permanent and expensive. Aluminum is functional but can look industrial. Wood, however, is often the perfect choice for a DIY project. It offers a unique combination of benefits that make it ideal for homeowners.
First, wood is affordable. Compared to custom-fabricated metal or poured concrete, a wooden ramp can save you a lot of money, especially if you build it yourself. Pressure-treated pine is widely available and budget-friendly.
Second, wood is beautiful and versatile. It blends naturally with your home and landscaping. You can stain or paint it to match your house, deck, or porch. It feels warm and traditional, adding to your home’s curb appeal instead of taking away from it.
Finally, wood is easy to work with. You do not need special welding equipment or concrete mixers. If you have basic woodworking tools like a saw, a drill, and a level, you have everything you need to build a sturdy wooden ramp. This makes it a perfect project for a confident beginner.
Before You Build: The 3 Golden Rules of Ramp Planning
A great ramp starts with a great plan. Before you buy a single piece of wood, you need to do some homework. Rushing this stage is the biggest mistake you can make. Taking the time to plan ensures your ramp is safe, functional, and built to last. There are three golden rules to follow.
Rule #1: Understand ADA Guidelines (Even for Home Use)
The Americans with Disabilities Act (ADA) provides guidelines for commercial ramps. While your home ramp does not legally need to meet these standards, they are the gold standard for safety. Following them is the best way to build a ramp that is easy and safe to use.
You can find the full standards at the official ADA Standards for Accessible Design website, but here are the key points for a home ramp:
- Slope: This is the most important measurement. The ADA recommends a 1:12 slope. This means for every 1 inch of vertical rise, you need 12 inches (1 foot) of ramp length. A steeper ramp is hard to use and can be dangerous.
- Width: The ramp should be at least 36 inches wide between the handrails. This provides enough space for a wheelchair to pass comfortably.
- Landings: A ramp needs a flat, level landing at the top and bottom. Each landing should be at least 60 inches by 60 inches. If your ramp changes direction, you need a landing there too. For very long straight ramps, you should have a landing for every 30 feet of length.
- Handrails: Handrails are essential for safety. They should be on both sides of the ramp. The top of the handrail should be between 34 and 38 inches above the ramp surface.
Rule #2: Measure Your Space Accurately
Now it is time to apply those guidelines to your home. Accurate measurements are critical. Grab a tape measure and a level.
- Measure the Total Rise: Place a long, straight board on the top landing (like your porch or doorstep) and extend it straight out. Make sure the board is level. Now, measure the vertical distance from the bottom of that board down to the ground where the ramp will start. This is your “total rise.”
- Calculate the Ramp Length: Use the 1:12 slope rule. For every inch of rise, you need one foot of ramp length. For example, if your total rise is 24 inches, you need a ramp that is 24 feet long (24 inches x 1 foot/inch = 24 feet).
- Check Your Space: Do you have enough room for a 24-foot ramp? Remember to include space for a 5-foot landing at the bottom. If a straight ramp is too long, you will need to design one with a turn or a switchback, which requires a landing at the corner.
Rule #3: Check Local Building Codes
This is a step many people forget. Before you build, call your local city or county building department. Ask them if you need a permit to build a wheelchair ramp. Some areas classify ramps as permanent structures that require inspection. They may also have specific rules about footing depth or handrail design. A quick phone call can save you a huge headache later. It ensures your hard work is safe and approved.
Choosing the Right Materials and Tools
With your plan in hand, it is time for the fun part: gathering your supplies. Choosing the right materials will make your ramp last for decades. Using the right tools will make the job easier and safer.
Best Wood for a Wheelchair Ramp
Your ramp will be exposed to rain, sun, and snow. You need wood that can handle the elements without rotting or warping. Pressure-treated (PT) lumber is the most common and cost-effective choice. It is chemically treated to resist moisture and insects. For other options, cedar and redwood are naturally resistant to rot but cost significantly more.
| Wood Type | Cost | Durability | Maintenance |
|---|---|---|---|
| Pressure-Treated Pine | Low | Very High (Resists rot & insects) | Needs sealing every 2-3 years |
| Cedar | Medium-High | High (Naturally resists rot & insects) | Can be left to weather gray or sealed |
| Redwood | High | Very High (Naturally resists rot & insects) | Needs sealing to maintain red color |
| Composite Decking | Very High | Excellent (Will not rot, warp, or splinter) | Low (Just needs occasional cleaning) |
For most DIYers, pressure-treated wood offers the best balance of cost and performance.
Essential Hardware and Fasteners
The wrong fasteners can rust and fail, compromising the safety of your ramp. Always use hardware rated for outdoor use with pressure-treated lumber.
- Screws: Use coated deck screws for attaching the deck boards. They are designed to resist corrosion.
- Bolts: Use hot-dip galvanized or stainless steel carriage bolts and lag bolts for connecting the main frame components. They provide incredible strength.
- Connectors: Joist hangers and other metal connectors make framing easier and stronger. Be sure they are also galvanized (look for a “ZMAX” or similar coating).
Your Complete Tool Checklist
You do not need a professional workshop, but a few key tools will make this project go smoothly. Here is a list of what you will need:
- Safety Glasses and Work Gloves
- Tape Measure
- Pencil
- Speed Square
- Chalk Line
- 4-Foot Level
- Circular Saw or Miter Saw
- Power Drill/Driver with bits
- Socket Wrench Set
- Shovel and Post Hole Digger
- Wheelbarrow (for mixing concrete)
The Proven Blueprint: A Step-by-Step Guide to Building Your Ramp
This guide covers a standard, straight ramp. The principles are the same for more complex designs. Remember to work slowly and measure twice before every cut. Safety is your top priority.
Step 1: Prepare the Foundation
The foundation supports the entire ramp. It must be solid. You will start the ramp on a small concrete pad and support it along its length with posts set in concrete.
- Lay Out the Ramp: Use stakes and string to outline the ramp’s footprint on the ground. This helps you visualize the final structure.
- Pour the Bottom Pad: At the base of the ramp, pour a small concrete pad (about 2 ft x 4 ft). This provides a smooth, solid transition from the ground to the ramp. Make sure it is level.
- Dig Post Holes: Along the layout lines, dig holes for your support posts (usually 4×4 posts). The holes should be about 24 inches deep or below the frost line in your area. Check with your local building department for this requirement. A good resource for regional frost line data can be found at university extension websites like the University of Minnesota Extension. Space the posts no more than 6-8 feet apart.
Step 2: Build the Ramp Frame (The Joists)
The frame is the skeleton of your ramp. It is usually made from 2×8 or 2×10 pressure-treated lumber. Think of it as building a long, angled ladder.
- Attach a Ledger Board: Securely bolt a 2×8 ledger board to the house or porch where the ramp will start. This board must be perfectly level and attached firmly to the house’s framing.
- Cut the Side Joists: These are the long boards that run the entire length of the ramp. Cut them to the length you calculated earlier. You will also need to cut a slight angle at the bottom so they sit flat on the concrete pad.
- Attach Joist Hangers: Nail joist hangers to the ledger board and to the inside of the two side joists.
- Cut and Install Cross-Members: Cut shorter pieces of 2×8 lumber to fit between the side joists. These are your cross-members. Install them into the joist hangers every 16 or 24 inches. This creates a strong, rigid frame.
Step 3: Install the Support Posts
Now you will set the posts that hold up the ramp frame.
- Place Posts in Holes: Put a few inches of gravel at the bottom of each post hole for drainage. Then, place your 4×4 posts into the holes.
- Position the Frame: Rest the assembled ramp frame on the posts. Use clamps to temporarily hold it in place.
- Level and Plumb: Use your level to ensure the ramp has a consistent, gentle slope. Also check that each post is perfectly vertical (plumb).
- Pour Concrete: With everything in position, mix and pour concrete into the post holes, filling them up to ground level. Let the concrete cure for at least 24-48 hours before continuing.
Step 4: Secure the Frame
Once the concrete is hard, you can permanently attach the frame.
- Attach Frame to Posts: Secure the frame to the posts using 1/2-inch galvanized carriage bolts. Use two bolts per post for a strong connection.
- Trim the Posts: Use your saw to cut the tops of the posts flush with the top of the ramp frame.
Step 5: Install the Decking
This is where your ramp starts to look finished. The decking is the surface you will walk and roll on.
- Choose Your Boards: 5/4-inch or 2×6 deck boards are excellent choices.
- Lay the First Board: Start at the top or bottom and lay your first board perpendicular to the joists. Make sure it is perfectly square.
- Continue Decking: Lay the rest of the boards, leaving a small gap (about the width of a nail) between each one. This allows rainwater to drain through.
- Fasten the Boards: Use two coated deck screws at every point where a deck board crosses a joist.
Step 6: Build and Attach Handrails
Do not skip this step. Handrails are a critical safety feature.
- Install Handrail Posts: Bolt 4×4 posts to the outside of the ramp frame every 4-6 feet. These posts should be about 42 inches tall.
- Attach the Top Rail: Attach a 2×4 or 2×6 board flat on top of the posts to create the handrail. The top of this rail should be between 34 and 38 inches from the ramp surface.
- Add a Mid-Rail: Install another 2×4 rail halfway between the ramp deck and the top rail. This prevents wheels or people from slipping off the side.
- Include a Toe Rail: It is also wise to install a small rail (like a 2×4 on its side) along the bottom edge of the ramp deck, just inside the handrail posts. This acts as a curb to stop a wheelchair wheel from accidentally rolling off the edge.
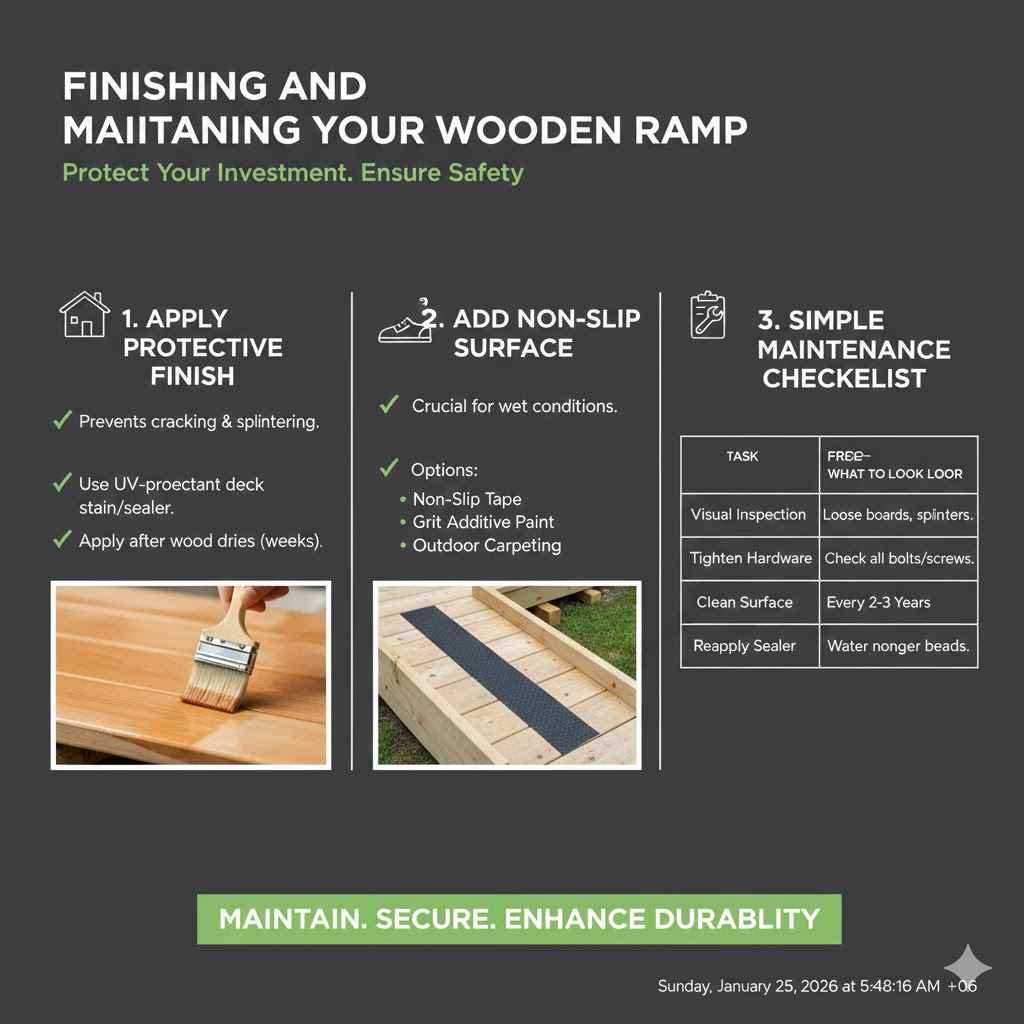
Finishing and Maintaining Your Wooden Ramp
Your ramp is built, but the job is not quite done. Proper finishing and regular maintenance will protect your investment and keep it safe for years.
Applying a Protective Finish
Even though pressure-treated wood resists rot, it can still crack and splinter from sun and water exposure. A good quality deck stain or sealer will protect it. Look for a product with UV protection and a water repellent. Apply it according to the manufacturer’s instructions, usually after the wood has had a few weeks to dry out.
Adding a Non-Slip Surface
A wet wooden ramp can be very slippery. This is a serious safety hazard. You can easily add traction in a few ways:
- Non-Slip Tape: Apply strips of heavy-duty, outdoor-rated adhesive grip tape.
- Grit Additive Paint: You can buy special porch and floor paint that has a sand-like texture mixed in.
- Outdoor Carpeting: A thin, durable outdoor carpet can be stapled down for excellent traction.
Simple Maintenance Checklist
A few minutes of inspection each year will keep your ramp in top shape.
| Task | Frequency | What to Look For |
|---|---|---|
| Visual Inspection | Every 6 Months | Loose boards, popped screws, splintering wood. |
| Tighten Hardware | Yearly | Check all bolts and screws to ensure they are tight. |
| Clean the Surface | Yearly | Use a deck cleaner and a stiff brush to remove mold, mildew, and dirt. |
| Reapply Sealer/Stain | Every 2-3 Years | When water no longer beads on the surface, it is time for a new coat. |
Frequently Asked Questions (FAQ)
How much does it cost to build a wood wheelchair ramp?
The cost varies based on size and material prices, but a typical DIY wooden ramp can cost between $25 to $50 per linear foot. A 24-foot ramp might cost between $600 and $1,200 in materials.
How long does it take to build a ramp?
For a beginner with some help, building a simple, straight ramp can take a full weekend. Plan for one day of preparation, layout, and setting posts, and a second day for framing, decking, and handrails.
Do I need a permit to build a wheelchair ramp?
It depends on your location. Many municipalities require a permit for any structure that is permanently attached to a home. Always call your local building department to ask before you start.
What is the best slope for a wheelchair ramp?
The safest and most recommended slope is 1:12. This means for every 1 inch of vertical height, you need 12 inches (1 foot) of ramp length. A gentler slope, like 1:16 or 1:20, is even easier to use, especially for those using manual wheelchairs.
Can I build a ramp without concrete footings?
It is not recommended. Concrete footings anchor the ramp securely and prevent it from shifting or sinking over time due to frost or soil movement. They are essential for a long-lasting, safe structure.
How can I make my wooden ramp less slippery in the winter?
In addition to a non-slip surface, you can use pet-safe ice melt products. Avoid rock salt, as it can damage the wood and corrode metal fasteners over time. A rubber mat at the top and bottom can also help.
Your Next Step to a Safer Home
Building a wooden wheelchair ramp is more than just a woodworking project. It is a way to provide safety, independence, and freedom for someone you care about. By breaking it down into simple steps, the process becomes manageable and deeply rewarding.
Remember the golden rules: plan carefully, measure accurately, and prioritize safety above all else. Use the right materials and follow a proven blueprint. You do not need to be a master carpenter to build a strong, reliable ramp. You just need patience and a clear plan. You now have the knowledge to build a ramp that will make a real difference in your home. It is time to get started.