
To trim a door with a circular saw, first measure and mark your cut line. Apply painter’s tape over the line and score it with a utility knife to prevent splintering. Clamp a straightedge guide to the door, accounting for your saw’s offset. Set the blade depth just past the door’s thickness and make a smooth, steady cut.
Does your door scrape against that beautiful new floor? Or maybe it sticks shut every time it gets humid. This is a super common problem in many homes. It’s frustrating, and the thought of fixing it can feel like a big deal. You might worry about making a crooked cut or chipping the paint. But what if I told you there’s a simple, safe trick to get a perfect, factory-smooth cut using a tool you probably already own? Stick with me, and I’ll show you how to trim that door perfectly. You can do this!
Why You Need to Trim a Door (and Why It Feels Scary)
First, let’s talk about why doors start to misbehave. It’s usually for one of a few simple reasons:
New Flooring: You installed thicker flooring like plush carpet or luxury vinyl plank. Now the door doesn’t have enough clearance to swing freely.
House Settling: Over time, houses settle and shift. This can knock door frames slightly out of square, causing the door to bind.
Humidity: Wood is a natural material. It swells in the humid summer months and shrinks in the dry winter. This can make a door that fits perfectly in January get stuck in July.
So, why does trimming it feel so intimidating? Most people worry about the same things:
Messing up the cut: A wavy, crooked line is the biggest fear. It can make an expensive door look cheap.
Splintering the wood: Circular saws can be aggressive. Without the right technique, they can tear out chunks of wood and paint, leaving a ragged edge.
*Ruining the door: Doors aren’t cheap! The fear of making a mistake and having to buy a whole new door is very real.
These are valid concerns! But here’s the good news: with the right method, a circular saw is the perfect tool for this job. You don’t need a thousand-dollar track saw or a professional workshop. You just need a genius trick that guarantees a straight, clean result every time.

The Genius Trick: Your Secret to a Perfect Cut
The secret isn’t one single thing, but a combination of two simple techniques. When you use them together, they make it almost impossible to fail. This method protects your door’s finish and guides your saw perfectly.
Part 1: The Splinter-Proof Shield
The number one enemy of a clean cut is “tear-out” or “splintering.” This happens when the saw blade’s teeth exit the wood, catching the surface fibers and ripping them out. Our trick stops this before it can happen.
We use two lines of defense:
- Painter’s Tape: Applying a strip of high-quality painter’s tape along your cut line works wonders. The tape holds the wood fibers down, preventing them from lifting and tearing as the blade passes through. It’s a simple but incredibly effective shield.
- Scoring the Line: This is the pro-level move. Before the saw even touches the wood, you’ll take a sharp utility knife and a straightedge and make a shallow cut directly on your line. This cleanly severs the top wood fibers, creating a perfect channel for the saw blade to follow. The saw’s teeth will cut below the scored line, leaving your visible surface edge absolutely flawless.
Part 2: The Unshakeable Guide
Trying to cut a perfectly straight line freehand is nearly impossible, even for experienced woodworkers. The secret to a laser-straight cut is not a steady hand—it’s a guide that won’t move.
Instead of relying on your ability to follow a pencil line, you’ll clamp a straightedge directly to the door. This can be a level, a piece of straight plywood, or a dedicated saw guide. Your circular saw’s baseplate will simply ride along this guide, forcing it to cut in a perfectly straight line. There’s no guesswork and no chance of wandering off course.
When you combine the splinter-proof shield with the unshakeable guide, you create a foolproof system for trimming your door. It’s simple, safe, and delivers amazing results.
Gathering Your Tools and Materials
You don’t need a lot of fancy equipment for this project. Let’s gather everything you’ll need so it’s ready to go.
Tool List:
- Circular Saw: Any standard circular saw will work. A corded saw provides consistent power, but a cordless one is fine if the battery is fully charged.
- Fine-Finish Saw Blade: This is important! Don’t use the rough blade that came with your saw. Get a blade with a high tooth count (60T or higher) for a clean, smooth cut.
- Tape Measure: For accurate measurements.
- Pencil: For marking your cut line.
- Clamps: At least two C-clamps or quick-grip clamps to hold your straightedge guide in place.
- Straightedge Guide: This can be a 4-foot level, a factory edge from a piece of plywood, or a specific circular saw guide accessory.
- Utility Knife: With a new, sharp blade for scoring.
- Sawhorses: Two sawhorses provide a stable, elevated work surface.
- Safety Gear: Safety glasses are a must. Hearing protection and a dust mask are also highly recommended. For more information on saw safety, check out the U.S. Consumer Product Safety Commission’s guide on circular saws.
Material List:
- Painter’s Tape: A quality brand that won’t leave residue.
- Sandpaper: A block with 120-grit or 150-grit sandpaper for smoothing the cut edge.
- Primer/Sealer (Optional): A small can of paint or polyurethane to seal the bottom edge of the door and protect it from moisture.
Choosing the Right Circular Saw Blade
The blade you use makes all the difference. A standard construction blade is designed for speed, not finesse. For a door, you want a blade that leaves a finish like it came from the factory. Here’s a quick guide:
| Blade Type | Tooth Count (for 7-1/4″ blade) | Best For | Why It Works |
|---|---|---|---|
| Framing/General Purpose | 24T – 40T | Rough cutting 2x4s, plywood sheathing | Fewer, larger teeth cut very fast but leave a rough, splintery edge. Avoid this for doors. |
| Fine-Finish/Plywood | 60T – 100T | Cutting doors, trim, veneers, melamine | Many small teeth take tiny bites, resulting in a super-clean cut with minimal tear-out. This is what you want. |
| Combination Blade | 40T – 50T | Cross-cutting and ripping solid wood | A good all-around blade, but a dedicated fine-finish blade is even better for this specific task. |
Invest a few extra dollars in a good fine-finish blade. It’s the single best upgrade you can make for this project.
Step-by-Step: Trimming Your Door Like a Pro
Alright, let’s get to work. Follow these steps carefully, and you’ll have that door trimmed and re-hung in no time.
Step 1: Measure and Mark Carefully
First, figure out exactly how much you need to trim. Place a straightedge on the floor across the doorway to see where the door is hitting. Measure the gap. It’s often best to trim a little less than you think—you can always take more off, but you can’t add it back! A good rule of thumb is to aim for a 1/2-inch to 3/4-inch gap between the bottom of the door and the floor.
Take the door off its hinges and lay it across your sawhorses. Measure up from the bottom of the door in at least three spots (left, middle, right) and make a small pencil mark for each. Use your straightedge to connect these marks into a single, crisp cut line.
Step 2: Apply the Painter’s Tape
Take your painter’s tape and apply a strip so that your pencil line runs right down the middle of it. Press the tape down firmly to ensure it has good contact with the door’s surface. This is your splinter guard.
Step 3: Score the Cut Line
Place your straightedge along the pencil line. Hold it firmly and use your sharp utility knife to make a shallow but clean cut along the line. You don’t need to press hard; you’re just trying to sever the very top layer of wood veneer or paint. This single step is a game-changer for preventing chipping.
Step 4: Set Up Your Guide Rail
This is the most critical measurement of the whole process. You need to position your straightedge guide so the saw blade cuts exactly on your line. To do this, you must know your saw’s “offset.”
The offset is the distance from the edge of the saw’s base plate (the part that will run along your guide) to the blade itself. Measure this distance on your saw. Let’s say it’s 1.5 inches. You will need to clamp your straightedge guide 1.5 inches away from your cut line, on the side of the door you are keeping.
Calculating Your Guide Position
| Measurement | Description | Example |
|---|---|---|
| Saw Offset | Distance from the edge of the saw’s base to the saw blade. | 1.5 inches |
| Guide Position | Distance from your cut line to where you clamp the guide. | 1.5 inches (on the “keeper” side of the door) |
Measure this offset distance from your cut line and make a few marks. Align your straightedge with these new marks and clamp it down tightly at both ends. Double-check that it’s secure and won’t budge.
Step 5: Set Your Saw’s Blade Depth
You don’t want the blade extending far below the door. This increases the risk of kickback and can make the cut less clean. To set the depth, unplug your saw, hold it next to the edge of the door, and lower the blade until it extends about 1/4 inch past the bottom surface of the door. Lock the depth setting in place.
Step 6: Make the Cut
Put on your safety glasses! Plug the saw back in. Place the front of the saw’s base plate on the door, with the edge of the base pressed firmly against your clamped guide. Make sure the blade is not touching the door yet.
Start the saw and let it get to full speed before it touches the wood. Begin your cut with a slow, steady forward motion. Keep the saw’s base flat on the door and its edge tight against the guide. Don’t force the saw; let the blade do the work. Move smoothly all the way through the cut until the waste piece falls away. Let go of the trigger and wait for the blade to stop spinning completely before lifting the saw.
Step 7: Finish the Edge
Congratulations, the hard part is over! Carefully peel off the painter’s tape. You should see a perfectly crisp, clean edge. Take your sanding block with 150-grit sandpaper and lightly ease the sharp corners of the cut edge. Just a few gentle swipes is all it takes to prevent future splintering.
If you want to add extra protection, now is the time to seal the raw wood on the bottom of the door. Apply a coat of primer, paint, or a clear sealer like polyurethane. This prevents the door from absorbing moisture, which is a key cause of swelling. As experts from the University of Minnesota Extension explain, a good finish protects wood from moisture and wear.
Step 8: Re-hang the Door
Once your sealer is dry, you can re-hang your door. Open and close it a few times to admire your handiwork. It should swing freely with no scraping or sticking. You did it!
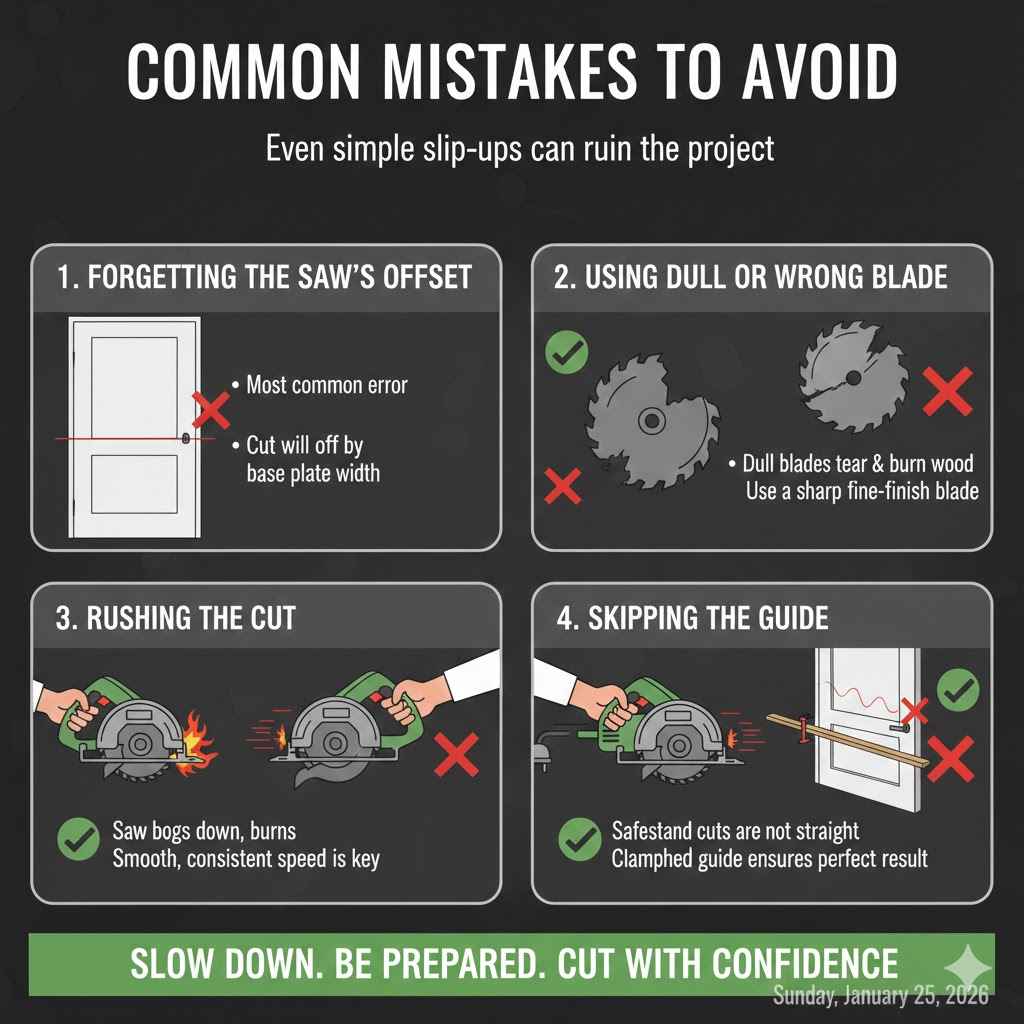
Common Mistakes to Avoid
Even with a great technique, a few simple slip-ups can happen. Here’s what to watch out for:
- Forgetting the Saw’s Offset: This is the most common error. If you clamp your guide right on the cut line, your cut will be off by the width of your saw’s base. Always measure and account for the offset.
- Using a Dull or Wrong Blade: A dull blade or a low-tooth-count framing blade will tear and burn the wood, no matter how good your technique is. A sharp, fine-finish blade is non-negotiable.
- Rushing the Cut: Pushing the saw too fast can cause it to bog down, burn the wood, or jump off the guide. Let the saw set the pace. A smooth, consistent speed is key.
- Skipping the Guide: Don’t try to be a hero and freehand the cut. It will not be straight. A clamped guide is the only way to guarantee a perfect result.
- Ignoring Safety: Safety glasses are essential. Sawdust can and will fly everywhere. Unplug the saw when making adjustments to the blade.
FAQ: Your Quick Questions Answered
How much can I trim off a door?
For a solid wood door, you can typically trim up to an inch off the bottom without issues. For hollow core doors, be very careful. They only have a small solid wood block at the top and bottom (usually 1 to 1.5 inches thick). Trimming more than that will cut into the hollow section. If you must trim more, you’ll need to insert a new wood block.
Can I trim a hollow core door this way?
Yes, absolutely. The painter’s tape and scoring method is especially important for hollow core doors, as their thin wood veneer skin is very prone to splintering. Just be mindful of the limited solid wood at the bottom.
What’s the best circular saw blade for cutting a door?
A plywood or fine-finish blade with at least 60 teeth (often labeled 60T to 100T). The more teeth, the smoother the cut. A carbide-tipped blade will stay sharp longer and give the best results.
Do I really have to take the door off the hinges?
Yes. Trying to trim a door while it’s still hanging is unsafe and will produce a poor-quality cut. You need a stable, flat surface to ensure the saw is properly supported and your guide is secure. Taking a door off is easy—just tap the hinge pins out with a nail set and hammer.
What if my cut is a little wavy or burned?
This usually means you either moved too slowly (causing burning) or didn’t keep the saw firmly against the guide (causing waviness). You can often fix a minor wave with a belt sander or a hand plane, but it’s best to get the cut right the first time by using a secure guide and a steady pace.
How do I prevent the wood from splintering?
This is the genius trick! Use painter’s tape over the cut line, score the line with a sharp utility knife, and use a high-tooth-count blade. This combination will give you a splinter-free edge every time.
Can I use a jigsaw for this?
I would strongly advise against it. Jigsaw blades are small and tend to wander, making it almost impossible to get a perfectly straight cut over the width of a door. A circular saw with a guide is the right tool for this job.
You’ve Got This!
Trimming a door doesn’t have to be a stressful, high-stakes project. When you break it down into simple steps and use the right techniques, it becomes a totally manageable DIY task. That scraping, sticking door is no match for you now.
Remember the keys to success: measure carefully, use painter’s tape, score your line, and clamp down a straightedge guide. This simple but powerful combination turns your regular circular saw into a precision cutting tool. You’ll save yourself the cost of a new door or a call to a handyman, and you’ll gain the confidence that comes from solving a problem with your own two hands. So go ahead, grab your tools, and give that door the perfect trim it needs.