
To fix Apple headphones microphone not working, first try cleaning the earphone jack and the small mesh screen on the mic. If that doesn’t solve the issue, try using a second pair of headphones to see if the problem is with the headphones themselves.
If the second pair works, contact the manufacturer of the initial pair for a replacement. If the second pair also doesn’t work, reach out to Apple Support for further assistance.
Table of Contents
1. Clean The Microphone And Speaker
One common issue that Apple headphone users face is a microphone not working. If you are experiencing this problem, the first step you should take is to clean the microphone and speaker. Over time, earwax, debris, or dust can accumulate in the microphone hole, causing sound input issues on your headphones. To solve this problem, follow the steps below:
Use a clean, dry, soft brush or cotton swab to remove earwax or debris from the microphone hole.
To clean the microphone hole effectively:
- Select a clean, dry, and soft brush or cotton swab. Ensure it is gentle enough not to damage the microphone or speaker.
- Insert the brush or swab into the microphone hole.
- Gently rotate or sweep the brush or swab to dislodge any earwax or debris.
- Repeat this process until you have thoroughly cleaned the microphone hole.
Wipe the microphone and speaker with a soft, dry cloth after each use.
Keeping your headphones clean after each use can prevent debris buildup and improve microphone functionality. To wipe the microphone and speaker:
- Take a soft, dry cloth.
- Gently wipe the microphone and speaker surfaces. Ensure you cover the entire area to remove any dirt or fingerprints.
- Repeat this process after every use to keep your headphones in optimal condition.
By following these simple steps to clean your microphone and speaker, you can potentially resolve the issue of your Apple headphones’ microphone not working. However, if this cleaning method does not solve the problem, there may be a more significant issue at hand that requires further troubleshooting or professional assistance. Stay tuned for our upcoming blog posts where we will discuss additional solutions to fix Apple headphone microphone issues.
2. Check The Connection And Compatibility
When it comes to troubleshooting issues with your Apple headphones microphone not working, one of the first steps you should take is to check the connection and compatibility of your headphones. This is a common problem that can often be resolved by ensuring that your headphones are properly connected to the device and that they are compatible with the device you are using.
Ensure that the headphones are properly connected to the device and the headphone jack is clean.
Start by checking the physical connection between your headphones and the device. Ensure that the headphone jack is firmly inserted into the device’s audio port. Sometimes, a loose connection can cause issues with the microphone functionality. If needed, gently remove and reinsert the headphone jack to make sure it is securely connected.
In addition to checking the connection, it’s important to inspect the headphone jack for any debris or dirt that might be obstructing the connection. Use a clean, dry cloth or a cotton swab lightly dampened with rubbing alcohol to gently clean the headphone jack. This can help ensure a clear and uninterrupted connection for your headphones.
Verify that the headphones are compatible with the device you are using.
Another factor to consider is the compatibility of your headphones with the device you are using. Not all headphones are universally compatible with all devices, so it’s important to check if your headphones are designed to work with the specific device you are using.
If you are using Apple headphones, they are typically designed for use with Apple devices such as iPhones, iPads, and MacBooks. However, it’s always a good idea to double-check the compatibility to ensure that your headphones are designed to work with your device.
| Compatible Devices | Not Compatible Devices |
|---|---|
| iPhones | Android smartphones |
| iPads | Windows laptops |
| MacBooks | Chromebooks |
If you find that your headphones are not compatible with your device, you may need to consider using a different set of headphones or explore other options such as using an adapter or purchasing headphones specifically designed for your device.
By checking the connection and compatibility of your Apple headphones, you can troubleshoot and potentially resolve the issue of the microphone not working. Remember to ensure a proper connection by cleaning the headphone jack and verify compatibility with your device to ensure a seamless audio experience.
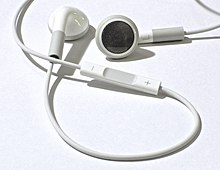
Credit: www.en.wikipedia.org
3. Restart And Update The Device
If you find that your Apple headphones microphone is not working, there are a few simple steps you can take to try and resolve the issue. One of the first things you can do is restart and update your device. Restarting the device can help refresh all settings and connections, while updating the device’s software can ensure that you have the latest bug fixes and improvements.
Restart the device to refresh all settings and connections.
The first step is to restart your device. This can help refresh all the settings and connections, which might be causing the issue with your Apple headphones microphone. To restart your device, follow these steps:
- Press and hold the power button until the “Slide to power off” option appears.
- Swipe the power off slider to the right to turn off your device.
- Wait for a few seconds, and then press and hold the power button again until you see the Apple logo.
- Release the power button, and your device will restart.
Check for any available software updates for your device.
In addition to restarting your device, you should also check for any available software updates. Updating your device’s software can fix any bugs or issues that might be causing the problem with your Apple headphones microphone. Here’s how you can check for software updates:
- Go to the “Settings” app on your device.
- Scroll down and tap on “General”.
- Tap on “Software Update”.
- If there is an update available, tap on “Download and Install”.
- Follow the instructions on the screen to complete the update process.
By restarting and updating your device, you can often resolve the issue with your Apple headphones microphone not working. These simple steps can help ensure that your device is running smoothly and that all connections and settings are refreshed. If the problem persists, you may need to contact Apple Support or the manufacturer for further assistance.
4. Allow App Access To The Microphone
One common reason why the microphone on your Apple headphones may not be working is because the app you are using doesn’t have permission to access the microphone. This can prevent the headphones from capturing audio and result in microphone issues. To solve this problem, you need to make sure the app you are using has the necessary permission to access the microphone.
Make sure the app you are using has permission to access the microphone
To check if the app has permission to access the microphone, you can follow these steps:
- Go to the Settings app on your iPhone or iPad.
- Scroll down and tap on the app you are having microphone issues with.
- In the app settings, look for the “Microphone” option and make sure it is enabled.
- If the microphone permission is already enabled, try toggling it off and then back on again. Sometimes, resetting the permission can resolve the issue.
Check the app settings and enable microphone access if necessary
If the app you are using doesn’t have permission to access the microphone, you need to enable it manually. Here’s how you can do it:
- Go to the Settings app on your iPhone or iPad.
- Scroll down and tap on “Privacy”.
- Look for the “Microphone” option and tap on it.
- You will see a list of apps that have requested access to the microphone. Find the app you are having issues with and make sure the toggle switch next to it is enabled.
Enabling microphone access for the app should allow your Apple headphones to capture audio properly. If the issue persists, you can try restarting the app or updating it to the latest version. Additionally, make sure that the microphone on your headphones is not covered or blocked by any debris. Cleaning the microphone hole with a soft brush or cotton swab can help improve audio input.
5. Check For Mic Blockage Or Damage
One of the common reasons for Apple headphones microphone not working is mic blockage or damage. If the microphone is covered or blocked, it won’t be able to pick up your voice clearly. Additionally, if the headphones have visible damage or wear, it can affect the microphone’s functionality. To ensure that your Apple headphones microphone is working properly, follow these steps:
Ensure that the microphone is not covered or blocked by any objects or clothing
Check the microphone area on your Apple headphones and make sure it is not obstructed by any objects or clothing. Sometimes, during everyday usage, lint or debris can accumulate in the microphone area, resulting in poor voice quality during calls or recordings. Clean the microphone area using a clean, dry, soft brush or cotton swab to remove any dirt or debris that might be blocking the microphone.
Inspect the headphones for any visible damage or wear
Inspect your Apple headphones for any visible damage or wear. Look for any cracks, dents, or exposed wires that could affect the microphone’s functionality. Even minor damage can interfere with the microphone’s ability to capture your voice properly. If you notice any visible damage, it is recommended to get your headphones repaired or replaced.
In conclusion, mic blockage or damage can cause issues with the microphone functionality on your Apple headphones. By ensuring that the microphone is not covered or blocked and inspecting the headphones for any visible damage or wear, you can troubleshoot and potentially resolve the issue. If the problem persists, it is advisable to contact Apple Support or the manufacturer for further assistance.
6. Test With Different Headphones
One way to troubleshoot and determine the cause of your Apple headphones microphone not working is to try using a different pair of headphones with a working microphone. This step can help you identify if the problem lies with the headphones or the device itself.
How to Test with Different Headphones
- Obtain a pair of headphones with a known working microphone.
- Disconnect your current Apple headphones from the device you are using.
- Connect the alternate headphones to the device.
- Test the microphone functionality by making a voice recording or placing a test call.
- Compare the results with the initial issue.
Determining the Cause
If the alternate headphones with a working microphone function properly, it suggests that the issue lies with your Apple headphones. In this case, you may need to consider cleaning the headphone jack, checking for any physical damage or contacting Apple Support for further assistance.
On the other hand, if the problem persists even with the alternate headphones, it indicates that the issue may reside with your device. In this scenario, you can try troubleshooting the device’s settings, updating the software, or contacting the manufacturer’s support for guidance.
Testing with different headphones can help you pinpoint whether the problem lies with your Apple headphones or the device itself. This step is essential for identifying the root cause and determining the appropriate course of action to resolve the microphone not working issue.
7. Seek Professional Support
If you have tried all the troubleshooting steps mentioned above and are still facing issues with your Apple headphones microphone not working, it may be time to seek professional support. Contacting the manufacturer or an authorized service center can help you get specialized assistance and resolve the problem.
If the issue still persists, contact the manufacturer or authorized service center for further assistance.
Reaching out to the manufacturer or an authorized service center is crucial when all your efforts to fix the Apple headphones microphone issue have been in vain. These professionals are specifically trained to handle such problems and have the expertise to troubleshoot and resolve the issue effectively.
By contacting the manufacturer or authorized service center, you can get access to specialized support and guidance tailored to your specific problem. They have in-depth knowledge about Apple products and can provide you with the necessary assistance to resolve the microphone not working problem.
When you contact the manufacturer or authorized service center, make sure to provide them with all the relevant details about the issue you are facing. This can help them understand the problem better and offer you the most suitable solution.
It is important to remember that seeking professional support not only saves your time and effort but also ensures that the issue is resolved correctly. Attempting to fix the problem on your own without the necessary expertise may further complicate the situation or even damage your headphones.
Therefore, if you are still experiencing microphone issues with your Apple headphones, do not hesitate to seek professional support from the manufacturer or authorized service center. They are experienced in dealing with such problems and can provide you with the necessary assistance to get your headphones working flawlessly again.
Apple Headphones Mic Not Working On Pc
Apple Headphones Mic Not Working Windows 10
Frequently Asked Questions On Apple Headphones Microphone Not Working
Why Are My Iphone Headphones Not Working During Calls?
There could be various reasons why your iPhone headphones are not working during calls. Make sure to check if the microphone hole is blocked and clean it regularly. Also, check the connection between the jack and the headphones and clean it if needed.
If the issue persists, try using a second pair of headphones to see if it works. If not, contact Apple Support for further assistance.
Why Is My Microphone Not Working On My Earbuds?
If your microphone is not working on your earbuds, make sure the microphone hole is not blocked. Clean the microphone hole regularly and remove any debris or earwax. Also, try wiping the earbuds with a soft, dry cloth.
Why Are My Headphones Not Working When I Plug Them In My Phone?
To fix headphone issues when plugged into a phone, try cleaning the jack and ensuring it’s connected properly.
Why Does Apple Headphones Mic Not Work On Xbox?
Apple headphones mic does not work on Xbox due to compatibility issues between the two devices.
Conclusion
If you’re experiencing issues with your Apple headphones microphone not working, there are several steps you can take to troubleshoot the problem. First, ensure that the microphone hole is not blocked and clean it regularly to prevent debris buildup. Additionally, clean the earbuds themselves with a soft, dry cloth after each use.
If the issue persists, try cleaning the earphone jack on your device and the small mesh screen on the microphone. You can use a cotton swab dampened with rubbing alcohol or compressed air to remove any dust or dirt that may be causing the problem.
If these steps do not resolve the issue, you may need to contact Apple Support or the manufacturer for further assistance. Remember, maintaining proper hygiene and regular cleaning of your Apple headphones can help ensure optimal microphone performance.

Williams Kane is a blogger and writer. He’s passionate about writing and connecting with the community, especially when it comes to sharing his ideas through writing.
I am a versatile author with a passion for exploring a wide range of topics on our multi-niche website. With a background in research and a love for writing, I bring a unique blend of expertise to our platform.
My journey began in the world of science, where I earned a degree in biology and developed a deep fascination for the natural world. This background enables me to delve into topics related to ecology, environmental conservation, and the wonders of the animal kingdom.
However, my curiosity knows no bounds, and I have ventured into various other niches as well. From technology trends and digital innovations to health and wellness tips, I strive to provide well-researched and engaging content that informs and entertains our diverse audience.
Furthermore, my dedication to staying current with the latest developments in each niche ensures that our readers receive up-to-date and reliable information. Whether it’s deciphering complex scientific concepts or simplifying tech jargon, I take pride in making complex subjects accessible to all.
Join me on our multi-niche journey, where we explore the depths of knowledge and share insights on a multitude of topics to inspire, educate, and entertain.
Related posts:
 Are Condenser Mics Good for Podcasts?
 Lg Tv Microphone Input Process
How Do You Connect a Wired Microphone? Simplest Way
How Do I Use the Microphone on My Android Tv?
Chromebook Microphone Settings: Mastering Your Audio Experience
Headset Microphone for Podcasting: Unleash Your Audio Power
Lg Tv Microphone Input Process
How Do You Connect a Wired Microphone? Simplest Way
How Do I Use the Microphone on My Android Tv?
Chromebook Microphone Settings: Mastering Your Audio Experience
Headset Microphone for Podcasting: Unleash Your Audio Power
 Wired Headset Microphone: Unleash Your Power!
 Desk Microphone Setup: Ultimate Guide to Perfecting Your Audio Experience