
Imac microphone not working? Here’s a quick and concise solution to fix the issue.
We will discuss the common reasons behind an imac microphone not working and provide step-by-step instructions to troubleshoot and resolve the problem. So, if you’re facing issues with your imac’s microphone, read on to find out how to get it working again in no time.
Whether it’s a hardware problem or a software glitch, we’ve got you covered with solutions that are easy to understand and implement. Let’s dive in and get your imac microphone back up and running.

Credit: www.techjunkie.com
Table of Contents
Troubleshooting Tips For Imac Microphone Not Working
Is your imac microphone failing to capture sound? Don’t worry, we’ve got you covered! Follow these troubleshooting tips to get your microphone back up and running in no time.
Check If The Microphone Input Is Selected Correctly:
- Open system preferences on your imac.
- Click on the “sound” icon.
- Navigate to the “input” tab.
- Ensure that the correct microphone input is selected.
Ensure The Microphone Volume Is Not Muted:
- Go to the menu bar and click on the volume icon.
- Check if the microphone volume is set to an audible level.
- Make sure the “mute” option is turned off.
Update The Audio Drivers On Your Imac:
- Open the app store on your imac.
- Click on “updates” in the toolbar.
- If there is an update available for the audio driver, click “update” to install it.
Check For Any Physical Damage To The Microphone:
- Inspect the microphone for any visible damage, such as frayed cables or loose connections.
- Try plugging the microphone into another device to check if it works.
Restart Your Imac And Test The Microphone Again:
- Click on the apple menu and select “restart” to reboot your imac.
- Once your imac has restarted, test the microphone to see if it is now working properly.
By following these troubleshooting tips, you should be able to resolve the issue of your imac microphone not working. Remember to check the microphone input selection, ensure the volume is not muted, update audio drivers, look for physical damage, and restart your imac.
Now go ahead and enjoy crisp and clear sound during your video conferences, voice recordings, or any other audio activities on your imac!
Credit: www.onlinemictest.com
Check The Microphone Settings In System Preferences
Is your imac microphone not working? Don’t worry, we’ve got you covered. In this section, we’ll walk you through the steps to check the microphone settings in your system preferences. It’s important to ensure that your microphone is properly configured and recognized by your imac.
Let’s get started:
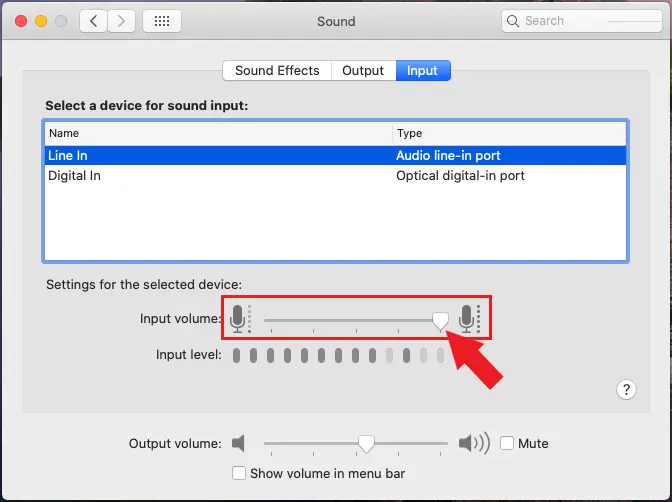
Adjust The Input Volume And Select The Correct Microphone:
- Open system preferences by clicking on the apple menu in the top left corner of your screen and selecting “system preferences.”
- In the system preferences window, click on the “sound” icon.
- Navigate to the “input” tab, where you will find the microphone settings.
- Make sure the input volume is turned up and not muted. Adjust it as needed by dragging the slider.
- Select the correct microphone from the list. If you have an external microphone connected, ensure it is selected as the input device.
Disable Any Background Noise Reduction Or Cancellation Settings:
- While still in the “sound” window, click on the “input” tab.
- Look for any options related to background noise reduction or cancellation and make sure they are turned off. These settings can sometimes interfere with the microphone’s functionality.
Reset The Pram/Nvram:
- Sometimes, resetting the pram/nvram can resolve microphone issues.
- Shut down your imac completely.
- Press the power button and immediately hold down the following keys: Command, option, p, and r.
- Keep holding the keys until you hear the startup sound for the second time and then release them.
- Restart your imac and check if the microphone is now working.
By following these steps, you can troubleshoot the microphone issue on your imac. Remember, it’s crucial to check the microphone settings in your system preferences, adjust the input volume, select the correct microphone, disable background noise reduction or cancellation settings, and if necessary, reset the pram/nvram.
Hopefully, these solutions will help you get your microphone up and running again.
Use An External Microphone Or Headset
The imac is a reliable device, but sometimes you may encounter issues with its built-in microphone. If you’re facing trouble with your imac’s microphone not working, you can try using an external microphone or headset as an alternative solution. Here are some steps you can follow to resolve the issue:
Test With A Different Microphone Or Headset:
- Connect a different microphone or headset to your imac to check if the issue lies with the built-in microphone.
- Ensure the new microphone or headset you’re using is compatible with your imac.
- Test the new microphone or headset by recording audio or making a call to see if it works properly.
Ensure The External Microphone Is Properly Connected To The Imac:
- Check that the external microphone or headset is securely plugged into the appropriate port on your imac.
- Ensure there are no loose connections or issues with the cables.
Adjust The Settings And Volume For The External Microphone:
- Go to the “system preferences” on your imac.
- Select the “sound” preference pane.
- Under the “input” tab, choose the external microphone or headset from the list of available devices.
- Adjust the volume slider to an appropriate level.
- Test the microphone by speaking into it and checking if your voice is being recorded or recognized by the imac.
Try Using A Usb Microphone If The Built-In Microphone Is Not Working:
- If the built-in microphone continues to have issues, consider using a usb microphone as an alternative.
- Connect the usb microphone to an available usb port on your imac.
- Follow the same steps as mentioned earlier to adjust the settings and volume for the usb microphone.
Using an external microphone or headset can be a quick and effective solution when your imac’s built-in microphone is not working. By following these steps, you can troubleshoot and resolve the issue, ensuring that you can continue using your imac for audio-related tasks without any interruptions.
Verify Microphone Functionality Through Other Applications
Test The Microphone With Other Applications Like Garageband Or Quicktime:
- Open garageband or quicktime on your imac.
- Create a new audio project or open an existing one.
- Select the option to record audio.
- Test the microphone by speaking into it.
- If you can hear your voice during playback, the microphone is working fine with these applications.
- If you still can’t hear any sound, proceed to the next step.
Check For Any Conflicting Applications Or Processes That May Be Blocking The Microphone Access:
- Close any running applications that might use the microphone.
- Check for any background processes that could be interfering with the microphone functionality.
- Disable or close any unnecessary apps or processes one by one to identify the issue.
- Test the microphone after disabling each app or process to see if the problem resolves.
- If the microphone starts working after disabling a particular app/process, consider uninstalling or updating it to prevent conflicts.
Reset The Smc (System Management Controller) On Your Imac:
- Shut down your imac completely.
- Disconnect the power cable from the back of the imac.
- Wait for about 15 seconds.
- Reconnect the power cable and wait for another 5 seconds.
- Start your imac.
- Test the microphone to check if it is working now.
- If the issue persists, there may be a hardware problem. Contact apple support for further assistance.
Remember, verifying microphone functionality through other applications, checking for conflicting apps/processes, and resetting the smc can help troubleshoot and resolve issues with your imac microphone.
Update Macos And Perform A Clean Installation
Check For Any Macos Updates And Install Them:
Keeping your macos up to date is crucial for ensuring that your imac’s microphone functions properly. Follow these steps to check for any available updates and install them:
- Open the apple menu by clicking on the apple icon in the top-left corner of your screen.
- Select “system preferences” from the drop-down menu.
- In the system preferences window, click on “software update.”
- If there are any updates available, click on “update now” to initiate the installation process.
- Follow the on-screen instructions and let the updates complete.
- Once the updates are installed, restart your imac to ensure the changes take effect.
Performing regular updates can address any known bugs or issues that could be causing problems with your microphone. Now, let’s explore the next step in resolving the microphone issue.
Perform A Clean Installation Of Macos:
If the previous step didn’t resolve the microphone problem, performing a clean installation of macos may help. Here’s how to go about it:
- Backup your important data to an external storage device or cloud service to prevent data loss during the clean installation process.
- Restart your imac, and while it’s starting up, press and hold the command + r keys until the apple logo or a spinning globe appears.
- This will enter your imac into macos recovery mode.
- In the macos utilities window, select “disk utility” and click “continue.”
- Choose your imac’s main drive from the left sidebar and click on “erase” at the top.
- Follow the prompts to erase the disk, ensuring that you’ve selected the correct drive.
- Once the erasure is complete, exit disk utility and select “reinstall macos” from the macos utilities window.
- Follow the on-screen instructions to reinstall macos and set up your imac as a new device.
- After the installation is complete, restore your backed-up data and check if the microphone is working again.
Performing a clean installation gives your imac a fresh start, often resolving any underlying software issues that were affecting the microphone.
Reach Out To Apple Support
If you’ve tried troubleshooting your imac microphone and the issue still persists, it’s time to reach out to apple support for further assistance. Apple’s dedicated support team can guide you through additional steps to resolve the problem. Here’s what you can expect when you contact apple support:
- Provide a detailed description of the issue and steps taken to troubleshoot: Begin by explaining the problem you’re facing with your imac microphone. Include any steps you’ve already taken to troubleshoot the issue. This information will help apple support understand your situation better and provide you with the most appropriate solutions.
- Follow any additional instructions provided by apple support: After describing the problem, be ready to follow the instructions given by apple support. They may ask you to perform specific actions, such as updating your software or resetting certain settings on your imac. Following their guidance will help you resolve the microphone issue effectively.
Remember to stay patient and provide accurate information when communicating with apple support. By doing so, you’ll increase the chances of resolving your imac microphone problem successfully.
How To Turn On Microphone On Macbook Air
Turning on the microphone on a MacBook Air is a straightforward process. Here’s how you can do it:
- Check the Physical Switch:
- Some MacBook Air models have a physical switch on the side that can be used to mute or unmute the microphone. Make sure this switch is not set to mute.
- System Preferences:
- Click on the Apple logo in the top-left corner of your screen to open the Apple menu.
- Select “System Preferences.”
- Sound Preferences:
- In the System Preferences window, click on “Sound.”
- Input Tab:
- Navigate to the “Input” tab. This is where you can manage your microphone settings.
- Select Microphone:
- In the Input tab, you should see a list of available input devices. Select the built-in microphone or an external microphone if one is connected.
- Adjust Input Volume:
- You can also adjust the input volume slider to set the microphone volume level.
- Test Microphone:
- To test if your microphone is working, you can speak into it, and you should see the input level indicator respond. The indicator is a series of bars that light up when sound is detected.
- Check Privacy Settings (macOS Catalina and later):
- If you are using macOS Catalina or later, you may need to check the privacy settings for the microphone. Go to “System Preferences” > “Security & Privacy” > “Privacy” tab. Select “Microphone” from the left sidebar and make sure the app you’re using has the necessary permissions.
These steps should help you turn on and configure your microphone on a MacBook Air. If you’re still experiencing issues, it’s possible that there might be a hardware problem, and you may want to contact Apple Support for further assistance.
How do I test microphone on IMAC?
Frequently Asked Questions Of Imac Microphone Not Working
Why Is My Imac Microphone Not Working?
There could be several reasons why your imac microphone is not working. It could be due to a hardware issue, like a loose connection or a faulty microphone. It could also be a software problem, such as incorrect settings or outdated drivers.
Try checking your microphone settings, updating your software, or contacting apple support for further assistance.
How Can I Fix The Microphone On My Imac?
To fix the microphone on your imac, first, check the physical connection and ensure it is securely plugged in. Then, adjust the microphone settings in the system preferences. If that doesn’t work, try restarting your imac and testing the microphone again.
If the issue persists, it may be necessary to update your operating system or contact apple support for further troubleshooting.
Why Is My Imac Microphone Not Picking Up Sound?
If your imac microphone is not picking up sound, there might be an issue with the microphone input volume or sensitivity settings. Check the sound preferences in the system settings and ensure that the input volume is not muted or set too low.
Additionally, make sure that the correct microphone is selected as the input device. If the problem remains, it could indicate a hardware issue that requires professional assistance.
Conclusion
Troubleshooting microphone issues on your imac can be a challenging task, but with the right approach, you can find a solution that works for you. Start by checking the basics such as ensuring your microphone is properly connected and not muted.
If that doesn’t solve the problem, try adjusting the sound settings and updating your system software. If all else fails, consider seeking professional help or using external microphones as an alternative. Remember to keep your system updated and regularly clean out any unwanted applications or files that could potentially interfere with your microphone functionality.
With these tips in mind, you can overcome the frustration of your imac microphone not working and get back to enjoying seamless audio communication.

Williams Kane is a blogger and writer. He’s passionate about writing and connecting with the community, especially when it comes to sharing his ideas through writing.
I am a versatile author with a passion for exploring a wide range of topics on our multi-niche website. With a background in research and a love for writing, I bring a unique blend of expertise to our platform.
My journey began in the world of science, where I earned a degree in biology and developed a deep fascination for the natural world. This background enables me to delve into topics related to ecology, environmental conservation, and the wonders of the animal kingdom.
However, my curiosity knows no bounds, and I have ventured into various other niches as well. From technology trends and digital innovations to health and wellness tips, I strive to provide well-researched and engaging content that informs and entertains our diverse audience.
Furthermore, my dedication to staying current with the latest developments in each niche ensures that our readers receive up-to-date and reliable information. Whether it’s deciphering complex scientific concepts or simplifying tech jargon, I take pride in making complex subjects accessible to all.
Join me on our multi-niche journey, where we explore the depths of knowledge and share insights on a multitude of topics to inspire, educate, and entertain.
Related posts:
 Top 7 Best Condenser Mic Under 200 USD ! Top Picks in 2023
 How to Connect a Condenser Mic to a Pc? Few Simple Steps
 Are Condenser Mics Good for Streaming?
How to Connect Wireless Microphone to Tv for Karaoke? Simple Few Steps
How Do You Use a Karaoke Mic on a Tv?
How to Connect a Karaoke Microphone
Are Condenser Mics Good for Streaming?
How to Connect Wireless Microphone to Tv for Karaoke? Simple Few Steps
How Do You Use a Karaoke Mic on a Tv?
How to Connect a Karaoke Microphone
 Google Meet Microphone Not Working: Troubleshooting Tips For Windows, Mac, Phone
Blue Yeti Microphone Settings: Unlock the Best Sound Experience
Google Meet Microphone Not Working: Troubleshooting Tips For Windows, Mac, Phone
Blue Yeti Microphone Settings: Unlock the Best Sound Experience