
How to replace roomba battery it’s a common thinking matter for all Roomba users. But don’t worry it’s a very simple way and you can do it within a few minutes.
This blog post will show you how easy it is to replace the Roomba battery. You can give thank the manufacturer of this robot vacuum because you can change the battery from your robot only using a screwdriver and your five minutes time.
Table of Contents
How do I know if my Roomba battery needs a new one?
At first, you should know how can you understand you need to change your Roomba battery. Here are the reasons why you change your rover battery…
- If your Roomba battery does not hold a charge
- If the battery has short service time
- The power light refuses to continue
- The robot gives low performance even after cleaning
- If performance does not increase after reset
- If you have an old Roomba.
If the above factors occur in your Roomba then you need to change the battery of your Roomba. But how to change your Roomba battery will be discussed in this article for your convenience.
How To Replace Roomba Battery – For All Series
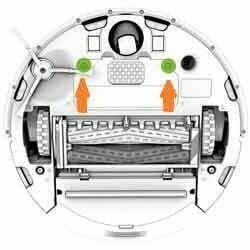
How do I replace Roomba 500 and 600 Series battery?
Roomba 500 and 600 series battery replacement process is the same process. Just follow our instruction. And do it step by step.
1. At first collect a new battery for your Roomba 500 or 600 series.
2. Remove the side brush and side brush screw after collecting a new battery.
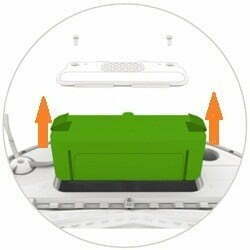
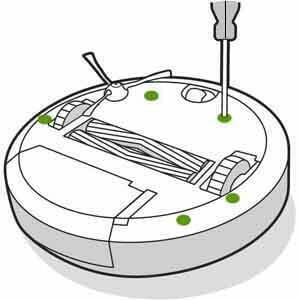
3. Now remove the 4 screws to open and remove the bottom cover.
4. Then remove the battery.
5. Now setup your new battery.
6. Replace properly the bottom cover, side brush, and side brush screw.
7. Now Properly charge your new battery.
Now enjoying your Roomba with good performance.
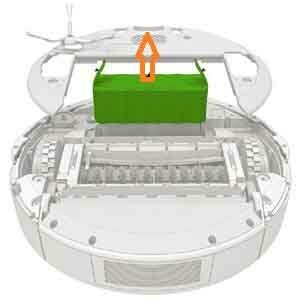
How DIY replace the Roomba battery for the 700, 800, and 900 series?
The battery replacement procedure will be the same for Roomba 700, 800, and 900 series. For that, We have explained together the method of replacing the batteries of these models here.
If you are confirmed your Roomba battery needs to change, then follow our step-by-step guide.
1. At first collect a new battery.
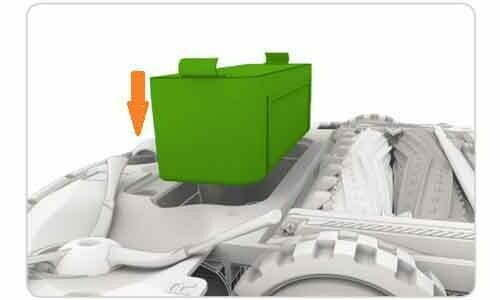
2. Now then unscrew the two (2) screws on the battery door, then remove the door and battery from your Roomba.
3. Set the new battery to the position where the old battery was.
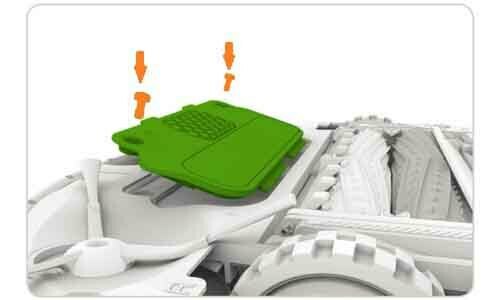
4. Place the battery door in the same position and reattach the previous two (2) screws. During this time, be careful not to stick the Roomba brush when installing the door.
Now enjoying your Roomba with good performance.
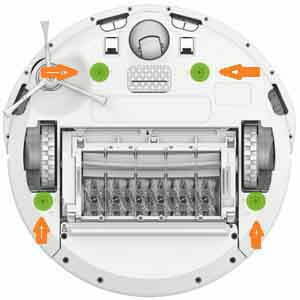
How do I Replace the Roomba “i” Series Battery?
Use the following process to remove and install the Roomba i Series battery.
Roomba i series is now most popular series. If you facing battery related problem in your Roomba. And if you are confirmed you need to change your battery. Then follow our step by step instructions.
1. At first you need to collect a new battery as per your required model.
2. Then your first step is to unscrew the edge sweeping brush with a flat head screwdriver and remove the edge sweeping brush.
3. Then remove the five screws holding the bottom cover with a cross-head screwdriver.
4. Remove the original battery from your robot.
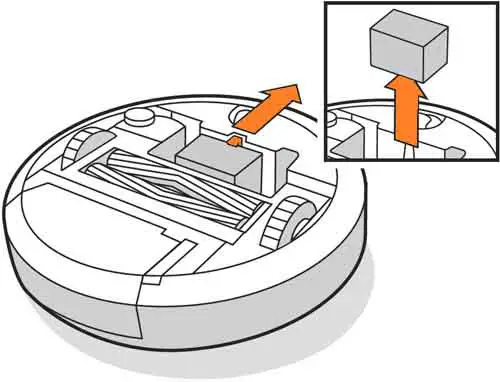
5. Insert the new collected battery in your robot. And clip it properly.
6. Now place the bottom cover back on the robot and then tighten the five (5) screws.
7. Finally, install the edge sweeping brush and tighten it with screws
Now enjoying your Roomba with good performance.
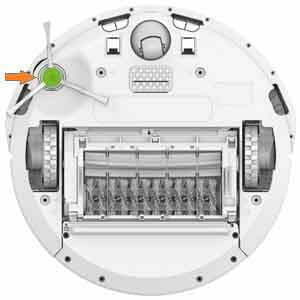
How do I replace the Roomba “s” Series Battery?
If you confirmed you need to change your s series Roomba battery. Please follow our spet by step instructions:
- At first you need to collect a new battery.
- Now your first step is to place the robot vacuum upside down on any flat surface.
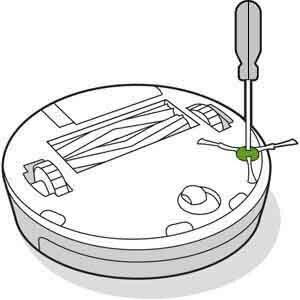
- Then loosen the six (6) screws using a screwdriver that holds the bottom cover.
- Now carefully remove the cover below.
- Loosen the screw that secures the battery.
- Using the battery tabs, remove the battery carefully.
- Now insert your collected new battery.
- Tighten the battery screw.
- Finally reinstall the bottom cover and tighten all six (6), screws making sure the bottom cover is flush with all sensors.
Battery Maintenance Tips For Roomba
We want to make sure that your Roomba lasts as long as possible so we have some tips for battery maintenance. Follow these steps below to ensure that your Roomba has enough power for a good cleaning session every time!
- Charge up before each use – Plugin overnight or during the day if needed
- Keep an eye on battery level – When charging, keep an eye on how much charge is left
- Clean out debris after each use – Make sure there are no clogs or hairballs
- Store in a cool place with plenty of air circulation 5) Avoid extreme temperatures
- Don’t leave plugged in when not charging 7) Do not expose charger cord/plug
- Use only approved chargers
- Never submerge charger
- Keep cords away from heated surfaces
- Turn off when unplugged
- Unplug immediately after fully charged
- Do not allow pets near chargers
- Allow at least 24 hours between charges
- If using outdoors, avoid direct sunlight
Also, you can see here more battery maintenance tips
After changing your Roomba battery if you do not get better service you should be looking for a new one. I would like to say you see here compare irobot Roomba models. You will get a complete comparison of all Roomba models. I hope it will help you to make a decision on a new one.
It is good for you to know how to reset or repair any Roomba many times while using it. So here you can learn how to reset Roomba and how to repair it.
How many years does a Roomba battery last?
It is a very common question for all Roomba users. In general, the average life of a Roomba battery is about two years.
However, this can vary depending on the model and usage. For example, if your robot vacuum is used daily or in larger homes with more carpeting, it may need to be replaced sooner than that. Although, all Roomba batteries are designed for around 2 years of use before they’ll need to be replaced
How do I test my Roomba battery?
First, make sure that the charging base is plugged in and turned on. Then, press the home button located at the top of your robot vacuum cleaner. The status light will flash green if it is ready to clean or red if there is an error with one of its components. If no lights appear, then check that both ends of the charging cable are securely inserted into their respective ports on either end of the robot vacuum cleaner.
You can also try plugging in another device such as a lamp or phone charger to see if they work properly when plugged into this outlet; if not, then there may be an issue with wiring within your home itself which needs further investigation by a professional electrician before attempting any repairs yourself.
Finally, make sure that you have fully charged batteries installed inside each side of your robot vacuum cleaner before trying again to activate it using its home button; otherwise, it won’t be able to start cleaning until these batteries have been replaced with fresh ones first!
What do you do if your Roomba won’t charge?
It can be frustrating when your Roomba won’t charge. You might think it’s broken, but there are actually several things that could be causing the problem.
Whether your Roomba is not charging, has trouble docking itself, or just isn’t cleaning properly – we will get it working again in no time! See this video for clearly to know about this issue!
Final Verdict:
If you are a Roomba owner who has experienced battery failure, we hope that this article on how to replace Roomba battery will help alleviate some of your frustrations and allow for an easy repair.
The process is very simple and only takes about 5 minutes to complete. We know how frustrating it can be when the robot vacuum’s battery dies in the middle of cleaning or detecting obstacles on its own schedule so we want to make sure you have all the information needed before starting any repairs. You may not need our services at all but if you do please contact us!
Thank you for reading and happy vacuuming!
Related Post:
Compare iRobot Roomba Models| Which One to Have?
How to Reset iRobot Roomba? All Series! Read to know
How To Repair, Clean, Maintain And Disassemble Everything On A iRobot Roomba?

Williams Kane is a blogger and writer. He’s passionate about writing and connecting with the community, especially when it comes to sharing his ideas through writing.
I am a versatile author with a passion for exploring a wide range of topics on our multi-niche website. With a background in research and a love for writing, I bring a unique blend of expertise to our platform.
My journey began in the world of science, where I earned a degree in biology and developed a deep fascination for the natural world. This background enables me to delve into topics related to ecology, environmental conservation, and the wonders of the animal kingdom.
However, my curiosity knows no bounds, and I have ventured into various other niches as well. From technology trends and digital innovations to health and wellness tips, I strive to provide well-researched and engaging content that informs and entertains our diverse audience.
Furthermore, my dedication to staying current with the latest developments in each niche ensures that our readers receive up-to-date and reliable information. Whether it’s deciphering complex scientific concepts or simplifying tech jargon, I take pride in making complex subjects accessible to all.
Join me on our multi-niche journey, where we explore the depths of knowledge and share insights on a multitude of topics to inspire, educate, and entertain.
Related posts:
 How to Use Tineco A11 Hero Handheld Vacuum Cleaner
 How to Clean Tineco A11 Hero Handheld Vacuum Cleaner
 How to Use Afoddon Cordless Vacuum Cleaner?
 How to Use Tineco Lightweight Vacuum Cleaner?
 How to Clean Tineco Lightweight Vacuum Cleaner?
 How to Use Inse Cordless Vacuum Cleaner?
 Dyson Vacuum Lost Suction : Ultimate Solution for Powerful Cleaning
 Vacuum Cleaner Vax: Unleash the Cleaning Power!