
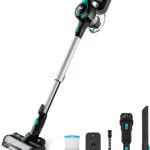
Irobot Roomba is a blessing in disguise when it comes to cleaning your home. Not only it performs efficiently, but also you don’t have to apply physical effort to get the job done.
At some point, you will encounter a situation where your cleaner is not doing its task properly. The problem can happen for multiple reasons, and if you don’t solve it immediately, you could put the machine in jeopardy.
Don’t worry; we have got your back. From the following article, you will find out all about how to irobot Roomba repair and the way you can tackle the problem strategically.
Read on to find out more.
Table of Contents
Why Do You Need to iRobot Roomba Repair?
All technological devices need repairing at some. It is a mandatory task in the case of Roomba because it is a robot and runs on software.
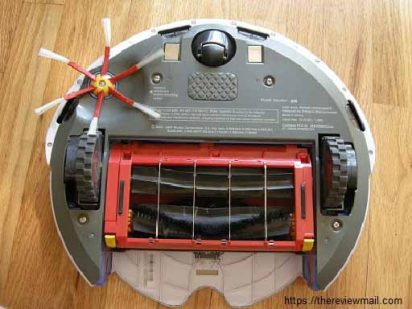
Furthermore, after daily use, the device starts to accumulate carpet fibers as well as hair. Due to this, the motor fails to turn the wheels, sweepers, and brushes. If you avoid this issue, the situation can trigger to a new level, which can be a costly process.
Other than this, the battery will start getting weak after daily cleaning. You will notice that it is not finishing the task like its usual manner, and your floor is still dirty. So, the only solution is to replace the battery.
Service iRobot Roomba
The Repairing Process
There are several ways that you can repair your beloved cleaner. Some require the help of professionals,whereas; some can be solved without their presence.
Below are all of them. Check it out.
Process 1: Giving the Roomba to the Technicians
If you have a broken or malfunctioning Roomba, don’t make a sudden plan of buying a new one because there is a way you can repair it. You can drop it off at the products repair service center, and they will solve the problem within a given time. Plus, they won’t charge you that much, which can give you a sigh of relief.
The people who will fix your device are highly skilled, and they are dedicated to making it look as good as new.After you take it from them, you will see a change in your machines’ performance, and the best thing is, it will clean like the time you bought it in the first place.
It is recommended that you should have your Roomba cleaned by a professional after every 30 uses. To be on the safer side, you can do it two times a year.
Services Provided by Them
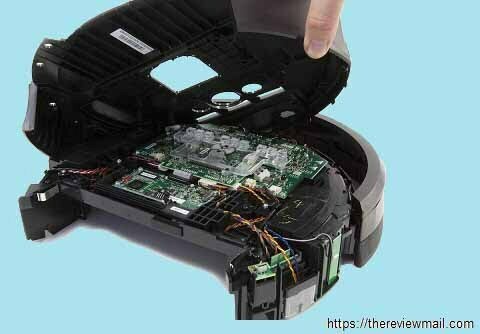
First of all, they will inspect your device and then take it apart so that they can remove all the dust and hair. Surprisingly, they will do it with the help of a powerful air compressor and some hair removal equipment.
Yes, all the debris will be removed from the Wheels, Cliff Sensor, and Optical Sensors. They will also check the filter, and if needed, it will either be cleaned or replaced.
As you can see, these are the kind of work that you can’t do at home by yourself since it is time-consuming and needs careful handling. If you have battery issues, they can remove and replace them on your behalf, cheers! You can know here how to replace Roomba battery.
How Much Will they Charge You?
It depends on the model you have purchased and the machines’ condition. Normally, it takes at least $50 (or more) to take apart the device and clean everything.
The techniques will check whether your unit only needs cleaning or more than that. If it needs additional repairing, you have to be mentally prepared that it could cost you up to $120 (or more).
You could get overwhelmed by looking at this amount but look at the positive side, you don’t have to buy a new one, and this saves you a huge amount of money.
Process 2: Solving Minor Issues by Yourself
As already mentioned above, you could face battery problems. Fortunately, it is sometimes related to internal malfunction,which you can solve inside your home.
Professionals suggest that you should reset and cycle the unit. You can do it in 5 easy steps.
- Step 1: Remove the battery, and press the CLEAN button between 5 and 15 seconds
- Step 2: Put the battery back again, and charge the device until the indicator displays alight.
- Step 3: When you see the light, charge the Roomba for an additional 72 hours without any break.
- Step 4: After 3 days (72 hours), the device will perform even better, and the battery won’t run out like the previous time.
- Step 5: Repeat the whole process more than once until you see an improvement. If you don’t find any positive change, buy a new battery.
Some Tips
- If you have a Roomba from a specific brand, make sure you repair it from their service center instead of looking for a cheaper alternative.
- Don’t look for a temporary solution and instead, focus on the long term benefits.
- Always moderate your battery’s condition so that you can extend its longevity.
- Try to reset the device if you notice any software issues.
- It is true that you can clean the device, but you have to keep in mind that the process won’t be easy. So, it is best that you take professionals’ help.
- If you live in the United States of America or Canada, don’t think twice and contact irobot Customer Care.
- In case you live outside the mentioned country, no problem, simply contact Irobots’ international distributor.
- Make sure you have your units’ serial number and warranty claims safe secure. This can help you out in several ways if you are in trouble.
- If you are a user of Roomba 600 series, then check this error messages chart.
Conclusion of iRobot Roomba Repair
Hope you have got what you were looking for from this article. Don’t procrastinate when you know you have to iRobot Roomba repair. Face the problem head-on and overcome the obstacle immediately. In this way, you can be a step ahead of the problem.
Enjoy using your iRobot Roomba. Happy cleaning!

Williams Kane is a blogger and writer. He’s passionate about writing and connecting with the community, especially when it comes to sharing his ideas through writing.
I am a versatile author with a passion for exploring a wide range of topics on our multi-niche website. With a background in research and a love for writing, I bring a unique blend of expertise to our platform.
My journey began in the world of science, where I earned a degree in biology and developed a deep fascination for the natural world. This background enables me to delve into topics related to ecology, environmental conservation, and the wonders of the animal kingdom.
However, my curiosity knows no bounds, and I have ventured into various other niches as well. From technology trends and digital innovations to health and wellness tips, I strive to provide well-researched and engaging content that informs and entertains our diverse audience.
Furthermore, my dedication to staying current with the latest developments in each niche ensures that our readers receive up-to-date and reliable information. Whether it’s deciphering complex scientific concepts or simplifying tech jargon, I take pride in making complex subjects accessible to all.
Join me on our multi-niche journey, where we explore the depths of knowledge and share insights on a multitude of topics to inspire, educate, and entertain.
Related posts:
 How to Use Tineco A11 Hero Handheld Vacuum Cleaner
 How to Clean Tineco A11 Hero Handheld Vacuum Cleaner
 How to Use Afoddon Cordless Vacuum Cleaner?
 How to Clean Afoddon Cordless Vacuum Cleaner?
 How to Clean Tineco Lightweight Vacuum Cleaner?
 How to Use Inse Cordless Vacuum Cleaner?
 How to Clean Inse Cordless Vacuum Cleaner?
 Vacuum Cleaner Vax: Unleash the Cleaning Power!
Comments are closed.