
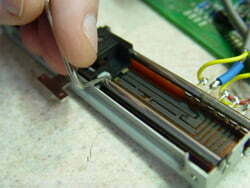
To clean a mixing console, you will need: -A soft, lint-free cloth – Isopropyl alcohol (IPA) -Distilled water Start by dusting the surface of the console with the soft cloth to remove any loose dirt or debris. Next, use a slightly dampened cloth with distilled water to wipe down the surface. Be sure to avoid getting any water inside the faders or potentiometers. Finally, use a clean, dry cloth with IPA to disinfect the console.
- Start with the power off and unplugged
- Use a vacuum cleaner with a soft brush attachment to remove any loose dirt and dust from all surfaces of the console
- Wipe down all surfaces of the console with a clean, damp cloth
- Be sure to avoid getting any water inside the unit
- Use a mild soap and water solution on a clean cloth to remove any stubborn dirt or stains from the surface of the console
- Rinse thoroughly with a damp cloth afterwards to remove any soap residue
- Allow the console to air dry completely before powering back on and using again
Also Read: Best Mixing Console For Recording Studio
Table of Contents
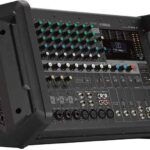
How to clean a dirty mixing console
How Do You Clean And Sanitize a Mixer?
Assuming you are referring to a stand mixer:
First, unplug the mixer.
Next, remove the mixing bowl and beaters. Wash the bowl and beaters in hot, soapy water. Rinse well and dry with a clean towel.
To clean the body of the mixer, dampen a cloth with warm water and mild detergent.
Wipe down the mixer, then rinse with a second cloth dampened with only water.
Dry thoroughly with a third towel.
Finally, use a cotton swab or toothpick to clean out any nooks or crannies. Reassemble your mixer and plug it in to test it out!
How Do You Clean Studio Equipment?
When it comes to cleaning studio equipment, there are a few things you need to keep in mind.
First of all, you want to make sure that you unplug all of your equipment before you start cleaning. This will help to prevent any accidents or damage to your equipment.
Next, you’ll want to gather all of the supplies you’ll need for cleaning. This includes a soft cloth, mild soap and water, and a vacuum cleaner with a brush attachment.
Once you have everything gathered, you can start by dusting off all of your surfaces with the soft cloth.
Be sure to get into all of the nooks and crannies, as dust can build up over time and cause problems with your equipment.
Once the surfaces are dusted, you can move on to cleaning them with the mild soap and water solution.
Again, be sure to reach all areas – especially if there are any buttons or controls on your equipment that could be damaged by water.
Finally, use the vacuum cleaner with brush attachment to clean out any remaining dirt or debris from your studio equipment. Be careful not to scratch any surfaces while doing this. And that’s it! By following these simple steps, you can easily keep your studio equipment clean and in good working condition.
How Do You Clean the Inside of a Hand Mixer?
When it comes to keeping your hand mixer clean, the most important thing is to make sure that the beaters are free of any food particles or grease. The best way to do this is to wash them by hand in warm, soapy water.
If you need to, you can also use a little bit of white vinegar to help remove any stubborn stains. Once the beaters are clean, you can then move on to cleaning the body of the mixer. This can be done using a damp cloth and some mild soap.
Be sure to avoid getting any water inside the mixer itself, as this could damage the electrical components. If your hand mixer has been used for anything other than mixing batter or frosting (such as kneading dough), then it’s also a good idea to give it a thorough cleaning with hot water and dish soap.
This will help remove any lingering food particles or grease that could cause problems down the line.
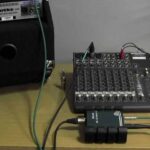
How to Clean a Sound Mixer
If you’ve ever tried to clean a sound mixer, you know it can be a bit of a challenge. Here are some tips on how to get your mixer looking and sounding its best:
- Unplug the mixer from any power sources.
- Remove all of the input and output cables.
- Use a soft, dry cloth to dust off the exterior of the mixer. Be sure to avoid getting any moisture or cleaning solutions on the unit.
- Next, use a slightly dampened cloth to wipe down all of the control knobs and faders. Again, be careful not to get any water inside the unit.
- Finally, use a cotton swab or toothpick to clean out any dirt or debris that may have gotten lodged in between the keys on the keypad (if your mixer has one).
Conclusion
If your mixing console is starting to look a little dirty, it’s probably time for a good cleaning. Here we showed you how to do it. We hope you understand and now know how to clean a mixing console.

Williams Kane is a blogger and writer. He’s passionate about writing and connecting with the community, especially when it comes to sharing his ideas through writing.
I am a versatile author with a passion for exploring a wide range of topics on our multi-niche website. With a background in research and a love for writing, I bring a unique blend of expertise to our platform.
My journey began in the world of science, where I earned a degree in biology and developed a deep fascination for the natural world. This background enables me to delve into topics related to ecology, environmental conservation, and the wonders of the animal kingdom.
However, my curiosity knows no bounds, and I have ventured into various other niches as well. From technology trends and digital innovations to health and wellness tips, I strive to provide well-researched and engaging content that informs and entertains our diverse audience.
Furthermore, my dedication to staying current with the latest developments in each niche ensures that our readers receive up-to-date and reliable information. Whether it’s deciphering complex scientific concepts or simplifying tech jargon, I take pride in making complex subjects accessible to all.
Join me on our multi-niche journey, where we explore the depths of knowledge and share insights on a multitude of topics to inspire, educate, and entertain.
Related posts:
 Top 6 Best Budget Audio Mixer for Home Studio In 2022
 How to Setup Mixing Console for Recording? A Complete Guide
 What You Need to Know About Live Mixing Consoles?
 What to Use With Mixing Console Stereo Channels?
 How to Connect Amplifier to Mixing Console?
What is a Mixing Console? An Ultimate Guide
How to Connect Amplifier to Mixing Console?
What is a Mixing Console? An Ultimate Guide
 Analog Vs Digital Live Sound Mixing Consoles ! What’S the Difference
 Types of Mixing Console ! To know Which Is The Best For You