
How to replace packing tape dispenser, it’s a common question for every packing tape dispenser user. Don’t worry we have come here to solutions to your query.
First, remove the old dispenser by unscrewing it from the mounting bracket.
Next, insert the new dispenser into the bracket and screw it in place.
Finally, feed the end of the packing tape through the dispenser and pull out the desired amount.
- Open up the packing tape dispenser by removing the screws that are holding it together
- Take out the old packing tape roller and replace it with a new one
- Put the packing tape dispenser back together by screwing it back up
- Test out the new packing tape roller to make sure it works properly
Get from here Best Packing Tape Dispenser.
Table of Contents
Scotch Packing Tape Dispenser Instructions Video
If you’re looking for a quick and easy way to dispense scotch packing tape, then you’ve come to the right place. This Scotch packing tape dispenser instructions video will show you how to use a dispenser to get the job done quickly and efficiently. Using a scotch packing tape dispenser is incredibly easy.
Simply insert the roll of tape into the dispenser, and then pull the trigger to dispense the desired amount of tape. You can also adjust the tension on the trigger, which will allow you to control how much tape is dispensed at once. With a little practice, you’ll be able to use your scotch packing tape dispenser like a pro in no time!
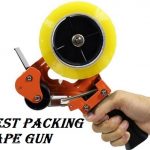
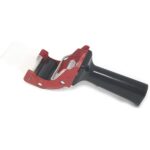
Best Packing Tape Dispenser
A packing tape dispenser is an essential tool for anyone who regularly ships packages. A good dispenser will make it easy to apply packing tape to boxes, and will help ensure that the tape is applied evenly and smoothly. There are a variety of different types of packing tape dispensers on the market, so it’s important to choose one that will work best for your needs.
One type of packing tape dispenser is the handheld Dispenser. This type of dispenser is small and lightweight, making it easy to carry with you when you’re shipping packages. Handheld dispensers typically have a trigger mechanism that allows you to control how much tape is dispensed, which can be helpful when you’re trying to avoid wasting tape.
Some handheld dispensers also come with a built-in cutter, so you can easily cut the tape once it’s been applied to the box.
Another type of packing tape dispenser is the desktop Dispenser. Desktop dispensers are larger than handheld Dispensers and usually sit on a table or countertop.
They typically have a lever arm that you depress in order to dispense the desired amount of packing tape. Many desktop Dispensers also include a cutting blade, so you can quickly and easily trim the excess Tape from around the box. When choosing a packing Tape Dispenser, it’s important to consider what type of packaging materials you’ll be using most often.
If you ship a lot of heavy items, for example, then you might want to opt for a stronger and more durable Dispenser than someone who ships lighter items like clothes or books. It’s also important to think about how often you’ll be using the Dispenser; if you plan on using it daily, then opting for a higher-quality model can save you time and frustration in the long run.
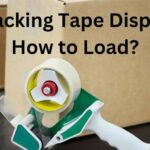
How to Load Hdx Packing Tape Dispenser
If you’re looking for a heavy-duty packing tape dispenser that can handle big jobs, the HDX Packing Tape Dispenser is a great option. This dispenser can accommodate rolls of up to 2 inches in width, and it has a built-in cutter that makes it easy to get clean, straight cuts every time. Loading the HDX Packing Tape Dispenser is quick and easy – just follow these simple steps:
- Remove the empty roll of tape from the dispenser.
- Unroll a new roll of tape and place it on the spindle in the center of the dispenser.
- Pull the end of the tape through the slot in the top of the dispenser, then wrap it around the spindle once or twice to secure it in place.
- Insert the end of the tape into one of the two side slots, then pull it tight so that there’s no slack in the roll. You’re now ready to start taping!
Packing Tape Dispenser Amazon
Whether you are packing for a move or just need to store some items away, you will need a good packing tape dispenser. There are many different types and brands of packing tape dispensers on the market, so how do you know which one to choose? We have done the research for you and found the best packing tape dispenser on Amazon.
The X-Treme Tape Dispenser is our top pick. It has a heavy duty construction that can handle any type of packing tape. The ergonomic design makes it comfortable to use and the built-in cutter ensures that you always have a clean edge to work with.
This dispenser also comes with a money back guarantee, so you can be sure that you are getting a quality product. If you are looking for a cheaper option, the Duck Brand High Strength Packing Tape Dispenser is a great choice. It is made from durable plastic and has an easy-to-use design.
The built-in cutter is also great for getting clean edges on your tape. No matter what your budget or needs are, there is sure to be a packing tape dispenser on Amazon that will work for you. Be sure to read the reviews before making your final decision so that you know what others think of the products mentioned above.
Duck Tape Dispenser Instructions
Assuming you would like step by step instructions on how to make a duck tape dispenser: First, you will need the following materials: -1 roll of duck tape
-1 pair of scissors -1 pen or marker -1 ruler or measuring tape
-1 piece of cardboard (optional) Now that you have gathered your materials, follow these steps to create your very own duck tape dispenser!
1. Start by cutting a strip of duck tape that is about 2 inches wide and 12 inches long.
2. Next, use your scissors to cut small slits into each end of the strip of duck tape. These slits should be about ½ an inch apart and only go in about ¼ of the way.
3. Once you have made the slits, fold over each end so that they are now covering up the raw edges of the Duck Tape.
You can use a pen or marker to trace along the folded edge to make a nice clean line.
4. Now take another strip of Duck Tape and place it sticky side down onto one end of the first strip (the one with the slits). Line up the edges as best as possible and then press down firmly to secure in place.
Repeat this step on the other end.
5a). If you want to be able to store extra rolls of Duck Tape inside your dispenser, cut a small rectangle out of cardboard and insert it into one end before adding more Duck Tape over top (this will act as a spacer).
Add as many rolls as desired before securing this end shut with more Duck Tape.
5b). If you do not want to store any extra rolls inside your dispenser, simply add more Duck Tape over both open ends until they are completely covered/sealed shut. And there you have it! Your very own DIY Duck Tape Dispenser!
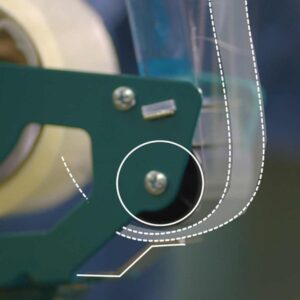
How Do You Change a Packing Tape Dispenser?
Assuming you’re talking about a handheld packing tape dispenser, there are only a few steps to follow:
1. Open up the dispenser by unscrewing the top cover. This will expose the roll of packing tape inside.
2. Unwind any tape that is currently on the roll and discard it.
3. Place a new roll of packing tape onto the spindle in the center of the dispenser, making sure that the sticky side of the tape is facing outwards.
4. Screw the top cover back on, and your dispenser should be good to go!
How Do You Put a Sticky Tape Dispenser Together?
Assuming you would like a blog post discussing the assembly of a sticky tape dispenser: Most people have used or at least seen a roll of adhesive tape. This useful invention can be found in many sizes and colors and is often used to secure wrapping paper, hold together boxes, or even hang up decorations.
But have you ever wondered how those rolls of tape are made? It’s actually not as complicated as one might think. Here is a step-by-step guide on how sticky tape is produced:
First, the raw materials must be gathered. The base material for the adhesive part of the tape is typically acrylic, which is a type of plastic. The backing material is usually made from paper or fabric.
Once these materials are acquired, they must be cut into strips that will eventually be wound onto the spindle of the tape dispenser. After the strips are cut to size, they need to be coated with adhesive. The most common type of adhesive used for sticky tape is pressure-sensitive adhesive (PSA).
This substance becomes tacky when it’s pressed against another surface but doesn’t adhere permanently until it’s been activated by heat or light. Once the strips are evenly coated with PSA, they need to be cured before moving on to the next step. Curing simply means letting the adhesive dry and become less viscous so that it will stick to surfaces more readily.
After curing, it’s time to affix the backing material to the strips of adhesive. This can be done by hand or with a machine depending on how much sticky tape needs to be produced. Once all of the strips have been glued together, they need to cooled so that the glue sets completely before being wound onto spools.
The final step is packaging! Sticky tapes comes in all sorts of containers including cardboard tubes, individual rolls wrapped in plastic, and even large industrial spools. And there you have it! That’s how sticky tapes are made!
Why is My Tape Dispenser Not Working?
If your tape dispenser isn’t working, there are a few possible explanations. The first is that the blade inside the dispenser may be dull. To fix this, simply open up the dispenser and replace the blade with a new one.
Another possibility is that the roll of tape itself is jammed. This can usually be fixed by unspooling some of the tape and then rewinding it back onto the roll. If this doesn’t work, you may need to replace the entire roll of tape.
Finally, it’s possible that there is something blocking the path of the blade inside the dispenser. This could be a piece of debris or even just a build-up of dust. Simply cleaning out the dispenser should fix this problem.
How Do You Put Tape in a Scotch Tape Dispenser?
Assuming you’re talking about the classic Scotch tape dispenser: With the serrated edge of the tape facing up, insert the roll of tape into the slot at the top of the dispenser. Push down on the roll until you hear a clicking sound, indicating that it is in place.
Pull out a small length of tape and cut it with the built-in blade. That’s it! Now you can use your dispenser as normal.
How to set up and use TAPE GUN | TAPE DISPENSER
Conclusion
If your packing tape dispenser is broken or lost, don’t despair! You can easily replace it with a few household items. All you need is a sharp knife, a strong adhesive such as super glue, and a sturdy surface to work on.
With a little effort, you can have your packing tape dispenser back in no time.

Williams Kane is a blogger and writer. He’s passionate about writing and connecting with the community, especially when it comes to sharing his ideas through writing.
I am a versatile author with a passion for exploring a wide range of topics on our multi-niche website. With a background in research and a love for writing, I bring a unique blend of expertise to our platform.
My journey began in the world of science, where I earned a degree in biology and developed a deep fascination for the natural world. This background enables me to delve into topics related to ecology, environmental conservation, and the wonders of the animal kingdom.
However, my curiosity knows no bounds, and I have ventured into various other niches as well. From technology trends and digital innovations to health and wellness tips, I strive to provide well-researched and engaging content that informs and entertains our diverse audience.
Furthermore, my dedication to staying current with the latest developments in each niche ensures that our readers receive up-to-date and reliable information. Whether it’s deciphering complex scientific concepts or simplifying tech jargon, I take pride in making complex subjects accessible to all.
Join me on our multi-niche journey, where we explore the depths of knowledge and share insights on a multitude of topics to inspire, educate, and entertain.
Related posts:
 How to Load Scotch Packaging Tape Dispenser? Simple Few Steps
 Best Packing Tape Gun For Commercial Use & Buying Guide 2023
 3M Packing Tape Dispenser How to Load? Do It Within 1 Minute
 Packing Tape Rite Aid: The Ultimate Solution.
 Water-Activated Packing Tape: The Ultimate Solution for Hassle-free Shipping.
 Hand Held Tape Dispensers: Streamline Your Packaging Process Now!
 Best Tape To Hang Pictures On Wall: Strong, Easy & Damage-Free.
 Best Tape for Scrapbooking : Unleash Your Creativity and Perfection