
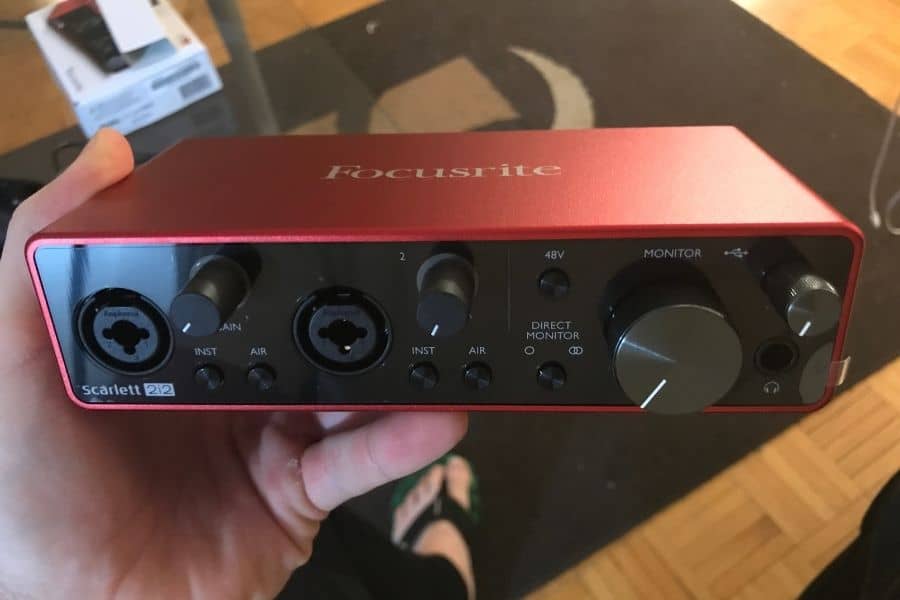
How to Connect Condenser Mic to Audio Interface?: To connect a condenser microphone to an audio interface, you will need an XLR cable. Connect the XLR cable to the microphone, and then connect the other end of the cable to the audio interface. If your audio interface has phantom power, make sure that it is turned on.
- Open up your audio interface and locate the XLR input
- This is where you will plug in your condenser microphone
- Take your XLR cable and plug it into the XLR input on your audio interface
- The other end of the XLR cable will go into the XLR output on your condenser microphone
- Once everything is plugged in, turn on your audio interface and make sure that the phantom power is turned on (if your condenser microphone requires it)
- Now you should be able to start recording with your condenser mic!
Also Read: Best Condenser Mic Under 200
Table of Contents
How to Connect Condenser Mic to Amplifier
If you’re looking to connect a condenser mic to an amplifier, there are a few things you’ll need to do first.
First, make sure that your amplifier has what’s called “phantom power.” This will provide the power necessary for the condenser mic to function.
Next, connect the XLR cable from the microphone to the input on the amplifier.
Once everything is hooked up, turn on both the amplifier and microphone and begin speaking or singing into the microphone. You should now be able to hear yourself through the amplifier!
Do You Need an Audio Interface for a Condenser Microphone?
If you want to use a condenser microphone with your computer, then you need an audio interface. The audio interface provides the necessary power for the condenser microphone and also converts the signal from analog to digital so that it can be used by your computer.
There are many different types of audio interfaces available on the market, so you will need to choose one that is compatible with your computer and meets your needs.
Can You Plug a Mic into an Audio Interface?
Yes you can plug a mic into an audio interface. Most audio interfaces will have at least one XLR input for microphones, as well as a 1/4″ input for instruments. Some higher-end interfaces will also have additional inputs and outputs for more flexibility.
How Do I Connect My Condenser Mic to My Computer?
If you want to connect a condenser mic to your computer, you’ll need an audio interface. An audio interface is a device that converts the analog signal from your mic into a digital signal that your computer can understand.
Most audio interfaces will have a XLR input for your mic, as well as other inputs and outputs for headphones, speakers, and instruments.
To connect your condenser mic to an audio interface, first make sure that it is powered on. Then, connect the XLR cable from your mic to the XLR input on the interface.
Once it’s connected, open up your computer’s sound settings and set the audio interface as your default playback device.
Now when you speak into your microphone, you should be able to hear yourself through your computer speakers!
How Do I Record Audio With My Condenser Mic?
Assuming you have a basic understanding of audio equipment and recording, here is a step-by-step guide to recording with a condenser mic:
1. Connect your mic to the audio interface using an XLR cable. If your interface has multiple inputs, make sure you are plugging into the correct one.
2. Open your DAW (Digital Audio Workstation) of choice. We will be using Pro Tools in this example, but the process is similar in other software.
3. Create a new track by clicking on the “+” symbol at the top of the screen, or going to “File > New Track.”
4. In the “New Track” dialogue box that pops up, select “Audio” for the track type and make sure “Input 1” is selected under “Input.” You can also name your track here if you want. Then click “Create.”
5. Now that you have created an audio track, it’s time to set up your input source by clicking on the dropdown menu next to where it says “Record.”
6. Selecting “Input 1” from this menu will route any signal coming from that input directly into Pro Tools so we can record it.
7. The next thing to do is set your recording level by hitting the record enable button (the red circle with a line through it) on your newly created track and adjusting the fader until you see green lights in your levels meter peaking around -12 dBFS (decibels below full scale).
If they’re peaking too high (into the red), turn them down; if they’re not peaking high enough, turn them up. You want to avoid clipping, which occurs when levels are too high and cause distortion in your recordings.
8. Once you’ve found a good recording level, hit play in Pro Tools and start speaking or singing into your microphone!
How to connect your microphones to your interface
Conclusion
If you’re looking to connect a condenser mic to an audio interface, there are a few things you’ll need to take into consideration. First, you’ll need to make sure that the audio interface you’re using has phantom power, as this is necessary for powering most condenser mics. Once you’ve confirmed that your interface has phantom power, simply connect the mic to the interface using an XLR cable and turn on the phantom power from the interface.
You should then be good to go!
Relevant Post:
Are Condenser Mics Good for Streaming?
Why is My Condenser Mic Not Working?
How to Connect Condenser Mic to Bluetooth Speaker?
How to Connect Condenser Mic to Mac?
How to Connect Condenser Mic to Speaker?
How to Connect a Condenser Mic to a Pc?
Are you a user of a condenser mic?
Does a condenser mic need phantom power?
How to use condenser mic on tiktok?
Are condenser mics good for singing?
Can you record guitar with a condenser mic?

Williams Kane is a blogger and writer. He’s passionate about writing and connecting with the community, especially when it comes to sharing his ideas through writing.
I am a versatile author with a passion for exploring a wide range of topics on our multi-niche website. With a background in research and a love for writing, I bring a unique blend of expertise to our platform.
My journey began in the world of science, where I earned a degree in biology and developed a deep fascination for the natural world. This background enables me to delve into topics related to ecology, environmental conservation, and the wonders of the animal kingdom.
However, my curiosity knows no bounds, and I have ventured into various other niches as well. From technology trends and digital innovations to health and wellness tips, I strive to provide well-researched and engaging content that informs and entertains our diverse audience.
Furthermore, my dedication to staying current with the latest developments in each niche ensures that our readers receive up-to-date and reliable information. Whether it’s deciphering complex scientific concepts or simplifying tech jargon, I take pride in making complex subjects accessible to all.
Join me on our multi-niche journey, where we explore the depths of knowledge and share insights on a multitude of topics to inspire, educate, and entertain.
Related posts:
 Does a Condenser Mic Need Phantom Power? Find Out Here!
 A Beginner’s Guide on How to Use Condenser Mic on Tiktok
 Microphone Not Working Android: Fix it Now with These Power Tips
Connect Microphone to Samsung Tv
Good Wireless Microphone for Karaoke
Blue Yeti Firmware: Enhance Your Recording Experience
Microphone Not Working Android: Fix it Now with These Power Tips
Connect Microphone to Samsung Tv
Good Wireless Microphone for Karaoke
Blue Yeti Firmware: Enhance Your Recording Experience
 How to Easily Connect Microphone to Computer: The Ultimate Guide
 How To Turn On Camera And Microphone On Mac? A Quick Guide