
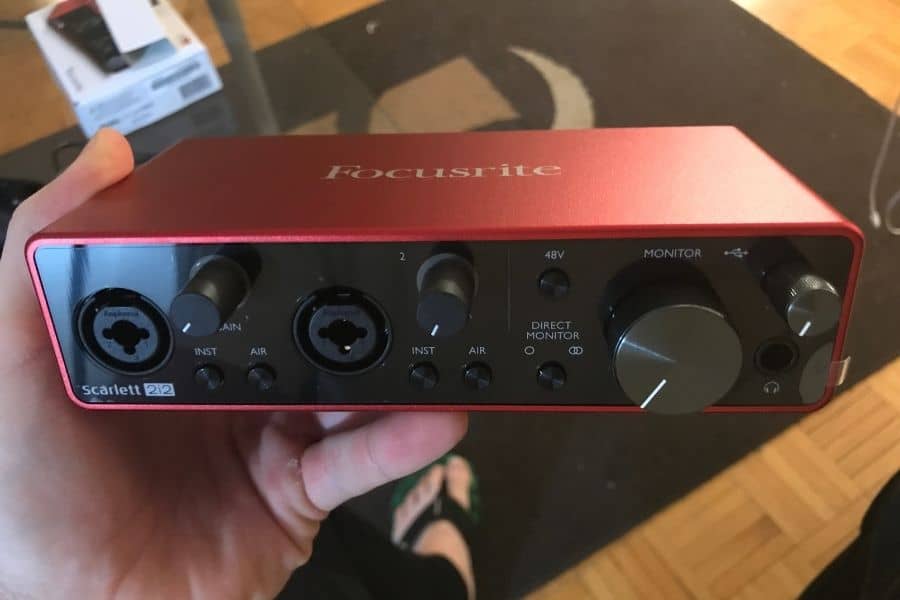
How to Connect a Condenser Mic to a Pc?: To connect a condenser mic to a PC, you’ll need an audio interface with a XLR input. You can then plug the XLR cable from the mic into the interface, and the interface will connect to your computer via USB. Once everything is plugged in, you’ll need to configure your software to recognize the new hardware.
In most cases, this is simply a matter of going into your sound settings and selecting the audio interface as your default microphone device.
- First, connect the XLR end of the mic cable to the condenser microphone
- Next, connect the other end of the mic cable to the audio input port on your PC
- Once the cable is connected, you will need to configure your PC’s sound settings to use the condenser microphone as its primary input device
- To do this, open the “Sound” control panel and navigate to the “Input” tab
- In the “Input” tab, select your condenser microphone from the drop-down list of input devices
- Finally, click “Apply” and then “OK” to save your changes and exit the Sound control panel
Also Read: Best Condenser Mic Under 200
Table of Contents
How To Connect Condenser Mic To Computer (Mac or PC)
How Do I Connect My Condenser Microphone?
If you want to connect a condenser microphone to your computer, there are a few things you need to know first. For starters, condenser microphones require phantom power in order to work properly. This means that you’ll need an audio interface with phantom power or a separate phantom power supply.
Once you have that taken care of, simply connect the microphone to the audio interface using an XLR cable and you’re good to go!
How Do I Connect My Condenser Microphone to Windows 10?
If you’re looking to connect a condenser microphone to your Windows 10 computer, there are a few things you’ll need to do first.
First, check to make sure that your condenser microphone is compatible with Windows 10. If it is, then you’ll need to purchase an adapter that will allow you to connect the two.
Once you have the adapter, follow these steps:
1. Plug the XLR end of the adapter into your condenser microphone.
2. Connect the other end of the adapter into your computer’s USB port.
3. Open up your sound settings (you can do this by right-clicking on the sound icon in your taskbar and selecting “Open Sound Settings”).
4. Under “Input,” select “USB Microphone.”
5. You should now be able to use your condenser microphone with Windows 10!
Also Read: mxl 770 review
How Do I Connect My Condenser Mic to My Computer Without Phantom Power?
If you want to connect a condenser mic to your computer without phantom power, you’ll need to use a special adapter.
This is because most condenser mics require phantom power in order to function properly.
However, there are a few adapters on the market that will allow you to connect your condenser mic to your computer without needing phantom power.
One such adapter is the XLR-to-USB Adapter from MXL. This adapter allows you to directly connect any XLR-based microphone – including condenser microphones – to your computer’s USB port, without requiring any additional phantom power source.
Another option is the iRig Pre HD from IK Multimedia, which is an interface that lets you connect virtually any microphone – again, including condenser models – to your computer via USB, with or without phantom power.
So if you’re looking to connect a condenser mic to your computer without phantom power, one of these two adapters should do the trick!
How Do I Connect My Xlr Condenser Mic to My Computer?
If you’re looking to connect an XLR condenser microphone to your computer, there are a few things you’ll need.
First, you’ll need an audio interface with XLR inputs. These can be found in a variety of prices and sizes, so it’s important to find one that fits both your needs and your budget.
Once you have your audio interface, simply connect the XLR cable from your microphone to the appropriate input on the interface.
Next, open up your recording software of choice and set the input source to be your audio interface. You may need to adjust the gain levels in order for your software to pick up the signal from the microphone properly.
And that’s it! You should now be able to record using your XLR condenser mic with ease.
How to Set Up a Condenser Microphone on Windows 10
If you want to start podcasting or recording your own music, you’ll need a good quality microphone. A condenser microphone is ideal for this purpose, providing clear sound quality that will make your recordings sound great. But before you can start using your new mic, you’ll need to set it up properly on your Windows 10 computer.
Here’s how to do it:
1. Connect the microphone to your computer’s USB port. If your mic uses an XLR cable, you’ll need an adapter to connect it to the USB port.
2. Open the Sound settings in Windows by going to Start > Settings > System > Sound .
3. In the “Input” section of the Sound window, select your condenser microphone from the drop-down menu next to “Choose your input device.” If you don’t see your mic listed here, try restarting your computer with the mic connected.
4. Once you’ve selected your mic, click on “Device Properties.” In the Microphone Properties window that appears, go to the “Levels” tab and adjust the volume until it’s at a comfortable level for recording (usually around 80%). You can also use the “Enhancements” tab to enable noise reduction if needed.
Make sure to click “Apply” after making any changes in this window.
5. That’s it!
Also Read: best affordable condenser mic for vocals
FAQs
Q1: How do I connect a condenser microphone to my PC?
A1: To connect a condenser microphone to your PC, follow these steps:
- Check your microphone: Ensure your condenser microphone has the correct connector type (usually XLR or USB) compatible with your PC.
- XLR Microphone Connection:
- If your microphone has an XLR connector, you’ll need an audio interface with an XLR input.
- Connect the XLR cable from your microphone to the XLR input on the audio interface.
- Connect the audio interface to your PC using a USB or FireWire cable.
- Install any necessary drivers for the audio interface if prompted.
- USB Microphone Connection:
- If your microphone has a USB connector, simply plug it directly into an available USB port on your PC.
- Windows should automatically detect and install the necessary drivers for the USB microphone.
Q2: How do I set up my condenser microphone on Windows?
A2: After connecting your condenser microphone, follow these steps to set it up on Windows:
- Open Sound Settings:
- Right-click on the speaker icon in the taskbar and select “Open Sound settings.”
- Select Input Device:
- Under “Input,” select your condenser microphone from the list of available devices.
- Adjust Microphone Levels:
- Click on “Device properties” below the input device list to adjust the microphone volume and additional settings.
- Test Your Microphone:
- Click on “Test your microphone” to make sure it’s working correctly.
Q3: How do I configure my condenser microphone in macOS?
A3: To set up your condenser microphone on macOS:
- Open System Preferences:
- Click the Apple menu and select “System Preferences.”
- Select Sound:
- In the System Preferences window, click on “Sound.”
- Choose Input Device:
- Under the “Input” tab, select your condenser microphone from the list of available input devices.
- Adjust Input Volume:
- Use the input volume slider to adjust the microphone’s sensitivity.
- Test Your Microphone:
- Speak into the microphone, and you should see the input level meter respond to your voice.
Q4: How can I monitor my condenser microphone’s audio on my PC?
A4: To monitor your condenser microphone’s audio in real-time on your PC:
- Enable Monitoring:
- Some audio interfaces and recording software allow you to enable “direct monitoring” or “software monitoring.” Check your hardware and software settings.
- Use Headphones:
- Connect headphones to your audio interface or PC’s headphone jack to hear your microphone’s audio while recording.
- Adjust Latency:
- If you experience noticeable delay (latency) in your monitoring, adjust your audio interface settings or use ASIO drivers (for Windows) to minimize latency.
Q5: How do I record with a condenser microphone on my PC?
A5: To record with a condenser microphone on your PC:
- Choose Recording Software:
- Install recording software like Audacity, Adobe Audition, or use built-in software like GarageBand (macOS) or Voice Recorder (Windows).
- Select Input Device:
- Within your recording software, select your condenser microphone as the input device.
- Set Levels:
- Adjust microphone levels within the recording software to ensure a clean and distortion-free recording.
- Press Record:
- Start recording within your chosen software.
- Save and Export:
- After recording, save your audio file and export it in your desired format.
These FAQs should help you connect, set up, and start recording with your condenser microphone on your PC.
Conclusion
Condenser microphones are often used in recording studios and for other professional applications. They are also popular with home users who want to improve the quality of their audio recordings. Connecting a condenser mic to a PC is not difficult, but there are a few things you need to know before you get started.
First, you need to make sure that your PC has an audio input jack. If it does not, you will need to buy an adapter that will allow you to connect the microphone to the computer’s USB port. Once you have confirmed that your PC has an audio input jack, you can proceed with connecting the microphone.
Next, locate the audio input jack on your PC. It is typically located on the back of the computer, near the power supply unit. Once you have found the audio input jack, insert the mini-plug end of the microphone cable into it.
Finally, plug the other end of the microphone cable into the XLR input on the back of the condenser mic. Make sure that both ends of the cable are securely connected before turning on your computer’s software program or recording device. With everything properly connected, your condenser mic should now be ready to use!
Relevant Post:
How to Connect Condenser Mic to Audio Interface?
How to Connect Condenser Mic to Speaker?
How to Connect Condenser Mic to Bluetooth Speaker?
How to connect condenser mic to Mac?
MXL 770 Frequency Response and Graph
How Does a Condenser Microphone Work?
Is a Condenser Mic Good for Vocals?
Condenser Microphone Problems and Solution
Best Affordable Condenser Mic For Vocals
Best Condenser Mic Under 200 USD
Does a condenser mic need phantom power?

Williams Kane is a blogger and writer. He’s passionate about writing and connecting with the community, especially when it comes to sharing his ideas through writing.
I am a versatile author with a passion for exploring a wide range of topics on our multi-niche website. With a background in research and a love for writing, I bring a unique blend of expertise to our platform.
My journey began in the world of science, where I earned a degree in biology and developed a deep fascination for the natural world. This background enables me to delve into topics related to ecology, environmental conservation, and the wonders of the animal kingdom.
However, my curiosity knows no bounds, and I have ventured into various other niches as well. From technology trends and digital innovations to health and wellness tips, I strive to provide well-researched and engaging content that informs and entertains our diverse audience.
Furthermore, my dedication to staying current with the latest developments in each niche ensures that our readers receive up-to-date and reliable information. Whether it’s deciphering complex scientific concepts or simplifying tech jargon, I take pride in making complex subjects accessible to all.
Join me on our multi-niche journey, where we explore the depths of knowledge and share insights on a multitude of topics to inspire, educate, and entertain.
Related posts:
 How to Connect Condenser Mic to Speaker?
 Can You Record Guitar With a Condenser Mic?
 How to Connect Mic to Android Tv | Simple Few Steps
How Do I Use the Microphone on My Android Tv?
Where iPhone Microphone Went Missing: Troubleshooting Tips
Understanding the Dynamic vs Condenser Microphones Debate: Unraveling the Key Differences
Headset Microphone for Podcasting: Unleash Your Audio Power
How to Connect Mic to Android Tv | Simple Few Steps
How Do I Use the Microphone on My Android Tv?
Where iPhone Microphone Went Missing: Troubleshooting Tips
Understanding the Dynamic vs Condenser Microphones Debate: Unraveling the Key Differences
Headset Microphone for Podcasting: Unleash Your Audio Power
 Desk Microphone Setup: Ultimate Guide to Perfecting Your Audio Experience