
How to Build a Mixing Console?: To build a mixing console, you’ll need to gather some materials. You’ll need an audio interface, a mixer, speakers, and cables. Once you have all of your materials, you’ll need to set up your audio interface and mixer.
Then, you’ll need to connect your speakers to the mixer.
Finally, you’ll need to connect all of your cables from the audio interface to the mixer. Once everything is connected, you should be able to start mixing!
- Acquire all the necessary materials
- This includes wood for the frame, particle board for the top and bottom, screws, drill bits, saws, a router, binding posts, audio jacks, volume controls, EQ controls, and power switches
- Cut the wood to size according to your design plans
- Assemble the frame of the console using screws or nails
- Attach the particle board to the top and bottom of the frame
- Drill holes for all of the audio jacks, binding posts, volume controls, EQ controls, and power switches according to your design plans
- Use a router to create any desired routing channels in the particle board
- Assemble everything in the console and wire it up according to your design plans
Also Read: Best mixing console for recording studio
Table of Contents
Custom Mixing Console
A custom mixing console is a great way to get the perfect mix for your specific needs. By working with a professional audio engineer, you can create a one-of-a-kind piece of equipment that will help you achieve the sound you desire. There are many factors to consider when designing a custom mixing console.
The first step is to decide what type of mixer you need.
There are two main types of mixers: digital and analog. Each has its own strengths and weaknesses, so it’s important to choose the right one for your project.
Once you’ve decided on the type of mixer, you’ll need to select the features that are most important to you. Do you need a lot of input channels? Do you need EQ or compression on each channel?
What about effects like reverb or delay? By figuring out what’s most important to you, you can narrow down your options and find the perfect mixer for your needs.
Finally, it’s important to work with a reputable audio engineer who can help bring your vision to life.
They’ll be able to recommend the best components and help with the assembly process. With their expertise, you can be confident that your custom mixer will meet all of your expectations.
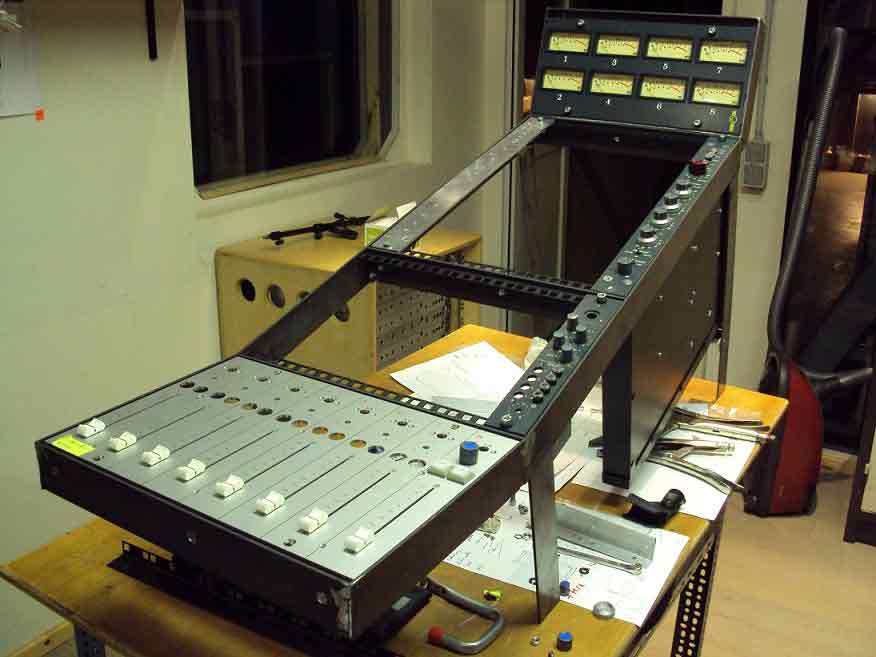
Diy Analog Mixing Console
Analog mixing consoles are the backbone of any professional recording studio. They provide a high quality signal path for all of your outboard gear and allow you to mix multiple audio sources together.
While digital mixing consoles have become popular in recent years, there is still no substitute for the sound quality and flexibility that an analog console provides.
Building your own analog mixing console can be a challenging but rewarding project. There are a few things you need to consider before getting started, such as the number of channels you need, the type of mixer topology you want to use, and what kind of features you want to include. Once you’ve got a plan in place, it’s time to start shopping for parts.
The most important part of any mixer is the summing amplifier, so make sure to get a good one! With a little bit of planning and elbow grease, you can build yourself a high-quality analog mixing console that will serve you well for years to come.
Diy Digital Mixer
A digital mixer is a versatile piece of equipment that can be used to mix audio signals from multiple sources. They are often used in live sound reinforcement and recording applications, as well as in broadcast and post-production.
Digital mixers typically have a variety of input and output options, allowing them to connect to a wide range of audio sources and destinations.
They also usually offer a number of built-in effects that can be applied to the audio signal, such as reverb or delay. One advantage of digital mixers over their analog counterparts is that they can be controlled via software, giving the user more flexibility when it comes to adjusting settings and creating custom presets.
If you’re thinking about setting up your own home studio or live rig, then a digital mixer could be a great addition to your gear.
In this article, we’ll take a look at some of the things you need to know before buying one.
What are the 3 Types of Mixing Consoles?
There are three types of mixing consoles: digital, analog, and hybrid. Each type has its own strengths and weaknesses, so it’s important to choose the right one for your needs.
Digital mixing consoles are the most advanced type of console, and they offer a wide range of features and capabilities.
They’re also the most expensive type of console, so they’re not always the best choice for smaller budgets. Analog mixing consoles are more affordable than digital consoles, but they don’t offer as many features.
They’re a good choice for those who need a simple mixer that can get the job done without all the bells and whistles.
Hybrid mixing consoles are a mix between digital and analog consoles. They offer some of the best features of both types of consoles, but they’re also more expensive than either digital or analog models.
How Do You Set Up a Mixing Console?
Assuming you would like a blog post discussing how to set up a mixing console for live sound reinforcement, here are some tips:
1. The first thing you need to do is make sure that you have all the necessary equipment. This includes the mixer itself, speakers, microphones, and all the cables required to connect everything.
2. Once you have all the gear, the next step is to set up the speakers. Start by placing them in strategic positions around the room so that they will create an even sound field. Then use speaker stands or other support structures to position them at the correct height.
3. Next, it’s time to connect everything using cables. Make sure that all of your connections are secure and tight so that there is no risk of loose wires causing problems later on.
4. Now it’s time to power up your mixer and start adjusting the settings to get the sound quality that you want.
Pay close attention to levels and EQs so that you don’t end up with feedback or other unwanted noise in your mix.
5. Once you’re happy with your sound, sit back and enjoy your work!
How to Make a Sound Mixer at Home?
A sound mixer, also called a mixing console, is a device used to combine, route, and change the level, timbre and/or dynamics of audio signals. Mixers can process both analog and digital audio signals.
They are commonly used in recording studios, public address systems, radio stations, stage lighting systems and nightclubs.
There are several ways that you can make your own sound mixer at home. One way is to use an audio interface with multiple inputs. You can then connect this to your computer and use software to mix the audio signals.
Another way is to use a hardware mixer. This will require more equipment but will give you more control over the sound. If you want to create a professional-sounding mix, it is important to understand how each type of audio signal behaves.
For example, drums tend to have a lot of low frequency content which can muddy up the rest of the instruments if not mixed correctly. Vocals also have a wide range of frequencies that need to be balanced so they don’t get lost in the mix or sound tinny.
By taking the time to learn about different types of audio signals and how they interact with each other, you’ll be able to create much better sounding mixes at home.
With practice, you’ll be able to produce mixes that rival those from professional studios!
Can I Connect 2 Powered Mixers Together?
Yes, you can connect two powered mixers together. You would need to use a Y-cable that connects the main output of one mixer to the aux input of the other mixer.
This will allow you to mix the signal from both mixers together.
DIY SSL 4000E Mixing Console CLONE, Analog mixing
Conclusion
Building a mixing console is a pretty simple affair. All you need is some wood, some screws, and some electronic components. Here’s a quick rundown of what you’ll need to do:
1. Cut the wood to size. You’ll need two pieces for the top and bottom of the console, and two more for the sides. Make sure all the cuts are square and level.
2. Assemble the frame using screws and brackets.
3. Install the electronic components according to your design layout. Be sure to use appropriate wiring techniques so everything is properly grounded
4. Attach any necessary hardware, such as faders or input/output jacks
5. Now you have a basic mixing console that you can use for recording or live sound reinforcement!
Related Post:
How to Build a Mixing Console Desk?
How to Use a Digital Mixing Console?
How to Use a Analog Mixing Console?
Mixing Console Troubleshooting Checklist!
Best Mixing Desk for a Recording Studio
MXL 770 Review : Best Cardioid Condenser Mic
Top 8 Best Electric Guitar Under 300
Top 6 Best Budget Audio Mixer Review
What is Matrix on Mixing Console?

Williams Kane is a blogger and writer. He’s passionate about writing and connecting with the community, especially when it comes to sharing his ideas through writing.
I am a versatile author with a passion for exploring a wide range of topics on our multi-niche website. With a background in research and a love for writing, I bring a unique blend of expertise to our platform.
My journey began in the world of science, where I earned a degree in biology and developed a deep fascination for the natural world. This background enables me to delve into topics related to ecology, environmental conservation, and the wonders of the animal kingdom.
However, my curiosity knows no bounds, and I have ventured into various other niches as well. From technology trends and digital innovations to health and wellness tips, I strive to provide well-researched and engaging content that informs and entertains our diverse audience.
Furthermore, my dedication to staying current with the latest developments in each niche ensures that our readers receive up-to-date and reliable information. Whether it’s deciphering complex scientific concepts or simplifying tech jargon, I take pride in making complex subjects accessible to all.
Join me on our multi-niche journey, where we explore the depths of knowledge and share insights on a multitude of topics to inspire, educate, and entertain.
Related posts:
 Top 10 Best Mixing Console For Recording Studio: For All Budget!
 Best Mixing Desk for a Recording Studio: A Comprehensive Guide
 What Does a Mixing Console Do? You Should Know In Details !
 How Does a Mixing Console Work? Should You Know Everything’s
 How to Use a Analog Mixing Console?
What is Matrix on Mixing Console? Do You Know?
How to Use a Analog Mixing Console?
What is Matrix on Mixing Console? Do You Know?
 What is a Pad on a Mixing Console? Know in Details
What is a Line Level on Mixing Console?
What is a Pad on a Mixing Console? Know in Details
What is a Line Level on Mixing Console?