
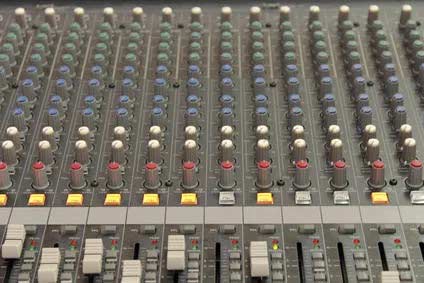
A mixing console also called a soundboard, is an electronic device used to combine, route, and modify audio signals. It allows a variety of input sources, such as microphones and instruments, to be mixed together and sent to an output device, such as a speaker or recording device. A mixing console typically has several channels, each with its own volume control and other settings.
How to use a mixing console? You have to know first. In this article, we discussed how to use a mixing console for your convenience in detail.
From this article, you will learn how to use each of the mixing consoles.
Check out the general rules at the beginning. Then you can know about each part in detail.
First, connect all of your input devices to the appropriate channels.
Then adjust the volume levels and other settings for each channel until you get the desired mix.
Finally, connect your output device(s) to the mixer and turn on both the mixer and the output device(s).
- Connect all of your audio sources to the mixing console
- This will typically involve connecting microphones, instruments, and other playback devices to the appropriate input jacks on the mixer
- Adjust the gain levels for each input channel
- The goal is to get a strong signal that is not clipping (distorting) without increasing the overall level too much
- Use the EQ controls to shape the sound of each individual channel as desired
- Send some or all of the channels to one or more output buses as needed
- For example, you might want to send all of the vocal channels to a dedicated bus for further processing with effects devices
- Finally, adjust the master output level as needed so that it is loud enough but not clipping
Also Read: Best Mixing Console For Recording Studio
Table of Contents
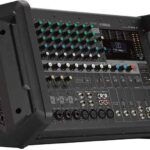
Large Mixing Console
A mixing console, also called a sound board, audio mixer or mixing desk, is an electronic device for combining, routing and changing the level, tone and dynamics of audio signals.
A mixing console typically has three sections: inputs, outputs and a central control area.
The input section accepts signal sources from microphones, instruments and other line-level devices; the output section sends signals to amplifiers and loudspeakers; and the central control area houses the electronic components used to adjust the level, tone and dynamics of each input signal.
The first commercially available mixing console was introduced in 1930 by British electronics manufacturer EMI. Since then, mixing consoles have come in a variety of shapes and sizes to accommodate the needs of different users.
Large-format mixing consoles are typically used in professional recording studios and live sound reinforcement systems; smaller mixers are more commonly found in home studios and portable PA systems.
Mixing consoles can be analog or digital (or a combination of both). Analog mixers use voltage levels to control the amplitude of audio signals; digital mixers use digital signal processing (DSP) algorithms to manipulate audio data. Some digital mixers also include analog circuits for tasks such as preamplification, equalization and effects processing.
The term “mixing console” is sometimes used interchangeably with “soundboard,” “audio mixer” or “mixing desk.” However, these terms can refer to specific types of equipment: a soundboard is usually a large-format mixer used in professional recording studios; an audio mixer is typically a smaller format mixer used in live sound reinforcement applications; and a mixing desk refers to any type of mixer, regardless of size or intended use.
How to Use Mixer Grinder
A mixer grinder is a kitchen appliance used to grind spices or other food items. It is also known as a spice grinder. A good quality mixer grinder will make your life easier in the kitchen and help you save time.
There are many different types of mixer grinders available on the market, so it is important to choose one that suits your needs. Here are some tips on how to use a mixer grinder:
1. Read the manual carefully before using the mixer grinder. This will help you understand how to use it properly and avoid any accidents.
2. Make sure that all the parts of the mixer grinder are assembled correctly before plugging it in.
3. Choose the right setting for grinding your ingredients. If you want a fine powder, then choose a higher setting, but if you want a coarse powder, then go for a lower setting.
4. Add the ingredients into the jar of the mixer grinder and secure the lid tightly before turning it on. Start with small quantities and gradually increase it as per your need. Don’t overfill the jar as this can damage the blades of the mixer grinder or cause it to malfunction.
5. Grind only for short periods at a time so that ingredients don’t get overheated and preserve their flavor . Also, give rests in between so that motor doesn’t overheat 6 To cleanse, add little water and run machine for 30 seconds empty, then switch off and unplug.
How to Connect Mixer to Speaker
There are a few things you need to know in order to connect your mixer to your speaker.
First, you’ll need an audio cable that is compatible with both the mixer and the speaker.
Second, you’ll need to identify the input and output jacks on both the mixer and the speaker.
Once you have those things, follow these steps:
1) Plug one end of the audio cable into the output jack on the mixer.
2) Plug the other end of the audio cable into the input jack on the speaker.
3) Turn on both the mixer and the speaker.
4) Adjust the volume levels as desired.
How to Use Mixer for Baking
Baking is a process that requires precision and careful measurements. When it comes to baking, even the slightest change in ingredient proportions can result in an entirely different final product. This is where Mixer comes in – a tool that allows you to precisely measure your ingredients so you can get consistent results every time.
Here’s how to use Mixer for baking:
1. Download the Mixer app on your smartphone or tablet.
2. Enter the recipe you want to bake into the app.
3. Select the ingredients you need and add them to your virtual mixing bowl.
4. Use the sliders to adjust the quantities of each ingredient until they match the recipe proportions exactly.
5. Tap “Mix” and let the app do its thing!
It will mix all of your ingredients together in perfect proportion, so all you have to do is pour it into your baking dish and bake according to the recipe instructions. With Mixer, there’s no more guesswork involved in baking – everything will turn out perfectly every time!
How to Adjust Echo on Mixer
If you’re a musician, chances are you’ve had to mix your own music at some point. And if you’ve mixed your own music, chances are you’ve had to adjust the echo on your mixer. It’s not always an easy task, but with a little patience and practice, it can be done.
Here are a few tips on how to adjust the echo on your mixer:
1. Listen to the track that you’re mixing and identify where the echo is coming in. Is it during the intro? The chorus? The bridge? Once you know where it’s happening, you can better target it with your adjustments.
2. If the echo is too strong, try turning down the volume of the effected channel on your mixer. This will help reduce the overall level of echoes in the mix.
3. If the echo is too weak, try turning up the volume of the effected channel on your mixer. This will help bring out more of the echo in the mix. Just be careful not to overdo it!
4. Another way to adjust echoing is by using an equalizer (EQ). By boosting or reducing certain frequencies, you can help shape how strong or weak the echo is in your mix. Experiment with different EQ settings until you find something that sounds good to you.
5. Finally, if all else fails, there’s always resorting tomutingor soloing tracks during specific parts of the song to get rid of problem areas entirely .
This may not be ideal , but sometimes it’s necessary in order to get rid of excess echoed noise . With these tips , adjusting echo levels on a mixer should be a breeze ! Just take your time , experiment , and soon you’ll have a clean , polished sounding mix .
How Do You Use a Digital Mixing Console?
Digital mixing consoles are becoming increasingly popular in live sound and studio applications. While the basic concepts of using a digital mixer are similar to using an analog mixer, there are some important differences to keep in mind. In this article, we’ll take a look at how to use a digital mixing console for both live and studio applications.
When using a digital mixing console, the first thing you need to do is connect all of your input sources. This can be done either via physical cables or wire lessly, depending on the capabilities of your mixer. Once all of your inputs are connected, you’ll need to assign them to channels on the mixer.
To do this, simply press the “Assign” button on the channel you want to assign an input to and then select the desired input from the list that appears. Once all of your inputs are assigned to channels, it’s time to start mixing! The process of mixing with a digital mixer is very similar to mixing with an analog mixer.
Simply adjust the faders and EQs on each channel until you get the sound you’re looking for. One nice feature of many digital mixers is the ability to save and recall mixes. This means that if you find a sound you like, you can save it and recall it later without having to adjust all of the settings again from scratch.
That’s really all there is to using a digital mixing console! Whether you’re using one for live sound or studio recording, just follow these simple steps and you’ll be up and running in no time. Read for more details…
Why Do You Need a Mixing Console?
If you’re wondering why you need a mixing console, the answer is simple: to control the overall sound of your audio recordings. A mixing console allows you to adjust the levels of each individual track, as well as add effects like EQ and reverb. By having fine control over the sound of each track, you can create a polished, professional-sounding final product.
While it’s possible to mix audio without a mixing console, using one will make your life much easier. Without a mixing console, you would need to adjust the levels of each track individually in your DAW (digital audio workstation). This can be time-consuming and frustrating, especially if you’re trying to make small adjustments.
A mixing console gives you a central place to make all of your changes, which can save you a lot of time and hassle in the long run. So if you’re looking to take your audio recordings to the next level, investing in a good quality mixing console is a wise choice. It may seem like a big upfront cost, but it will pay off in terms of improved sound quality and efficiency down the line.
How Do You Mix Sound on a Mixer?
If you’re new to mixing, it can be difficult to know where to start. There are so many different variables and options that it can be overwhelming. In this blog post, we’ll break down the basics of how to mix sound on a mixer.
First, let’s talk about levels. When you’re mixing, you want to make sure that all of your levels are set correctly. This means that each individual track should be at a consistent level throughout the song.
You don’t want one part of the song to be significantly quieter or louder than another part.
Next, you’ll want to think about EQ (equalization). This is where you can adjust the frequencies of each track to create balance within the mix.
For example, if one track has too much low end frequencies, you can use EQ to reduce those frequencies and bring up the higher frequencies. This will help the track sit better in the mix overall.
Finally, you’ll want to add effects like reverb or delay as needed.
These effects can help create space and depth within the mix and add interest to certain tracks. However, it’s important not use too much of these effects, as they can quickly muddy up a mix if used excessively. So those are some basic tips for how to mix sound on a mixer!
What are the 2 Main Sections of a Mixing Console What is Their Purpose?
A mixing console is a device used to combine, route and control audio signals. It typically contains two main sections: the input section and the output section.
The input section is where audio signals are fed into the mixer.
These signals can come from microphones, musical instruments, tape decks, etc. The input section also allows you to control the level of each signal being fed into the mixer. This is important because it allows you to ensure that each signal is at an optimal level before it reaches the output section.
The output section is where all of the mixed audio signals are sent. From here, the signal can be sent to speakers, amplifiers, recording devices, etc. The output section also allows you to control the overall level of the mixed signal.
This is important because it allows you to adjust how loud or quiet the final mix sounds.
How Audio Mixers Work – What is a Mixer & What Does it Do? | Live Sound Lesson
Conclusion
If you’re new to using a mixing console, this blog post is for you. It covers the basics of how to set up and use a mixing console, including how to connect it to your other audio equipment. It also offers some tips on getting the most out of your mixing console.
Related Post:
How to Setup Mixing Console for Recording? A Complete Guide
How Does a Mixing Console Work?
How to Record Sound from Mixing Console for Live Streaming?
What is Matrix on Mixing Console?

Williams Kane is a blogger and writer. He’s passionate about writing and connecting with the community, especially when it comes to sharing his ideas through writing.
I am a versatile author with a passion for exploring a wide range of topics on our multi-niche website. With a background in research and a love for writing, I bring a unique blend of expertise to our platform.
My journey began in the world of science, where I earned a degree in biology and developed a deep fascination for the natural world. This background enables me to delve into topics related to ecology, environmental conservation, and the wonders of the animal kingdom.
However, my curiosity knows no bounds, and I have ventured into various other niches as well. From technology trends and digital innovations to health and wellness tips, I strive to provide well-researched and engaging content that informs and entertains our diverse audience.
Furthermore, my dedication to staying current with the latest developments in each niche ensures that our readers receive up-to-date and reliable information. Whether it’s deciphering complex scientific concepts or simplifying tech jargon, I take pride in making complex subjects accessible to all.
Join me on our multi-niche journey, where we explore the depths of knowledge and share insights on a multitude of topics to inspire, educate, and entertain.
Related posts:
 Top 6 Best Budget Audio Mixer for Home Studio In 2022
 How to Setup Mixing Console for Recording? A Complete Guide
 How to Clean a Mixing Console? Should Know To Get Better
 What to Use With Mixing Console Stereo Channels?
 How to Connect Amplifier to Mixing Console?
What is a Mixing Console? An Ultimate Guide
How to Connect Amplifier to Mixing Console?
What is a Mixing Console? An Ultimate Guide
 Analog Vs Digital Live Sound Mixing Consoles ! What’S the Difference
 Types of Mixing Console ! To know Which Is The Best For You