
To connect a wireless microphone to a Smart TV, you need to first ensure that your TV and microphone are compatible with each other. Both the devices should have Bluetooth connection enabled in order for them to be connected. Then, you will need an external transmitter or receiver which connects to the TV via audio-in port or HDMI port.
After connecting it, switch on both the devices and pair them with each other by following instructions given in their respective user manuals. Once paired successfully, turn on your microphone and start using it with your Smart TV!
Table of Contents
How to connect Bluetooth Mic to your TV – Videoke Karaoke
How to Connect Wireless Microphone to Smart Tv? Step by Step Guide
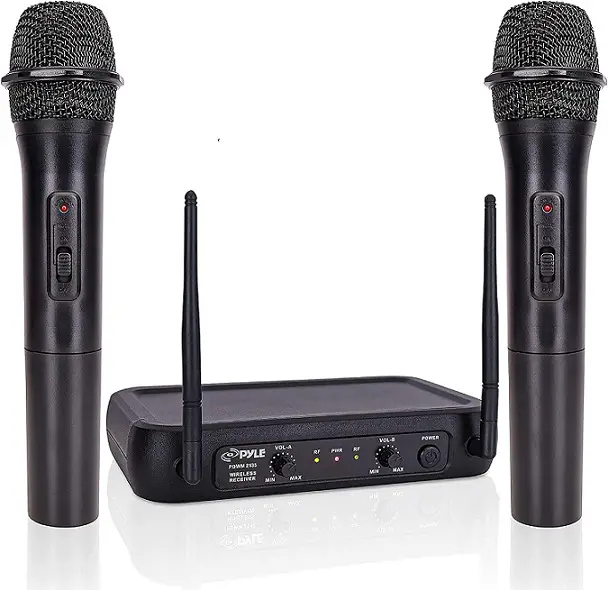
Wireless Microphone for Smart Tv
Wireless microphones for Smart TVs are a great way to make your viewing experience more immersive. These devices connect directly to your TV, allowing you to enjoy clear audio without the hassle of long wires. They can be used for everything from karaoke parties and family movie nights, to playing video games or streaming movies.
Wireless microphones also offer sound quality that rivals traditional wired mics, so you don’t have to sacrifice sound quality when using them with a smart TV.
How to Connect Bluetooth Microphone to Smart Tv
Connecting a Bluetooth microphone to your Smart TV is an easy process. All you need is the right equipment and a few steps in order to get it set up correctly.
First, make sure that both your TV and Bluetooth microphone are powered on, then press the ‘Menu’ button on your remote control.
From there, navigate to the ‘Settings’ menu and select ‘Bluetooth Settings’ or something similar depending on your model of television.
Once in this menu, look for the option that says ‘Add New Device’ or ‘Pair Device’. Select this option and ensure that your device is discoverable (if needed).
Finally, locate your Bluetooth microphone from the list of available devices displayed by pressing its name; after which you can connect it with ease!
Wireless Karaoke Microphone for Smart Tv
Wireless Karaoke Microphones for Smart TV are the perfect way to bring singing, karaoke, and all-around fun into your home. Not only do they provide a convenient way to connect with Bluetooth-enabled devices like smartphones and tablets, but they also allow you to stream music directly from streaming services like Spotify or Amazon Music. With multiple microphone inputs and built-in speakers, this type of microphone is perfect for hosting parties or just having a good time with friends.
How to Connect Microphone to Samsung Smart Tv
Connecting a microphone to your Samsung Smart TV is easy! All you need to do is connect the jack of the microphone into one of the audio input ports on your television. You can then select that specific port as the active sound input in the TV’s settings menu.
Once you have made this selection, your microphone will be ready for use with any compatible apps or games on your Samsung Smart TV.
Samsung Tv Microphone Input
The Samsung TV has a microphone input that allows you to use an external microphone to pick up your voice. This feature is great for recording audio and video calls, or streaming content with higher-quality audio than the built-in mic can provide. You can find this feature in most newer Samsung TVs, although some models may not have it available.
To access the microphone input on your Samsung TV, simply connect an external mic via the 3.5mm jack located on the back of the device.
Credit: www.amazon.com
Can Wireless Microphone Connect to Smart Tv?
Yes, it is possible to connect a wireless microphone to a smart TV. Many modern TVs come with one or more ports that allow you to plug in your wireless microphone receiver. This allows you to use the microphone wirelessly, without having any wires running from the TV directly.
You can then control the audio settings on your smart TV using the same remote as you would for other devices connected via HDMI or Bluetooth. Additionally, some smart TVs have built-in microphones and speakers so you don’t even need an external device at all – just turn on Voice Control and start speaking!
How Do You Connect a Wireless Microphone?
Connecting a wireless microphone is relatively simple, but it’s important to follow the right steps to ensure a successful connection.
First, you’ll need to turn on both the transmitter and receiver of your wireless microphone system.
Next, set the frequency of each component by either using the preset frequencies or manually setting them with a dedicated control panel.
Once both components are powered and their respective frequencies are correctly aligned, they should ‘pair’ and be ready for use!
Lastly, make sure that your microphone is connected properly; plugging in an XLR cable from the transmitter into the device you’re recording on (such as an audio interface). With these steps completed you should now have a fully functioning wireless microphone setup!
How Do I Connect My Bluetooth Microphone to My Samsung Tv?
If you would like to connect a Bluetooth microphone to your Samsung TV, the first step is to make sure that your TV supports Bluetooth connectivity. Many newer Samsung TVs have this feature built in, but if yours does not, you can purchase an external adapter that will allow it. Once you’ve verified compatibility and ensured all necessary components are available, you’ll need to turn on the Bluetooth functionality of both devices and then pair them together.
On the TV side of things, press the Menu button on your remote control and select ‘Sound’ from the options. Then scroll down until you find ‘Bluetooth Settings’, which should be either near or within this same menu option. Finally, enable ‘Bluetooth’ here before turning on your wireless microphone and putting it into pairing mode so that they two devices can detect each other’s presence and link up accordingly.
How Do I Connect My Bluetooth Microphone to My Tv Wirelessly?
Connecting a Bluetooth microphone to your TV wirelessly is an easy process. First, make sure both the microphone and TV are powered on and within range of each other. On your TV, go to the “Settings” menu and select “Bluetooth” from the list of options.
At this point you will want to turn on the pairing mode for your microphone by pressing its power button until it begins flashing blue or red (depending on manufacturer). Now return to the Bluetooth menu on your TV where you should be able to see the name of your microphone listed under “Available Devices”. Select it with either a remote control or mouse click and follow any additional prompts that appear during setup before being able to use it with audio applications like Netflix, Hulu or YouTube.
Conclusion
In conclusion, connecting a wireless microphone to your Smart TV is easy and straightforward. All you need is the right equipment and an HDMI port on your TV. Once that’s done, it’s as simple as plugging in the transmitter, turning on the microphone and receiver, then selecting the correct audio input from your TV settings menu.
With these few steps under your belt, you’ll be singing along with all of your favorite movies or shows in no time!

Williams Kane is a blogger and writer. He’s passionate about writing and connecting with the community, especially when it comes to sharing his ideas through writing.
I am a versatile author with a passion for exploring a wide range of topics on our multi-niche website. With a background in research and a love for writing, I bring a unique blend of expertise to our platform.
My journey began in the world of science, where I earned a degree in biology and developed a deep fascination for the natural world. This background enables me to delve into topics related to ecology, environmental conservation, and the wonders of the animal kingdom.
However, my curiosity knows no bounds, and I have ventured into various other niches as well. From technology trends and digital innovations to health and wellness tips, I strive to provide well-researched and engaging content that informs and entertains our diverse audience.
Furthermore, my dedication to staying current with the latest developments in each niche ensures that our readers receive up-to-date and reliable information. Whether it’s deciphering complex scientific concepts or simplifying tech jargon, I take pride in making complex subjects accessible to all.
Join me on our multi-niche journey, where we explore the depths of knowledge and share insights on a multitude of topics to inspire, educate, and entertain.
Related posts:
 Top 7 Best Condenser Mic Under 200 USD ! Top Picks in 2023
 How to Connect a Condenser Mic to a Pc? Few Simple Steps
 Why is My Condenser Mic Not Working? Lessons from the Pros
How to Connect Wireless Microphone to Tv for Karaoke? Simple Few Steps
How to Connect a Karaoke Microphone
Blue Yeti Microphone Settings: Unlock the Best Sound Experience
Why is My Condenser Mic Not Working? Lessons from the Pros
How to Connect Wireless Microphone to Tv for Karaoke? Simple Few Steps
How to Connect a Karaoke Microphone
Blue Yeti Microphone Settings: Unlock the Best Sound Experience
 Ios 16 Microphone Not Working: Quick Fixes!
Iphone Microphone Not Working : Troubleshoot and Fix Microphone Issues
Ios 16 Microphone Not Working: Quick Fixes!
Iphone Microphone Not Working : Troubleshoot and Fix Microphone Issues